• Plumbing Code Calculations With Spreadsheet Link and Schedule XL – Part 2

    Posted from CTC BIM Project Suite White Paper Library –  CTC Software

    Result

    When the workflow is developed and implemented, the entire building occupancy can be calculated in a minute, and the code validation table can be filled out. With one more step, that same table can be linked back into the Revit model for use on sheets. Any user, on any project, at any time can leverage this workflow to get updated numbers and update the tables on the sheets. Revit data-entry frustrations and quality control issues are gone, since you can leverage the power of computers to do what computers were designed for by automating the repetitive tasks that creative human minds are not great at completing.

    Savings/Benefits Users do not need to know the formulas that are running automatically. They do not need to depend on Dynamo scripts that can be volatile after updates. They can simply walk through a simple workflow that is stable and repeatable. The manual, error prone process can be eliminated, allowing users to focus more on design and documentation more than focusing on basic calculations and manual data entry. Time savings can be found every time that print day approaches. Design time can be extended since this time-consuming manual process is now automated.

    Conclusion

    Spreadsheet Link and Schedule XL from the CTC BIM Project Suite can help automate calculations. This example of occupancy and plumbing code calculations can be automated nearly 100%. There are many other areas where this type of automation can save hours of time consistently throughout the design and documentation process. Whenever you or your team are pulling data from the Revit model, transferring to a spreadsheet environment, running some calculations then manually transferring data or graphics back into Revit, think about how this can be automated by the BIM Project Suite. Manual, repetitive tasks are not enjoyable, often error-prone and should be eliminated where possible. Let the tools generated for you by CTC Software augment your workflow to allow you and your team to be more creative for longer periods.

    Plumbing Code Calculations With Spreadsheet Link and Schedule XL – Part 1

    Posted from CTC BIM Project Suite White Paper Library –  CTC Software

    The Issue

    Revit® has trouble with complex calculations and the ability to run cross-category math. This can be frustrating when design calculations need to be run. In the case of plumbing code calculations, we need to take the occupancy of a defined area (floor, smoke compartment, etc.) and use these totals to derive the number of different plumbing fixtures that are required by code to be designed into these areas. Many firms run these calculations manually, but this can be done far more efficiently. This white paper will describe how a re-usable workflow can generate occupancy, calculate plumbing fixture counts and generate graphics for use in Revit to present this information in a live model.

    Typical Workflow

    In manual workflows, some Architectural firms will use either fake calculated values in a Revit schedule, then sometimes copy those values across to a real parameter for display in a tag, a schedule, and on the actual room object. Some firms may also use a calculated value in a tag to reduce some of the manual data transfer. Other firms will export schedules to Excel®, and run calculations there, but then must manually copy the values back into Revit. In all cases, the process is very manual and extremely error prone.

    This is also rather time consuming, reducing potential production time. Regardless of how we get the room occupancy, we always must manually transfer the occupancy to a spreadsheet for our code checks, present the information in a meaningful way and return this information back to Revit. This is also entirely manual and error prone. Nothing keeps this information up to date with the Revit project model. There needs to be a better, more efficient way to do these types of calculations, and return the result of our efforts to the Revit project model and include the information on the construction document set.

    Solution

    This entire workflow can be heavily automated using the Spreadsheet Link and Schedule XL tools from the CTC BIM Project Suite. Your current spreadsheet can be incorporated, and the values entered far more automatically. Even the room occupancy calculations can be tuned to your liking, entered directly into the room/area/space elements you are using in the Revit model. Further, the spreadsheet graphics can be directly linked into the model, avoiding any manual image or CAD file workflows.

    • Establish predictable, repeatable workflows for all Revit users
    • Leverage existing spreadsheet layouts so formatting in Revit aligns with company graphic standards
    • Implement the power of spreadsheet formulas to drive calculations and graphics
    • Import spreadsheet graphics directly into the Revit model for use on sheets

    Parameter Jammer using Revit MEP and CTC Tools

    Are you a Revit MEP user and frequently download Revit content from manufacturers or sources like BIM Object? Once that content is loaded into the project, is there a struggle to get the family properly to work with your schedules? Well than the CTC Parameter Jammer tool is the one to help solve these problems.

    Downloading Revit family content regularly brings along shared parameters to your project that are different from your company’s standards. This will give inconsistent information within the schedules. Use Parameter Jammer to deal with those problems.
    Here is a schedule with a family loaded into a project but does not have information populated because of the inconsistent parameters from the family to the project.

    Run Parameter Jammer

    With a simple user interface, there a couple steps needed to map the loaded family’s parameters to match the project.

    • Select your companies shared parameter file
    • Select the schedule that the family will be residing in
    • Select the family/families that the parameters need to be modified

    In the next window, you will get a list of all the Shared Parameters from the selected schedule along with the family parameters. From the family parameter list, you will apply what needs to be done to the family. Parameter Jammer will also find same named parameters and automatically map them. When you select the drop-down list, you specify a family parameter to match the ones in your schedule. It will only show parameters that have the same units. You can also create a new instance or type parameter for the loaded family.

    A final report will be displayed to show what has been done.

    As you can see, downloadable content being used in a project does not need to have much modification for it to work properly in your current projects. Parameter Jammer gives you the ability to quickly grab information from the new loaded families and map those parameters to meet your company standards. Your schedules will be up to date and have no missing information in a matter of a few clicks using Parameter Jammer.

    CTC 2021 Revit Product Updates!

    CTC Software was actively preparing to release updates to our AEC tools for Revit 2021. This release took place on May 4th and affected all of our AEC offerings. HIVE has undergone a massive update, streamlining all aspects of user interaction and management. Our software suites have all been built to work on the new Autodesk 2021 platforms, and the SuperDoor Configurator and Casework Configurator content packs have been upgraded for 2021 as well.  All of these tools will continue to support the 2017 versions of Autodesk products and newer, so they will also fit into your workflows for any version from the last 4 years.  Additionally, the Mechanical Electrical Plumbing Productivity Pack content files have been upgraded to 2019, containing hundreds of updated families and a lot of new features and improved workflows.  These tools are purpose-built to support your entire workflow from beginning to end, putting the right tools in the right hands so all team members gain efficiencies every day.

    Contact CTC or one of our partners for more information about the 2021 updates to our tools!

    HIVE

    HIVE specifically has had major changes to the user interface of the content management system (CMS).  Many of you have provided feedback after extensively using the currently released HIVE system.  We listened!  The new HIVE has a major facelift, and the HIVE management portal on the web has been overhauled to make management easier, and to provide you with analytics for organization-wide use of CTC tools, project performance metrics and insights into how your teams are searching for content in the CMS.  As always, we strive to develop our tools alongside you, so you and your teams can work efficiently.  Feel free to share your experiences and ideas for how we can continue to improve.

    The other productivity tools in the software suites are all updated to work on the Autodesk 2021 platforms as well. This year we have decided to make sure that we support 5 version of Autodesk products, since we know many of our clients have projects with long lifecycles.  While Autodesk may not officially support 2017, we felt that we should continue to make our tools available for that release since some of you have let us know that your projects are still being managed in that version.  This new 2021 release of our tools will have the ability to communicate with the HIVE management portal so you can have a better understanding of the return on your investment this next year.

    CTC has 3 major Revit-based content packs.  The two that install into the ribbon are the SuperDoor Configurator and the Casework Configurator.  These, like our other suites, will be supported on Revit 2017-2021.  The other content pack, the Mechanical Electrical Plumbing Productivity Pack (MEPPP), has been heavily updated in its latest version. It will be supported on Revit 2019-2021 with the actual content delivered in Revit 2019 format.  We made this choice since most of the projects starting fresh in your firms will be on 2019 and later.  We did not see value in building on older versions, as existing projects in production do not see huge benefits in transitioning standards mid-production.  This MEPPP update has seen further standardization of the parameters used to help align our pack with metric users.  The first release will be in Imperial units of measure, but a metric pack will be coming soon.  This release saw heavy formula updates and further removal of unit dependencies.  The lighting fixtures, electrical equipment and mechanical equipment have seen major updates, improving face-based and level-based hosting in a single family, and general ease of use.  Many other categories have been touched as well, to ensure a uniform workflow and general consistent use.

    As always, we encourage you to contact us or our partners for more information on these workflow-improving tools.

    In the United States you can contact Applied Technology Group (ATG) at sales@ATGUSA.com. If you are are based in Canada, please contact:

    Mughees Altaf
    Account Manager — AEC Productivity Tools
    mughees.altaf@solidcad.ca 

    This article was created by CTC Software

    Working From Home with HIVE – CTC

    This article was created by CTC Software

    So, you need to work remote from the office and you have discovered it is a bit of a pain for production. Or, perhaps you have yet to discover the pains of extended remote work and you want to be prepared? CTC Software has tools to make all aspects of production more efficient, including the remote workforce.

    The biggest delay when working remotely in Revit, after the project model access, is getting and loading content. The project model has been properly solved by Autodesk’s BIM360 eco system. Sadly, that system is not very efficient at holding the content and allowing it to be loaded into project models. This content loading process typically involves someone using a VPN connection to remotely access the office network, then browsing across that VPN connection. When the time comes to load family content it is rather slow, but even worse is when system families or typical detail views must be accessed. These pieces of content are stored in project models, and these models can be rather large. Opening and transferring settings from these models is extremely slow across VPN.

    CTC has heard it said, “Well, I’ll just use Google docs, or Dropbox then…” Well, this may work, but keep in mind, small company libraries are about 1GB of content per Revit version so this could easily mean storing and syncing 4GB of Revit content, and this is estimating conservatively. Most firms have way more than that.

    So, what is the solution? CTC Has a toolset called HIVE. It is tuned to manage Revit’s custom libraries but can also be used for any kind of content. Since we are discussing Revit here, understand this, HIVE allows easy google-like searching of the regular loadable families, System families, typical drafting views, Schedules, and even fully assembled sheets. This all can be done with very minimal setup, and users get the content they need on-demand. All they need is an internet connection. This would not require any VPN for the content stored in HIVE.

    CTC has run demonstrations of HIVE from conferences like Autodesk University and BiLT. These conferences often have acceptable but certainly not speedy internet, and sometimes the internet at these events can be very unstable. While there, CTC often conducts HIVE demonstrations, browsing for any needed content with no perceptible delay.

    What does this mean for you? Well, your BIM Management team can easily configure HIVE to host all needed Revit Content, and your workforce can access it from any workstation connected to the internet. They will need the internet anyway to work on BIM360, so the system requirements and connections are already in place for them to use HIVE almost instantly.

    Contact your local CTC representative to get your trial of HIVE and understand how you can purchase this perfectly tailored solution for times just like the ones we currently find ourselves in.

    Contact:

    Mughees Altaf
    Account Manager — AEC Productivity Tools
    mughees.altaf@solidcad.ca 

    Roof Truss versus Rafter and Extending to Core tool

    I would like to point it out two tools that can make a big difference when designing roofs, the Truss or Rafter tool and the Extending to Core tool. They also affect the shape and size of the eave truss.

    Revit offers to options to justify the roof and the reasons why is because the bearing condition is very different between the two. The Rafter or Truss option is only available if we choose the Pick Walls tool.

    When we select Roof by Footprint, and the Pick Walls tool, we see at the Options Bar the Extend to wall core check box.

    The diagram below explains the different roof configurations that result from switching on and off the Overhang Extend to Core option and the Rafter or Truss option. When the Extend to Wall Core is activated, Revit will measure the overhang from the core. When it is not activated, it will measure the overhang from the exterior face of the wall. Also noticed how the Truss and the Rafter connections change. The Truss sits on the Exterior face of the wall while Rafter sits on the interior face of the wall.

    Another advantage of using the Pick Walls tool is to assure stability when editing the overhang. When we use the Pick Lines tool, Revit create a line that not attached to the wall. Notice that there is no option to change between Truss or Rafter. Below I draw a roof using the Pick Lines tool and another one using the Pick Wall command. See the difference when I change the overhang dimension.

    Notice that when using the Pick Lines tool, the roof and the wall are not aligned and to fix that we would have to drag the roof manually. On the contrary, using the Pick Walls command, the roof remains aligned to the wall. Whenever is possible, it is best to justify the roof using the Pick Walls tool when creating the roof footprint. By doing that we are avoiding future issues, saving time and getting the most out of Revit!

    Path of Travel update on Revit 2020.2

    Since my last post about the path of travel, Autodesk made a very useful update on the path of travel tool.

    The path of travel was calculated automatically by Revit picking the start and end point. Now we have the ability to add waypoints along the path of travel. This allows us to drag the points and adjust the path. You can also delete the waypoints to restore to default position.

    To activate the tool, simply select the path of travel. The tool will appear under the Modify| Path of Travel Lines. Select the Add Waypoint, click on the path of travel and drag it to adjust it. To delete it, select the Delete Waypoint and click on the point.

    H.H. Angus & Associates Ltd.

    Success Stories

    H.H. Angus & Associates Ltd.

    HH Angus is an employee-owned, independent consulting firm of engineers, technical specialists and project managers. Together, they create innovative solutions for their clients’ most complex challenges to expand what is possible for a better future.

    Project Profile

    Similar Projects

    Oneira Corporation

    Oneira Corporation, An EPCM* Company, Is A Leading Engineering And Technology Company Providing Industrial Process And Solutions Based in Toronto, Canada, Oneira has more than 30 years of experience working with global leaders in the Specialty Chemical, Chemical, Oil…

    DIALOG

    DIALOG believes that their passion for design should improve the wellbeing of our communities and the environment they share. DIALOG’s multi-disciplinary team of 700 includes architects, interior designers, structural, mechanical and electrical engineers, urban planners,…

    Cumulus Architects Inc.

    Cumulus Architects Inc. is a multidisciplinary architecture and design firm located in Toronto, Ontario. Cumulus is founded on the principles of team-based design and integrated project delivery with the belief design intelligence results from broad…

    Keeping Your Revit Model Healthy by Utilizing CTC Express Tools

    Many firms struggle to fully keep their Revit models healthy. There are manual, and tedious workflows that can be error prone.

    Do you want to do a thorough health check of your model prior to sending it out? Exhausting time checking to ensure information is correct, accurate and consistent across the project team, and projects can be tedious. Let’s look at a few tools from CTC Software that can help you make this process quicker and more effective project to project.

    1. BIM Manager Suite – Dimension Checker, Project Cleaner*, Type Swapper, Shared Parameter Manager, Family Processor, Import Link Manager
    2. BIM Batch Suite – Family Loader*, Family Exporter*, Plotter & Exporter
    3. BIM Project Suite – Model Compare, Spreadsheet Link

    Problems We Face

    1. We need to have, and should have standards
    2. Standards can be hard to maintain
    3. Standards can be cumbersome and tedious
    4. Consistency can be hard to track manually

    Workflow Process with 3 CTC Tools

    Shared Parameter Manager – Much easier way to manage your shares parameters compared to the out of the box method. Browse your master shared parameters file and compare to a source file. Filter differences between the master and source file, and add, modify, delete, move, duplicate, and find/replace.

    Family Processor – Able to make multiple changes to multiple families in batch to ensure the content’s schedules are consistent and accurate. Powerful when you are building a library, adding new content, or downloading content from manufacturers. Builds a summary health check file of each family so the BIM Management team is able to track new or changed content.

    Family Loader* – Once the content is up to date and standardized by using Shared Parameter Manager, and Family Processor, you can batch load those specific fixed or new families in a project.

    *For Free Tools, contact SolidCAD to discover and evaluate your current workflow in Revit and let us find the right solution for you. 

    Revit Data Corruption

    Let’s talk about data corruption in Revit. In this post I will look at these 4 points:

    1. File crashes before opening
    2. Crashes when opening a new view
    3. Looking for corrupt families
    4. Higher level investigation

    As always you should make sure you save a copy of your file for testing while trying to resolve corruption issues.

    File crashes before opening

    Sometimes a file cannot open because of a simple issue that can easily be overcome. Each of the following actions have the potential to get past a different issue. If your file crashes when you try to open it ask yourself:

    • Can the file be opened with or without audit checked?
    • Will the file open without the worksets loaded? Can I narrow it down to a specific workset that keeps the file from opening?
    • Can I open the file in a different build, or a newer version of Revit?
    • Sometimes new name allows you to bypass the issue, copy-paste file to new location
    • Isolate the file from the network save to a location where the links cannot be accessed.

    Crashes when opening a new view

    If your file crashes when you try to open or create new views, try these suggestions:

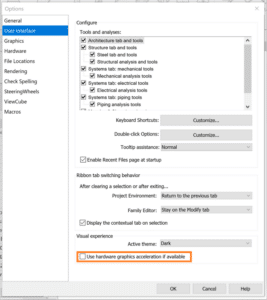
    • Turn off hardware acceleration and try each location one at a time.
    • Reset Revit settings
      • Customized settings are stored in the app data folder, when removed from this location the defaults are regenerated.
    • Repair the installation
      • This won’t change any user setting.
    • Open Revit without add-ins
      • Locate the following folder: C:\ProgramData\Autodesk\Revit\Addins\[Version].
      • Temporarily move the addin files from the folder above to another location.

    If any of these work for you take note, this is where the issue resides and you’ll want to know the exact cause whenever possible.

    Looking for Corrupt Families

    Sometimes the behavior you see in a file is caused by corrupt families follow this process to identify corrupt families.

    • Save a copy of the corrupt file
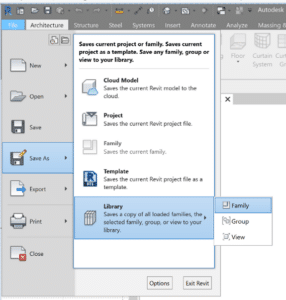
    • Open and save all families as a library, this process will fail when it reaches the 1st corrupt family.
    • Record the family named on the bottom left hand corner of the screen & delete the family and run again, repeat until the process completes successfully.
    • Open the original corrupt file and reload all the families on your list with versions that predate the corruption. If you’ don’t have a previous version of the family, you’ll need to recreate them.


    Higher level investigation & troubleshooting

    Many issues can also be fixed by returning to Revit’s original settings.  Try these steps one at a time, testing the file after each change.

    • Rename the .INI file (_old) which is in the AppData Roaming folder.
    • Rename App Data Folders (_old)
      • C:\Users\<username>\AppData\Local\Autodesk\Revit\Autodesk Revit 201x
      • C:\Users\<username>\AppData\Roaming\Autodesk\Revit\Autodesk Revit 201x
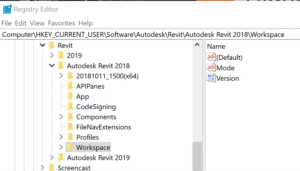
    • Rename Workspace in the registry editor

    When these folders/files don’t exist, they are recreated the next time the user opens Revit. Be sure rename and not remove these files/folders, as they will server as backups for the user original setting including keyboard shortcuts and font maps.

    Happy Reviting!

    Be sure to check my other videos in this series for more information.

    While you wait why not follow us @SolidCAD on Twitter, check out our other videos on YouTube, and see what our experts have to say on our BIM Blog!

    ___________________________________________________________________________________________________________________

    Additional Reading

    AKN: Revit – What Causes data Corruption

    AKN: Revit – Alternative Uninstall Directions