• How Roofing Contractors Increase Efficiency with Bluebeam Revu

    This story was originally published by  on the Bluebeam Blog.

    It’s been fun over the past couple of articles highlighting ways concrete and framing contractors are using Bluebeam Revu.

    To continue with this series highlighting specialty contractors, I want to focus on the roofing contractor. Let’s look again at a few creative ways Revu is being used in the industry.

    Whether you’re roofing single-family homes, multi-family residential or large commercial properties, this article will focus on ways we measure flat and sloped quantities on drawings. Perhaps more important, these tools will allow us to safely measure existing roofs when we don’t have drawings and little to no access on-site. If this gets you thinking about possibilities, check out my article, “How Roofing Contractors Capture Hard-To-Get Measurements Using Bluebeam Revu,” where I go into greater technical detail.

    Using satellite imagery

    I live in a northwest suburb of Minneapolis, a part of the country that sees all sorts of crazy weather, including tornadoes, wind and hail—not to mention a good amount of snow. Several years ago, a hailstorm damaged many homes in our area. When the insurance adjuster came out to take measurements of our roof, he was scared to go on the roof and made no effort to hide his fear.

    I gladly followed him around drawing the roof faces with ridgelines and valleys until we came to the back half of the house. We live in a split-level house with a walk-out basement, so the roof is two stories on the back side. He affectionately called it the “scary side.” Needless to say, he was the one drawing at that point while I looked for damage to report.

    What I wanted to do was invite him into the house, where I could easily get a roof layout from a satellite image online.

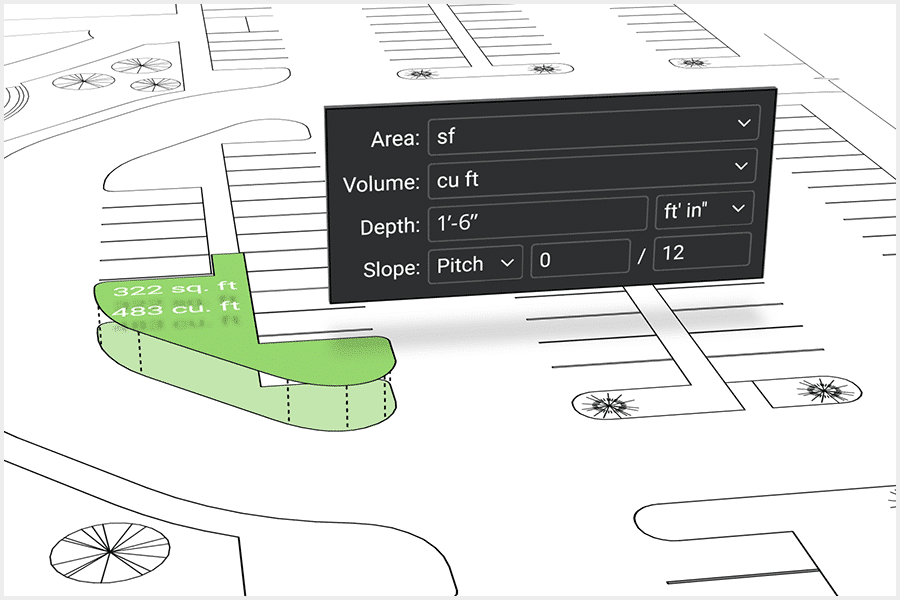
    Looking at mapping applications or apps like Google Earth, a contractor could quickly enter the project address and zoom to an aerial view. Often, these applications provide a bar scale somewhere on the image. Make sure you include this scale when capturing the screenshot. Opening the image in Bluebeam Revu, we’re able to use the bar scale, parking spaces or a known building edge to calibrate the image to the correct scale.

    Versatile Revu features

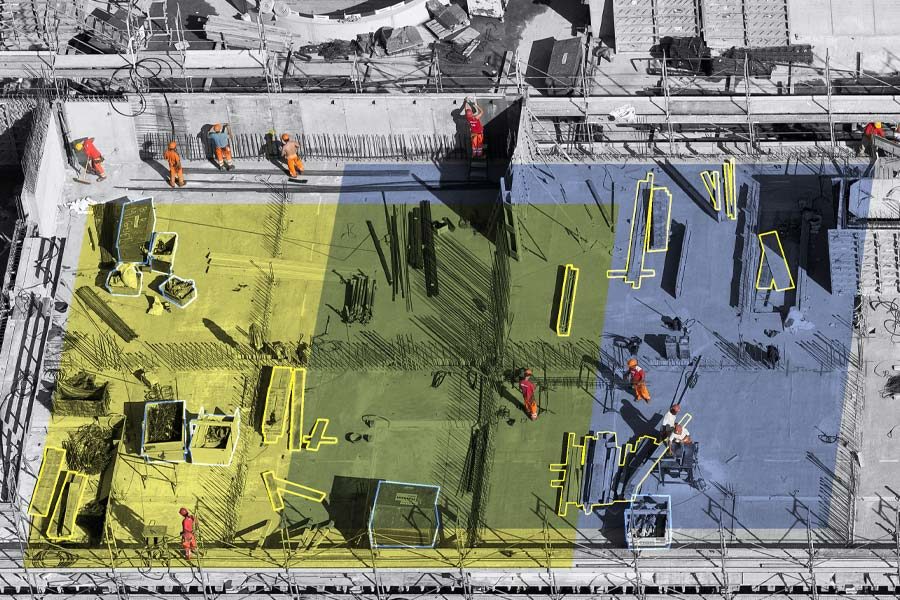
    With a properly scaled image, we can now use the area measurement tools to trace the outline of the building along the soffit or parapet. In different areas, we might use the Cutout tool to remove material for a rooftop unit or other special conditions. Obviously, the same workflow is easily done if drawings are provided; I just wanted to mention a workflow where we might be able to eliminate a site visit, travel time, coordinating roof access and nasty winter conditions.

    What about residential projects with sloped roofs?

    The same process can be used to collect the square footage of the roof layout. In this case, however, you can add an 8/12 pitch to the area measurement and Revu will do the math for you, updating the square footage. Revu also has great tools for measuring facia, soffits and sloped ridge and valley materials.

    In the case where drawings are outdated or not available at all (and aerial images also aren’t available), we still have options for collecting field information. Revu allows us to start a fresh new PDF of any size. You can include an engineer grid to help draw to scale as you measure. If you need measurements to be a little more precise, there are Sketch To Scale tools where you can draw the exact length and shape.

    With the versatile markups in Revu, you can record any roof penetrations, piping or curbs needing special materials or labor. If you do this regularly, create a PDF template with your company title block. Use Form Fields for project information.

    Whether you quantify square footage, squares for shingles or need the number of sheets of plywood, formulas can be embedded to collect all the important information quickly and accurately—and maybe even help avoid the “scary side” of the roof.

    If you’re a roofing contractor working on residential or commercial construction, or an insurance adjuster dreaming of working safely from home, hopefully I’ve sparked some new ideas to increase accuracy, efficiency and safety to your current workflows.

    5 Top Tools To Help Onboard Your Team With Construction Software

    This story was originally published by  on the Bluebeam Blog.

    One of the concerns people cite when it comes to digital transformation in their organizations is around onboarding teams without disrupting ongoing construction projects and processes.

    Our own research bears this out. According to a survey we carried out with DCW Connect earlier in the year, one in three construction businesses actively avoid investing in technology because of perceived challenges around training and change management.

    In our experience, this can be overcome through a robust communications plan that engages teams every step of the way and demonstrates how the tool will help the organization meet its objectives (more on this here).

    Of course, it helps if you have a construction technology provider that is a good cultural fit for your business and has the processes and tools in place to help you to get up and running as soon as possible.

    Here are five ways in which Bluebeam makes this transition as easy as possible:

    Tool 1: Plugins and integrations

    To help simplify the transition period, Revu supports a variety of plugins and integrations. This allows users to continue with legacy tools where needed and integrate Revu with their wider software stack.

    They divide into three key areas:

    • Plugins for AutoCAD, Revit, Navisworks, Sketchup and more support the collaboration between architects or engineers in the office and contractors and subcontractors in the field, so everyone has access to the right data at the right time (read more).
    • Integrations designed to simplify the transition between other software providers and Revu. Whether you’re working with other BIM technologies or need to connect to your project management solution, check out our list of active integration partners here.
    • Integrations supporting business operations, such as our SharePoint integration, which helps with better document and file management, keeping everything in one place and limiting risk.

    Tool 2: Deployment configurator

    The Revu Configuration Editor is designed to help IT teams roll out Revu to their organization in a standardized way and is part of the Deployment Packages (MSI).

    It is an optional tool that allows you to easily configure scripts for your Revu MSI deployment, MSP patch update or create scripts for post-installation deployments of custom assets, such as profiles, tool sets, hatch patterns and line styles.

    As a best practice, we highly recommend using this configuration tool for creating all your deployment scripts, which can be used with your deployment tool or other method of choice. You can also still create deployment scripts manually (more on this here).

    This video has more about how it all works.

    Tool 3: Profiles

    Profiles provide an easy way to store your favorite toolbars, menus and other display settings so that the tools you find most useful are readily available each time you open Revu.

    Profiles can also be used to shape the user interface of Revu for particular job functions within an organization. For example, a simplified interface for users who view, but don’t need to edit, PDFs can be created by turning off most of the toolbars and tabs within Revu, maximizing viewing space (more on customization here).

    Once set, profiles can be easily shared and amended when required. We’ve seen customers create a set of core profiles designed to support different functional team needs. Once exported and shared, these core profiles can still be tweaked by users if they want to turn other toolbar items back on to suit their personal preferences.

    Tool 4: Tool Chest and tool sets

    The Tool Chest allows you to store all your markups in tool sets and share them with anyone. It comes pre-loaded with several collections of industry-standard markups to help get you started. But we know every organization is different, so when ready, try creating your own tool sets either with individual or grouped markups. Your custom tools sets can be exported, saved locally to your machine, imported or shared, so no matter where your teams are operating from, everyone uses the same tools and markups. You can even share your custom tool sets with other build teams outside your organization to ensure standardized markups from project start to finish.

    This quick video guide offers more details.

    Tool 5: Training resources

    One of the key components of any rollout is a wealth of training resources that can be accessed at any time within your organization. No matter if your team prefers self-study videos or virtual guided training courses, Bluebeam has you covered.

    Some of our most popular resources are listed below:

    If you need further help and support with your rollout, you can get in touch with your local Bluebeam team here.

    How Framing Contractors Can Best Use Bluebeam Revu

    This story was originally published by  on the Bluebeam Blog.

    In my last article, we covered the features in Bluebeam Revu that all concrete subcontractors should know. I started the piece saying I’m a firm believer that every specialty contractor could benefit from implementing Revu. To continue with this series, I want to highlight the next subcontractor on site, the framing contractor.

    Let’s look again at some creative ways Bluebeam Revu is being used in the industry.

    It’s the framing contractor’s turn to show off and again prove my theory that every specialty contractor could benefit from implementing Revu in their everyday workflows.

    Whether you’re timber framing single-family homes, multi-family residential or steel stud commercial tenant improvement, this article applies to you. If you’re interested in seeing the more technical side of these workflows in action, check out my article.

    Material Takeoffs: With the complexities of wood framing, estimating would be difficult without some degree of guesswork. Not only do we have different nominal lumber for different wall thicknesses, but we also have different products like glulam, LVL, timbers, Versa, BCI rafters and I-joists with different series, as well as CDX plywood and OSB. With all of those comes a library of sizes, shapes and thicknesses.

    Do we base on averages for square footage or measure the linear footage of walls? If our material takeoffs are too low, the project is on hold waiting for supply shortages. If it’s too high, we have an owner assuming you’re hauling the lumber they paid for to the next job. Also, when material arrives, how do I know what goes where?

    With the flexibility of Revu, we can build custom tools with formulas embedded to not only get the length of material needed for the facia board, but that same markup could calculate the sub-facia and number of outlookers as well.

    Starting with the end in mind, takeoff tools can be built to calculate several materials at the same time, like an assembly. This allows a chance to embed industry know-how and ensure materials aren’t overlooked. Obviously, you can imagine this method easily translates into the pre-construction of wall panels or modularized construction by applying mark numbers to the panel assemblies.

    How to Use Revu to Create Successful Bids

    This story was originally published by  on the Bluebeam Blog.

    With smart PDFs now being generated as part of bid packages thanks to a variety of digital tools within the marketplace, end–users can now use technology to boost the visual appeal, accuracy, and overall value of bid packages.

    Bluebeam Revu can actually make use of those smart PDFs by making sure that it allows estimators to take off quantities accurately,” said Deepak Maini, a qualified mechanical engineer with two decades of experience. “The tools that you’ve got available in Bluebeam Revu, the accuracy of picking regions, the accuracy of visually searching items, and the standardization potential make it a great asset to making a successful bid package.”

    Three keys to a successful bid

    • Accuracy of the scale of the sheet
    • The right set of customizable and standardized digital tools
    • Accurate cost values associated with materials and labor

    Quantity takeoffs and accuracy

    Now a noted guest lecturer at the University of Technology Sydney (UTS) and University of New South Wales (UNSW), Maini, the current national technical manager for Cadgroup Australia, advocates for paperless bid packages and credits Revu as a crucial piece of the puzzle.

    “In the Australia-New Zealand market, and actually in the global market as a whole, the climate is very competitive,” Maini said. “The process of taking off quantities within today’s market needs to be accurate and needs to be fast. And that’s where Bluebeam Revu plays a massive role. With it, the estimator can take off quantities on one job and then quickly get onto the next job without wasting too much time.”

    “There’s absolutely no comparison between Revu and paper,” Maini continued. “We are talking about projects going in hundreds of millions of dollars and billions of dollars as well, which means that you’ve got these PDF sheets getting delivered to you, which are not two or three sheets. You’ve got 100-150 sheets getting delivered and that’s why taking off quantities using an accurate process is really important.”

    Digital collaboration with Bluebeam

    Ensuring scale can also be achieved within the sophisticated calibration capabilities in Revu. This is crucial when receiving documents as you don’t have to rely on the imagery to be accurate in scale, which could be a huge issue for estimation.

    “In Revu, we calibrate the sheet and we find out what scale the objects are at, and then when we are taking off the quantities, it ensures that we use the right scale and we get the right measurements,” Deepak said.

    Standardizing

    Being able to consistently takeoff accurate quantities is essential to completing bid packages in a timely and accurate manner.

    “This is again where Bluebeam Revu is absolutely fantastic,” Maini said. “I create certain specialized and takeoff tools, I can then have them sitting in my own custom toolset, and then I can distribute the toolset within my own team, which means that everybody who’s taking off the quantities will have the same display of quantities. ”

    Cost values can also be plugged into Revu, allowing instant dollar projections for the project. “As you take off the quantities, it gives you the dollar value of that quantity right there in front of you,” Maini said. “You can have that displayed as a table on the sheet, which means that you can straight away find out how much it’s going to cost you.”

    The ability within the digital tools in Revu to drive accuracy and consistency among estimators allows firms the flexibility to more accurately staff projects, without the risk of lesser experienced estimators using a process of their own, which might hinder the accuracy of the quantity takeoffs and the success of the bid as a whole.

    An Electrician’s 4 Favorite Bluebeam Revu Features

    This story was originally published by DOMONIC DIAZ-WESTON on the Bluebeam Blog.

    Every construction trade plays a different role in each construction project. As a result, they are likely to find different values in the myriad tools and features available in Bluebeam Revu.

    Kaaron Lee-Wah, an electrician in Toronto, is no different. To him, Revu has become essential ever since his boss asked him to explore how to completely digitize his company’s electrical drawings from paper. Revu has allowed him to use tools in the software that make his job more efficient, helping him to save time on previous paper-based tasks.

    These are the Revu features that are unquestionably Kaaron’s favorite:

    Tool Chest“This allows you to create custom icons to help identify and create a clean and easy layout for your guys in the field to follow along. When it comes to electricians using Bluebeam, there are many different panels, circuits and devices that we have to account for and include on our drawing. With Tool Chest, you can create icons, color whatever size you need it, all in a matter of seconds—and they look very professional.”

    Calibrate“The Calibrate feature is pretty dope, where you’re able to upload a PDF version of any drawing—whether it be mechanical, architecture, electrical, even landscape—and you can customize that calibration to that specific scale. So, drawings come in many different scales, and other software have a hard time picking up and reading that scale of a drawing. But Bluebeam has a great feature, the Command + M tool, that can measure it, and you’re able to customize and calibrate any drawing or PDF you upload into Bluebeam, which gives you access to finding whatever measurement that you need—whether it be in millimeters or meters or feet—all off the custom calibration once you upload it into your Bluebeam Revu.”

    Overlay“It’s kind of similar to Snapshot, but with Overlay you’re able to grab the entire page itself and overlay it on top of a second set of drawings, and then that can help you identify or troubleshoot any issues with architecture and electrical drawings.”

    Snapshot“I find with Snapshot you’re able to now copy a section—let’s say the electrical drawings—and bring them over to the architectural drawings if you want to overlay for a certain reason. So, what we do in the electrical trade is I’ll take a Snapshot of the electrical drawings of let’s say a unit in a condo, and I will overlay it on the architectural drawings, which show you more detail—wall sizes, how long a wall is, how deep the wall is. It’s an amazing feature, and it comes in clutch every time.”

    Watch on YouTube https://www.youtube.com/watch?v=zAkD-l8v_m8 

    How Concrete Contractors Can Best Use Bluebeam Revu

    This story was originally published by Troy Degroot on the Bluebeam Blog.

    I’m a firm believer that every specialty contractor could benefit from implementing Bluebeam Revu in their everyday workflows. For this article, I’d like to highlight a concrete contractor’s position from bid to built.

    There are a few important objectives we find in any construction project. I’d like to walk through how Revu meets those requirements. If you’re interested in learning more about how these can be done in Revu, have a look at “5 Ways Concrete Contractors Get the Most Out of Bluebeam Revu.”

    Every company is different in how it approaches projects. In this article, I want to highlight the possibilities so you can see where Revu fits and what customizations may be required to make it fit your unique needs.

    Let’s look at those project objectives.

    From the first time you open the request for proposal (RFP), there are things a project manager starts to think about even before they open the drawings—and even more as the plans rollout.

    Project Location: Do we have crews in the project location, or do we need to accommodate for travel expenses? While Revu may not have a “location cost” built into the available tools, it is possible to develop these. Perhaps you want to have a pulldown menu with specific cities or areas where you perform work regularly. Along with the locations in a pulldown, you could also associate a percentage markup to account for that area based on historical project data.

    Pour Dates and Schedule: Do we have crews available to meet dates and project phases? For large development projects with phases, we can use the Spaces feature in Revu. Simply draw a Space shape around an area of work and name it “Phase II.” By doing so all the slabs, curbs, etc., will be categorized in the markups list under the Phase name. This makes it easier to allocate crews, materials and equipment based on the specific requirements of each phase. We can also track the progress using the built-in Status column where crews can mark each day’s progress on what slabs, walls or foundations were completed.

    Equipment Required: Just like labor availability, we need to consider equipment availability for things like forms, trucks, curb or cross pan machines. Creating custom tools in Revu, you can place a symbol within a “Phase” indicating what equipment is required. You can even allocate a rental price per day for the equipment cost estimate.

    Estimate: There are great measurement tools included in Revu allowing you to calculate area of slabs, volume of isolated pad footings or linear footage of strip footings. The versatility of Revu and our ability to customize tools opens the door to personalizing your markups and what data is generated. We can differentiate types of pours by color, linestyle and hatch patterns, or even add labels to display a description right on the drawing. We can also add parameters like design mix, hand vs. machine, or whether fiber mesh or WWF is required. In some cases, we could even estimate the rebar required or the number of trucks need to be scheduled based on cubic yards.

    Finish Requirements: We need a clear understanding of finishes like construction/control joint layouts, stamped design, smooth or broomed, color stained or saw cut requirements. Applying different colors or hatch patterns to the markups will clearly identify those areas in a clear and visual way for the estimator and the crew in the field. A custom line tool representing saw cuts allows you to trace them on plan and quickly apply labor and equipment costs based on a linear footage collected in the markups.

    QA/QC: As a final walk through you can do a punch list noting any damage cause by other trades. You can easily incorporate images or video documenting these damages and what it will cost to fix them.

    Revisions and Scope Changes: Every project has delays for weather, site and utility prep. Often projects have design changes as well and we need to not only stay current but also track and communicate scope changes. These can often change cost and pricing as the scope begins to creep after the original estimate. Revu also has tools called Document Compare and Overlay Pages that will look at two drawings and quickly point out the differences. Document Compare is going to automatically draw clouds around all the changes. Overlay Pages is like the old light tables we used to place physical drawings over one another and see what was different. After finding the changes, your takeoff markups can quickly be stretched or moved rather than starting over. At that point, you have tangible evidence of scope changes for cost updates.

    After reading these objectives and possibilities, you could have one of three responses. One, this article helped evaluate Bluebeam Revu as a solution. Two, you already use Revu, but the article sparked ideas on how your current use could improve. Or three, we confirmed you’re already getting the most out of your software investment.

    How Sets in Revu Simplifies Document Management

    This story was originally published by Rob Dunn on the Bluebeam Blog.

    Digitally creating PDF drawings and sharing them for review and markups through the cloud saves lots of time for professionals in the architecture, engineering, and construction (AEC) industry. But constantly organizing and tracking the huge volume of files and folders created daily is a challenge.

    When team leaders or project managers need the right set of drawings in the right hands in a quick and organized fashion, that can require picking through hundreds of drawings in dozens of folders and sorting or tagging those files into an entirely new folder—which might be replaced next week anyway. And, if anyone errs in updating a drawing or folder, that can cost time to discover and correct.

    Deepak Maini, national technical manager at Cadgroup Australia, is an expert on Bluebeam Revu, as well as a strong advocate for using Sets.

    Maini described Sets as “a collection of multiple PDF files, organized, categorized and displayed in a single view.” He continued: “So, all of the PDFs could be located in separate folders, but the Sets feature allows the document to be displayed as a single document in specified sort order. It’s the most efficient way to work with drawings that cannot be merged because of digital signature or other PDF security reasons.”

    Think of how many sources for drawings go into a project; you’ll probably immediately think of the structural team, the services team, and the architectural team—but that’s leaving out quality and safety, inspections, BIM collaboration, document management, and many other teams that need to access or provide drawings.

    It’s imperative that every team is clear on which drawings and files are the most up to date when they need them, without every team having to continually track changes and revisions for every document.

    Sets organize files without refiling

    Sets in Revu offer a straightforward solution to this challenge that eliminates the need to constantly create new folders to organize files—or the endless clicking that can go into checking what files are up to date across different folders.

    Sets allow users to quickly add and organize PDF files according to both preset categories such as Architectural, Mechanical, Plumbing (MEP), and others, as well as create custom categories.

    Individual files or entire folders can be added, as can files that can’t be merged due to digital signatures or PDF security, because you’re not actually merging the PDFs into a new file. Each drawing remains in its original folder, but the Sets function allows users to view files or make changes (depending on permissions) without creating any further information infrastructure.

    Simply put, you can view or alter files across numerous folders from a single column or window, and you don’t have to endlessly find, drag and organize drawings into new folders.

    You can use Sets to add individual Files, entire Folders, or Folders with selected Subheaders.

    Using sets is simple

    To use Sets in Revu, open the Sets function to create New Sets. Add individual files, and then choose from the Options menu how you want your files organized as thumbnails—by file name or preview, which you can change anytime.

    Next, choose the Categories under which your files fall; built-in categories include General, Civil, Landscape, Structural, and others that are universal to the building and design industries, or you can create your own.

    Once you’ve created your Set and assigned Categories, it’s time for Tags. This is where Sets offer a tremendous advantage in organizing your files.

    You can add as many Tags as you like to files in a Set. So, you might Tag a drawing or file for the purpose of sharing with a particular field installer, or to keep track of drawings for teams coming on different days of the week, or to organize drawings for the review of a safety inspector. Again, drawings can have numerous Tags, but they never leave their original file; they’re simply viewed and edited through Sets.

    Select your own Tags to customize your Sets for unique purposes or viewers and attach as many Tags as necessary to files in your Set.

    The Sets advantage

    Once you’ve created a Set, you have an easily navigable and sortable group with thumbnails, and you’re ready to put your Set to work. The primary functions of Sets include:

    • Uploading a PDF file in a Set to Studio Projects in Revu and setting permissions for viewing or editing
    • Marking up or revising drawings and PDF drawings
    • Incorporating new drawings or PDF drawings
    • Superseding drawings, which are automatically Stamped as SUPERSEDED in their original folders, so there are no issues of drawing redundancy or errors over which drawings are most current
    • Allowing comparisons and overlaying of PDF versions of the same drawings, and tracking changes
    • Exporting the markups list as PDF, CSV or XLS, or printing PDF drawings
    • Creating a drawing log as a PDF, CSV or Excel file, saving time from the tedious process of creating and maintaining one manually
    • A drawing is automatically stamped as SUPERSEDED when changes are made

    Sets have so many useful functions that Maini is surprised its use isn’t more widespread.

    As Maini described it: “I just think that this is one of those features, it’s actually really powerful. Within five to seven minutes, I was able to put together an entire drawing set. In the real world, if people are trying to access all these drawings, they must go through different folders. They must look at all these files. Plus, making sure that they always have access to the latest version of the documents, especially when they must print them, is an absolute nightmare. Whereas this feature, it’s a powerful feature, but not too many people use this and not too many people are aware of this.”


    8 Ways Layers Create Clarity in Revu

    This story was originally published by Troy DeGroot on the Bluebeam Blog.

    ne powerful feature in Bluebeam Revu I think everyone should be using in some capacity is Layers.

    If you come to Revu with a CAD background, you probably understand and use Layers already. For those who don’t, you just don’t know what you don’t know. I hope this article helps shed light on a new opportunity to add flexibility, organization and clarity to your PDF workflows.

    For those old enough, Layers could be described like this: Remember in grade school when the teacher used the overhead projector to show things on the wall or pull-down screen? The surface of the overhead is the PDF when you open it. The clear film they write and draw on is a layer. That layer can be taken off or hidden, turned back on, or you could overlay several different layers to see them all on the screen.

    In Revu, we can isolate categories of markups or flatten them. If you’re not familiar with the Flatten function, refer back to this previous blog post.

    You might be asking: “Where do we find Layers?” There are a few places.

    First, let’s look at the Panels on the sides of the Revu interface. You should see a black vertical bar on the side with several panel tabs toward the top. Right-click below the tools and hover over “Show.”


    There, you’ll then see a list of Panels; click on the Layers option. When it turns blue, that means it’s visible.

    Another place you will see Layers is, when you open a document printed from drafting/design tools, they will often transfer from the original file. To quickly see what Layers look like and how they can be powerful, try the Overlay Pages tool. If you’re not already using Overlay Pages when revisions cross your desk, brace yourself.

    Here are some quick definitions of how Layers could be used for different phases of the project lifecycle.

    Planning: When planning a new construction development, you might use Layers to break down different elements of design requirements. For example, you might have individual Layers for building area, parking, green space, etc.

    Design Review: During the design and review phase, you might have Layers and colors indicating markups needing to be added to the drawings, markups which are just comments to the drafter for reference or internal notes for design intent. You might even have Layers to track first-round markups and another for additional comments after the backcheck.

    Estimating: When I build custom tools for estimating, I like to always include Layers to break down systems or material types. I always reverse engineer the tools and think about how I might manipulate the Layers when the sheet is full of markups. You might want to turn off all the flooring area measurements so you can see all the transition strips.

    Hiding all the concrete slabs will make it easier to see and select the isolated footing, or maybe you only want to see the continuous strip footings. Layers allow you to isolate materials so you can build out the estimate without having all material Layers on at the same time.

    Site Preparation: On the civil design side, you might want to get quantities and differentiate cut-and-fill areas indicating what materials can be reused someplace else on site. If you’re recording progress with site images or survey points, you might organize those by date as well.

    Construction: During construction, we can use Layers to break down your schedule. Looking at the estimating markups, you could determine how many concrete trucks come each day and isolate the curbs, slabs and footing accordingly. You could also use it for site logistics locating material deliveries, job trailers and portable toilets on site with a date layer. Knowing what needs to move on site as the project progresses can keep everyone informed on expectations.

    As-Builts: When on site recording existing conditions, P&ID or verifying installation, Layers can be used to indicate new vs. existing, supply vs. return, gas vs. water piping or to indicate valves that need to be replaced.

    Facility Management: When tracking so many systems in a facility, it can help to keep them all in one drawing and use Layers to organize them. When all the Layers are on, it might seem like an organized mess, but when you isolate the low voltage layer to investigate a network problem, suddenly it’s clean and precise. After you solve that emergency, you might switch Layers for a plumbing issue or verify the dates on fire extinguishers.

    Extra Credit: Incorporate Layers so those markups you do early in a project are still used downstream, eliminating redundant work. I’ve worked with several specialty contractors building tools for the sales team to layout while walking a site with the owner. All the devices are built with pricing, so they immediately have an estimate.

    Those same markups are moved and revised by the engineering team back in the office, with the estimate being updated automatically. When revisions pass through, they have direct visuals of scope creep and price increases. These markups can also be used by the installation team on site, changing the status of each device as they complete the install. In Studio Sessions in Revu, the project manager knows in real time how much work remains on site, helping him schedule the next project.

    As you can see, there are many powerful ways to use Layers throughout all phases of a construction project. I hope you found this introduction to Layers in Revu helpful and you have some new ideas of how you might implement them into your workflows.

    To learn more about layers check out my other blog post, “Understanding Revu Layers Like a Pro.”


    How to Build a Digital Project Dashboard for Plan Documents

    This story was originally published by Bluebeam, Inc. on the Bluebeam Blog.

    Digitizing plan documents is only as effective as your ability to access them as you work. Digital dashboards in Bluebeam Revu make it easy to do both


    While completely digitizing document management remains among the construction industry’s determined priorities, the challenges of truly becoming fully digital don’t stop there.

    Once a contractor completes its transition from paper-based workflows and processes to a 100% digital document environment, the next challenge often is determining the quickest and most efficient way to facilitate the proper distribution of plan documents to all project stakeholders during its lifecycle.

    Even though having an entirely digital document management system is inherently more organized and efficient than a paper-based one, issues around folder structure, file access and viewing permissions are tedious and painstaking problems to solve.

    Enter digital dashboards.

    A digital dashboard is a visual interface that allows for easy access and navigation to a project’s digital document ecosystem. Whether someone is working in an office, jobsite trailer or in the field, digital dashboards allow all project participants a simple way to find, access and view relevant plan documents at the point of need—without having to navigate complicated folder and file structures.

    Digital dashboards are especially powerful for users of Bluebeam Revu, as the platform’s features for viewing, marking up, storing and collaborating on construction documents are made even more optimal by adding the proper visual interface.

    Michael Echave, a senior AEC technical specialist with industry consultancy ATG USA, is a big advocate of digital dashboards. He’s worked with clients in a variety of subsectors in the industry as they seek to finalize their digital document transformations by integrating visual interfaces to make project documents more accessible to workers spread across big and complex jobsites.

    Keep the end in mind

    According to Echave, there are many ways to create a digital dashboard to serve as a project’s document and reference materials navigation hub. Essentially, a dashboard is a hyperlinked page in itself where designers can create buttons and other interface elements to lead users to find plan documents stored in folders in a platform like Studio Projects in Revu, Bluebeam’s document storage capability.

    “You want your end goal in mind when you start to build a dashboard, and then you start peeling back those layers,” Echave said.

    There’s also a lot of flexibility in where dashboards are built. Of course, Bluebeam Revu is one option, using the markup tools to create navigable buttons that link to subfolders within Studio Projects or other document storage systems.

    An ATG project dashboard homepage.

    Once construction professionals have determined the program they’ll use to build the dashboard, it’s important to determine how many layers of navigation the dashboard will include. Dashboards can be as simple as having one homepage with several links to single-layered subfolders, or they can include several layers of complex subfolders that lead to different types of documents and reference materials, such as websites or other online resources.

    What’s more, a project may have multiple dashboards. For instance, field workers might work off a simplified dashboard for easy access, while engineers, designers or architects in the office may decide to have a more complex dashboard at their fingertips.

    Regardless, Echave said every dashboard will include a home page that features different links, or “actions,” that serve as clickable buttons. These buttons bring users to different subpages that help them refine their document search. Buttons can lead to PDF documents or entirely different applications or websites. The image below is an example of an ATG digital dashboard home page:

    Each subpage will include more interactive links, allowing users to navigate to even more subpages in the dashboard. The free storage in Bluebeam Studio Projects makes the possibilities of layers and subpages virtually endless.

    Critical steps to building a dashboard

    Pick a background

    Digital dashboards can be elegantly designed with compelling visuals or made simple with solid color backgrounds. Consider who the user will be for the dashboard when determining its design. Workers in the field may prefer a more straightforward design, Echave said, while architects or design professionals may find more complex design elements more engaging.

    Echave said when building dashboards, he typically uses an 8.5 X 11 for his border size. Then he inserts a logo.

    Use markup tools

    Next, Echave advises using markup tools such as rectangle, ellipse or polygon to place shapes that are colored and filled.

    Ultimately, this is the opportunity to consider how the dashboard’s subpages will be organized, which will inform the layout of the home page. Also keep in mind that the homepage will also serve as a template for the different subpages.

    Create links

    Using the text box markup in Revu, create links to different subfolders. Echave said images can also be used as links. Make sure that interactive icons and clear fonts are used as well, Echave said; this keeps the dashboard visually appealing for users.

    With the layout complete, add links to the static actions. For instance, the area highlighted in the image below will never change in any of the dashboard’s subpages. Users can also add static popup windows.

    Copy page to add multiple subpages

    Once this initial template is built, it can be copied via the thumbnails panel in Revu. Echave said to create as many subpages as needed to organize the digital dashboard. Users can also save text boxes or any markup into the Tool Chest as a custom Tool Set to allow users to replace them later on or on future dashboards.


    Once the outline has been copied for the dashboard’s intended page count, Echave said users can then start to reorganize each subpage, such as Site Plan and Submittals.

    After all subpages have been reorganized, Echave said it’s now time to add the link to the text boxes or images.

    Avoid broken links

    Avoid broken links by double-checking that every link works. One thing to keep in mind: if links go to local files on a computer, other users won’t be able to access them. Cloud-based storage like Studio Projects in Revu is ideal.

    When using Studio Projects, Echave said it’s important to set the proper project folder permissions. Project partners who do not have access to Revu can use a free 30-day trial to collaborate in the dashboard; after that, Revu will convert to view mode, allowing users to continue accessing Studio.

    Finally, if dashboards are created in Studio, construction professionals can send out email invitations to different project partners, giving them access to the digital dashboard.

    Maintain throughout project

    Once the dashboard is fully deployed on a project, Echave said it’s critical that it is maintained throughout the project’s duration. Keep it updated by refreshing it with the latest documents while ensuring that no links have been broken along the way.


    The Bluebeam Stapler—Making Working Life a Little Less Complicated

    This story was originally published by Bluebeam, Inc. on the Bluebeam Blog.

    Working on a job that requires numerous PDF files to be collated into one manageable document? It’s easy with Bluebeam Stapler.

    What is Bluebeam Stapler? Among other things, it’s a tool that helps users combine individual PDF documents into a single PDF. It can also batch convert a variety of document types, such as PDFs, Word docs, and Excel spreadsheets, into a single PDF file.

    If you’re working on a job that requires numerous PDF files to be collated into one manageable document or master file, and you’d like those files to be added to or amended, Bluebeam Stapler makes the tasks easier.

    Settings and the organization of the individual PDF files can be saved as a stapled job for future use, saving time and resources.

    Illustration by Nico Abbasi


    Making life simple

    Once a file has been established, updates to individual PDFs—which would usually involve creating a combined PDF again—can be done by opening up the previously created staple job, organizing the documents in the way you wish, hitting “staple”—and voila.

    Using Bluebeam Stapler helps your working life be more straightforward. It means not having to worry about slip-sheeting individual PDFs into the original PDF to replace outdated pages.

    It’s really useful when compiling a large document, such as a calculation package comprising many component PDFs.

    Easy to use

    The system’s interface is easy to use. One of the easiest ways to use it is “drag and drop.” You can take the files that you want to combine into a single PDF, select them, drag them over to the window, where you will see the normal Bluebeam combined PDF dialog.

    Naming PDFs using a numerical prefix makes identifying the files easier, as does showing the date that each file was last updated.

    Once you have everything where you want it, you just hit “staple.” The system automatically combines those PDFs, uses the file names of the individual PDFs and can bookmark those for you. Settings are also saved.

    If you want to update a couple of these files in the future, all you need to do is open up the file using the staple job file. It will automatically combine all those files in that single PDF again.

    Combination benefits

    You can create a master file, which will have a combined PDF package and can be easily bookmarked for future use. You can have as many or as few bookmarks as you like.

    Combining PDF documents used to take hours, not least when a document had possibly hundreds of individual PDFs that needed to be brought together.

    Using Bluebeam Stapler speeds up the process and helps increase efficiency. It’s that simple.