• Outil Civil 3D pour simplifier vos corridors et Projets 3D – CIM Project suite 2021

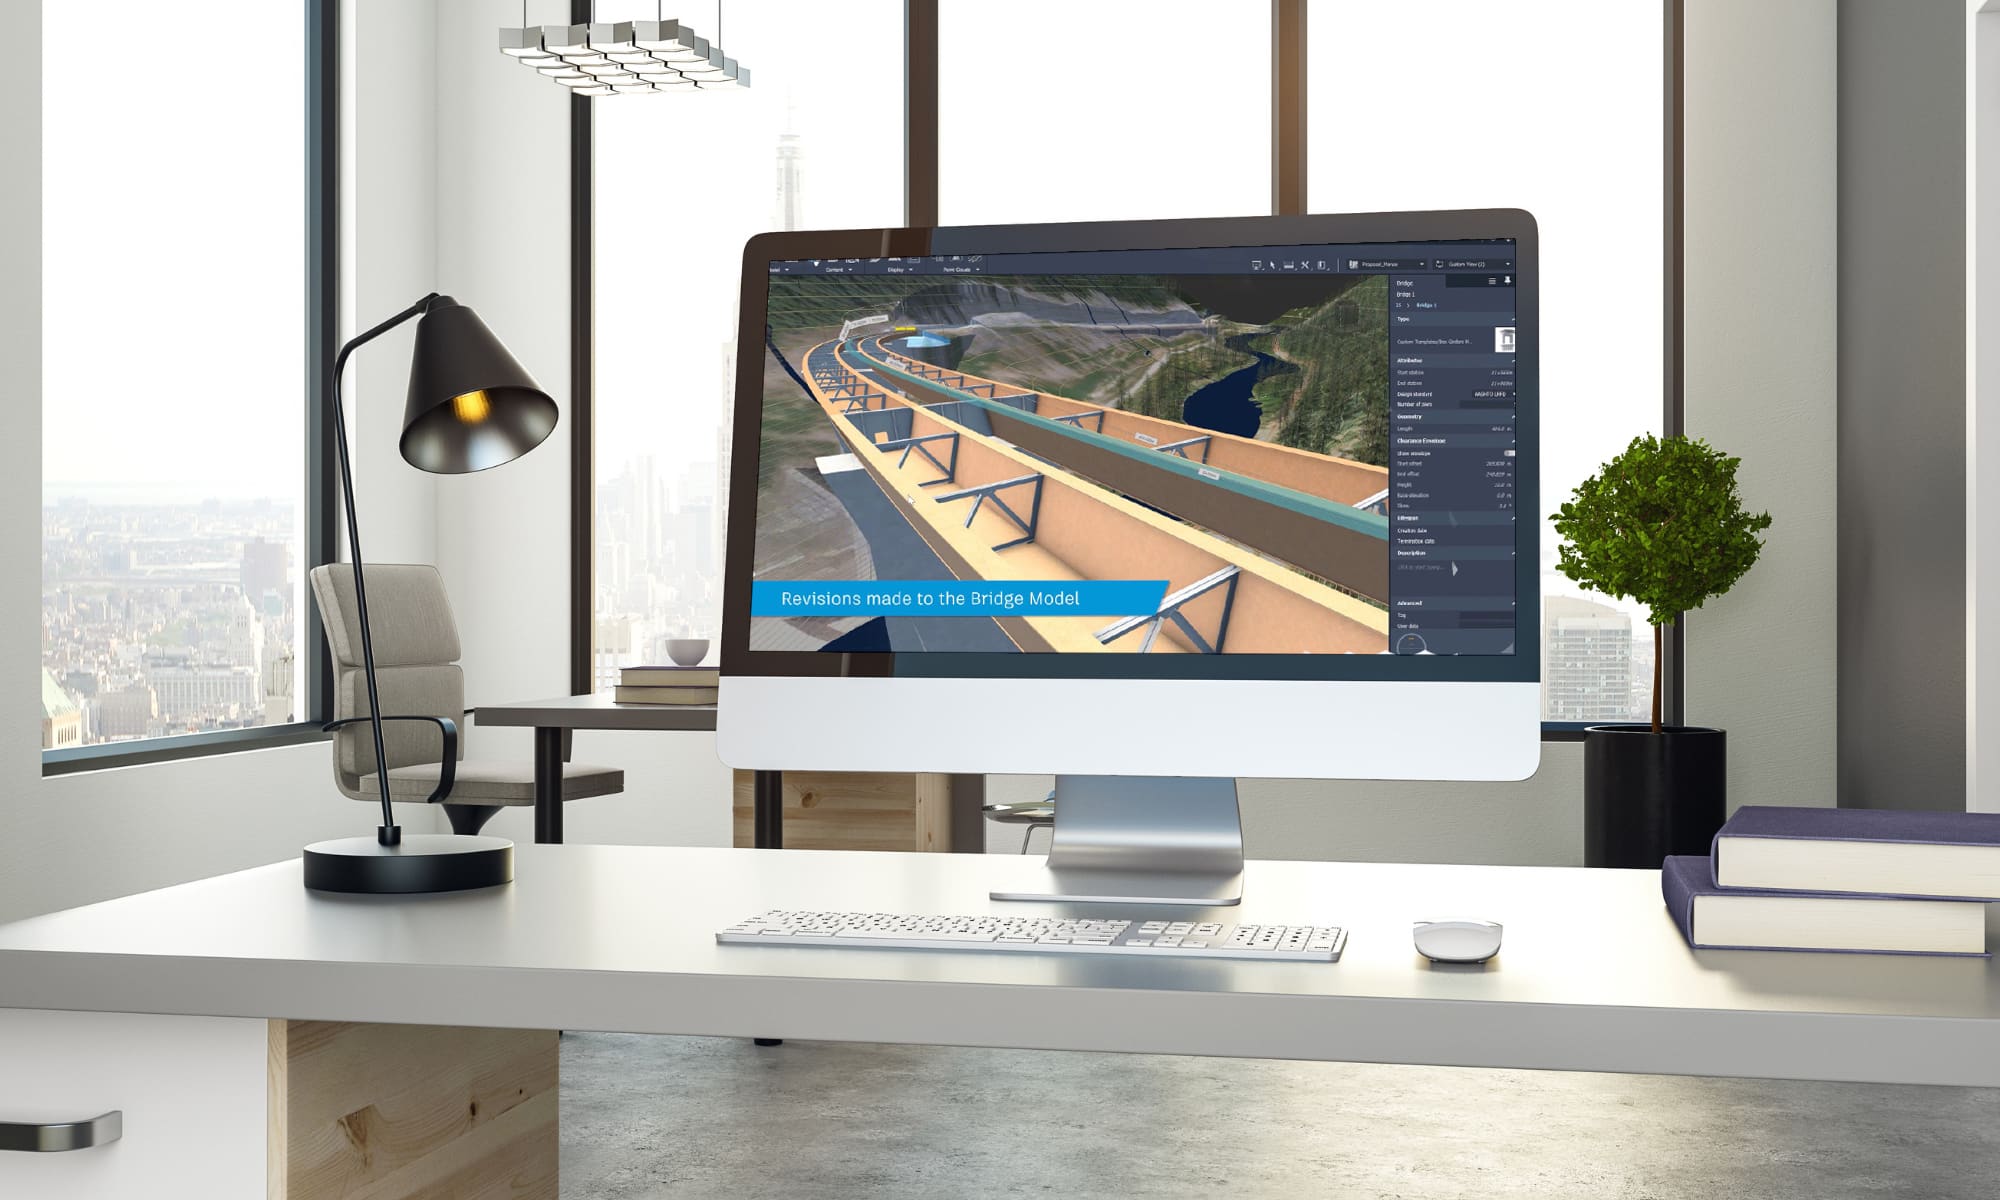
    L’article de blog d’aujourd’hui présentera des outils qui accélèreront la production de vos designs de Projets 3D, qu’ils soient des corridors routiers, des intersections ou des tranchées d’excavation.

    Nous utiliserons activement les outils Corridor Cleanup, Mapper, Splitter et Merger de la suite d’outils CIM Project développée par CTC Software.

    Séparer et fusionner vos projets 3D

    Lorsqu’on planifie notre design de corridor, qu’il soit simple ou complexe, avec ou sans intersections, utilisant différents profils types en simultanés appliquées sur multiples « régions », nous sommes dans l’obligation de penser au produit final pour optimiser notre performance de travail. Souhaitons-nous :

    • Avoir toutes les rues d’un nouveau quartier afin de produire un calcul unifié des quantités de matériaux pour notre projet?
    • Séparer en différents projets 3D nos intersections, fourches et cul-de-sacs de sacs pour simplifier logiquement la création de notre design?
    • Séparer ou non notre quartier en phases de construction au sein de différents projets 3D?

    Pour un concepteur de Civil 3D, ces questions auront une importance capitale dans son design. Retourner en arrière pour fusionner ou séparer des projets 3D représente des heures de travail, à redéfinir les éléments suivants:

    • Lignes de base,
    • Régions,
    • Cibles,
    • Paramètres de fréquences,
    • Surfaces dynamiques.

    Les outils Merger et Splitter de la suite CIM Project offrent une alternative ultra performante, qui permettra en quelques clics de sous-diviser et assembler des projets 3D, peu importe l’évolution dans le temps du projet.

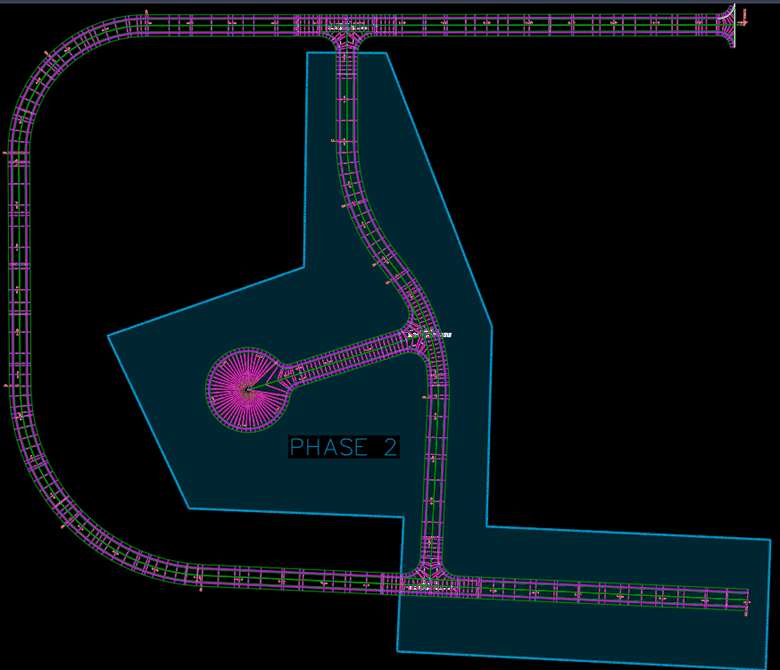
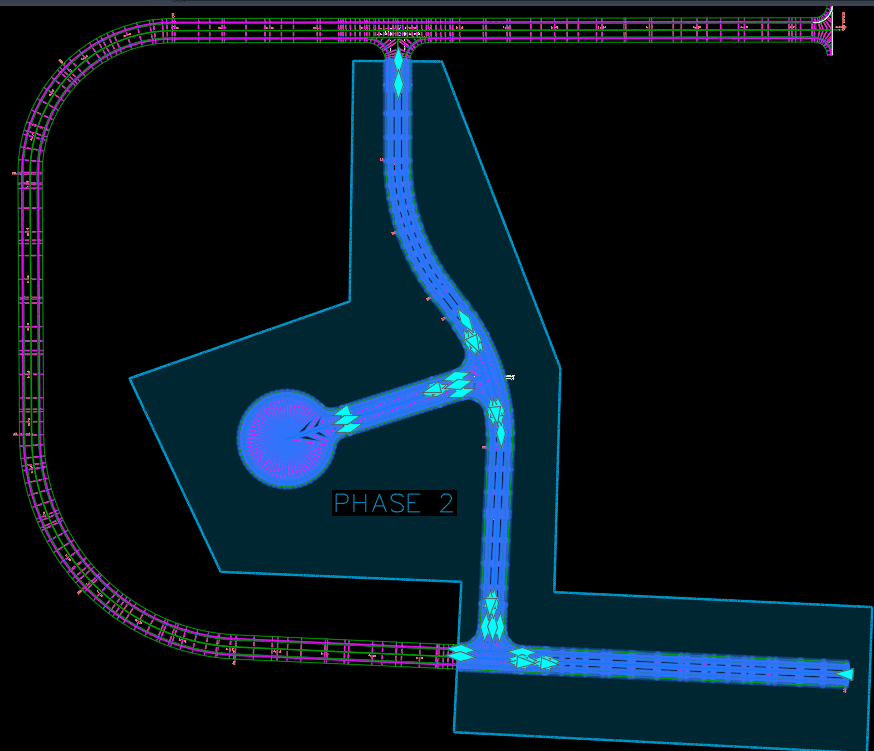
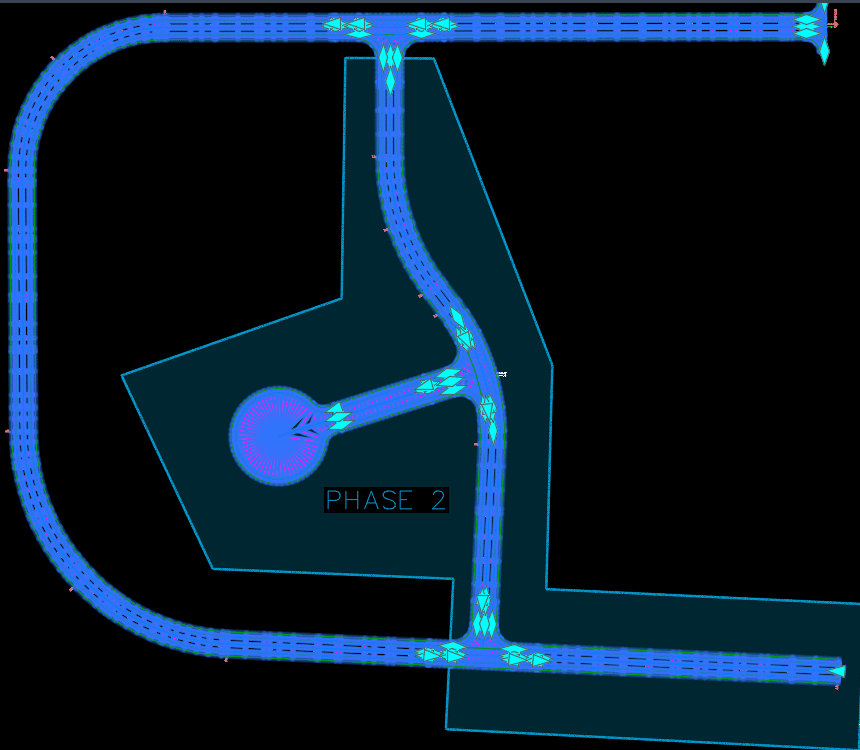
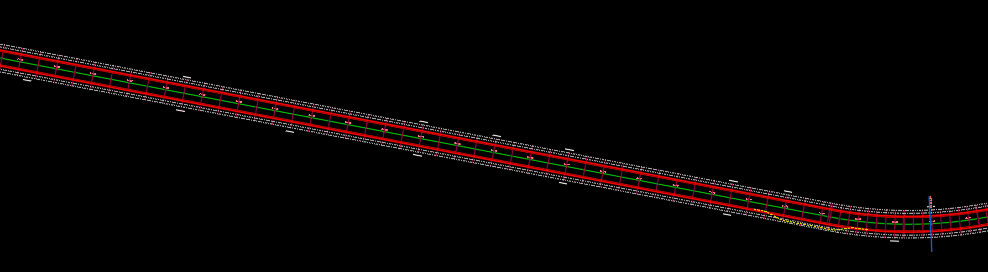
    Voici un projet 3D en un seul morceau couvrant tout un petit quartier qui, en cours de projet, doit être divisé en deux phases de construction :

    Voici une idée des éléments à considérer et à redéfinir dans cette séparation (et la liste peut encore être déroulée…) :

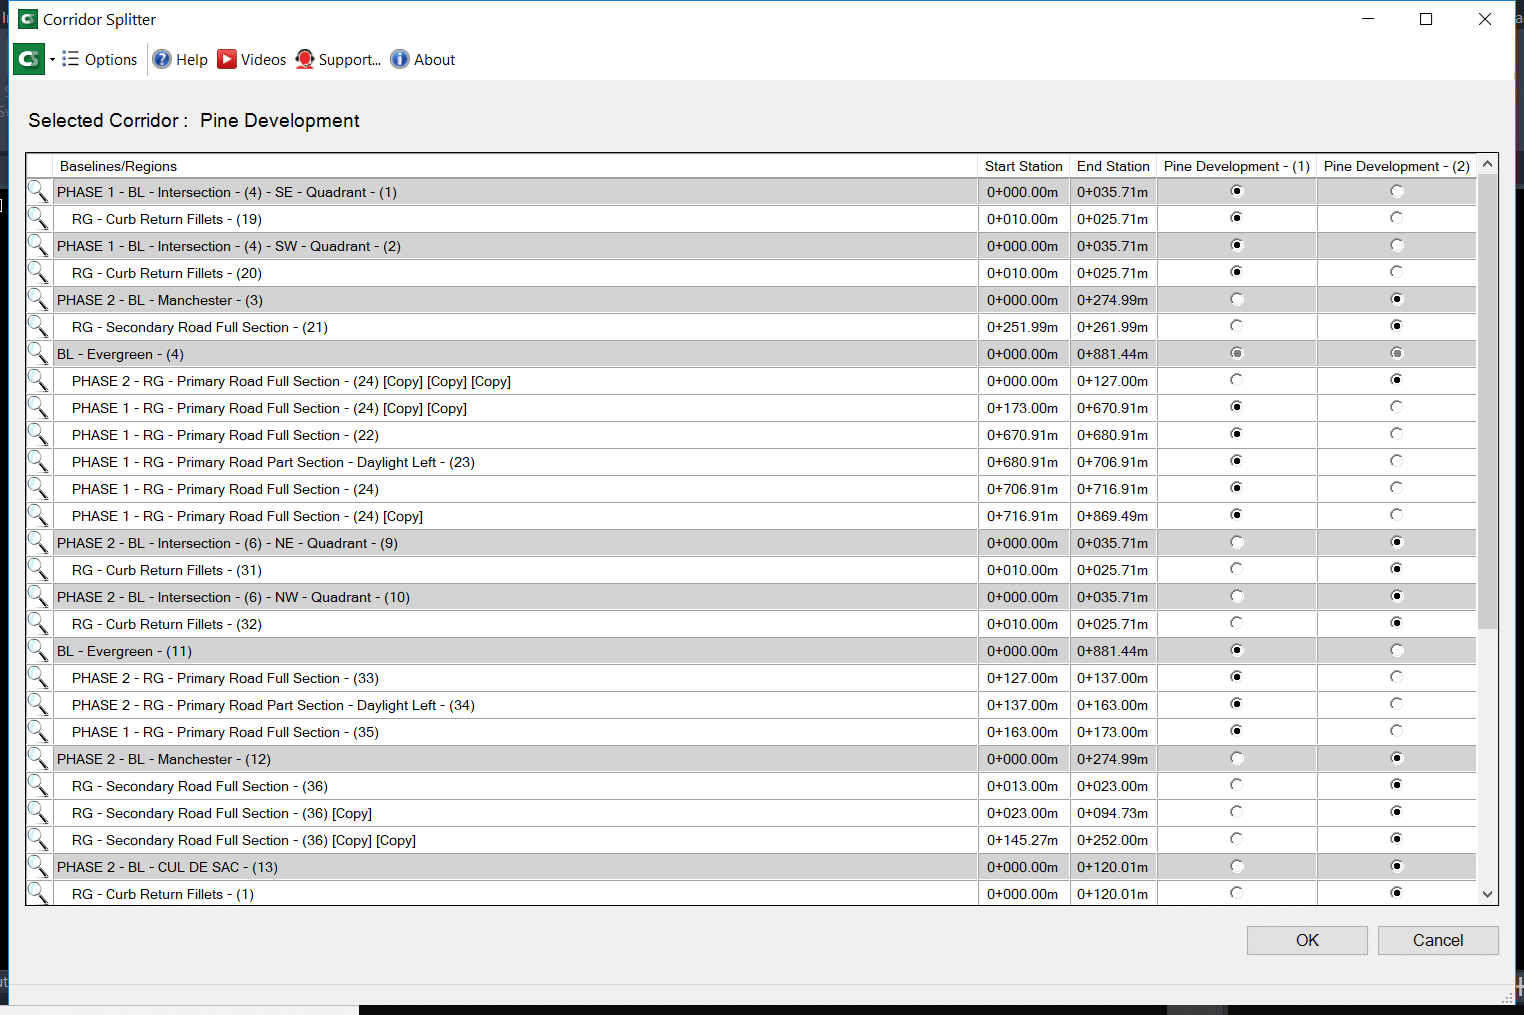
    L’outil Splitter permet de diviser en deux parties un projet 3D par ses régions ou lignes de base, tout en préservant les éléments discutés plus tôt qui servent activement à définir votre conception :

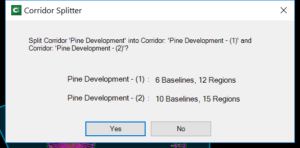
    Voici le résultat final, en quelques clics :

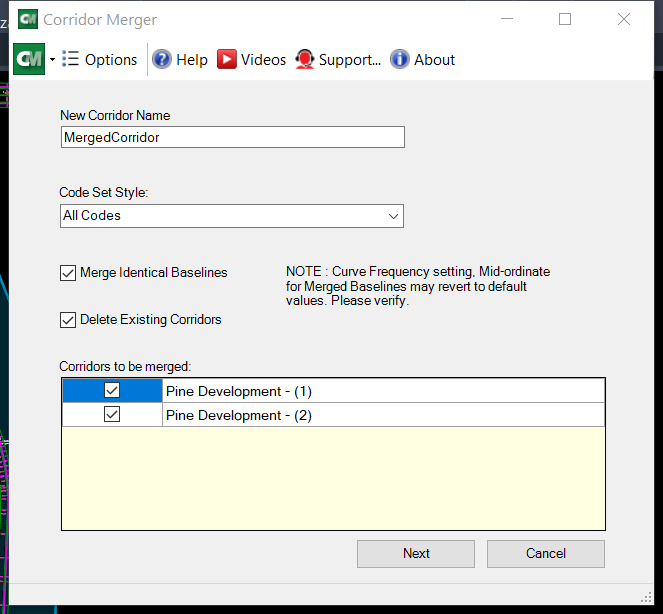
    L’outils Merger fait exactement le même travail à l’inverse, fusionnant deux projets 3D et plus à la fois :

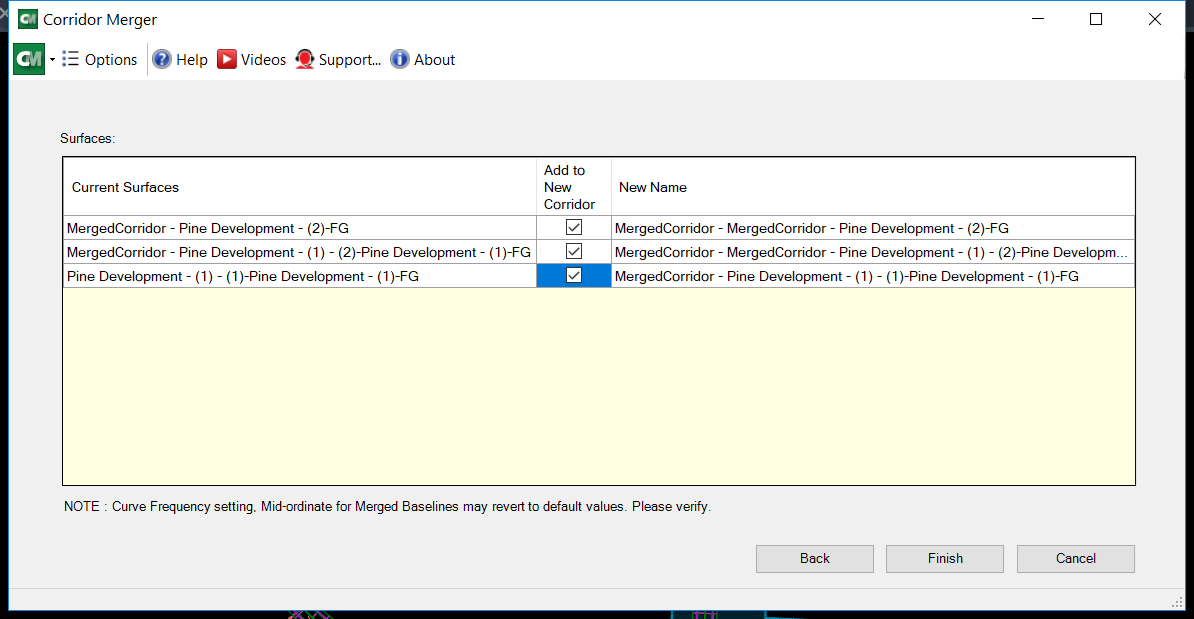
    Vous pouvez optionnellement réintégrer les surfaces de corridors propres à chacun des projets dans le corridor fusionné :

    Le résultat final réassemblé parle de lui-même, gardant intacte l’ensemble des paramètres de design de chacun des projets 3D à sa source :

    L’usage des cibles dans les projets 3D : un outil simple à l’utilisation complexe

    Tout design routier utilise activement des cibles de largeur ou d’élévation pour contrôler les valeurs variables des éléments de profil type (subassemblies), que ce soit pour ouvrir progressivement une voie de virage, former un cul-de-sac, former une intersection ou créer un élargissement pour un arrêt de bus.

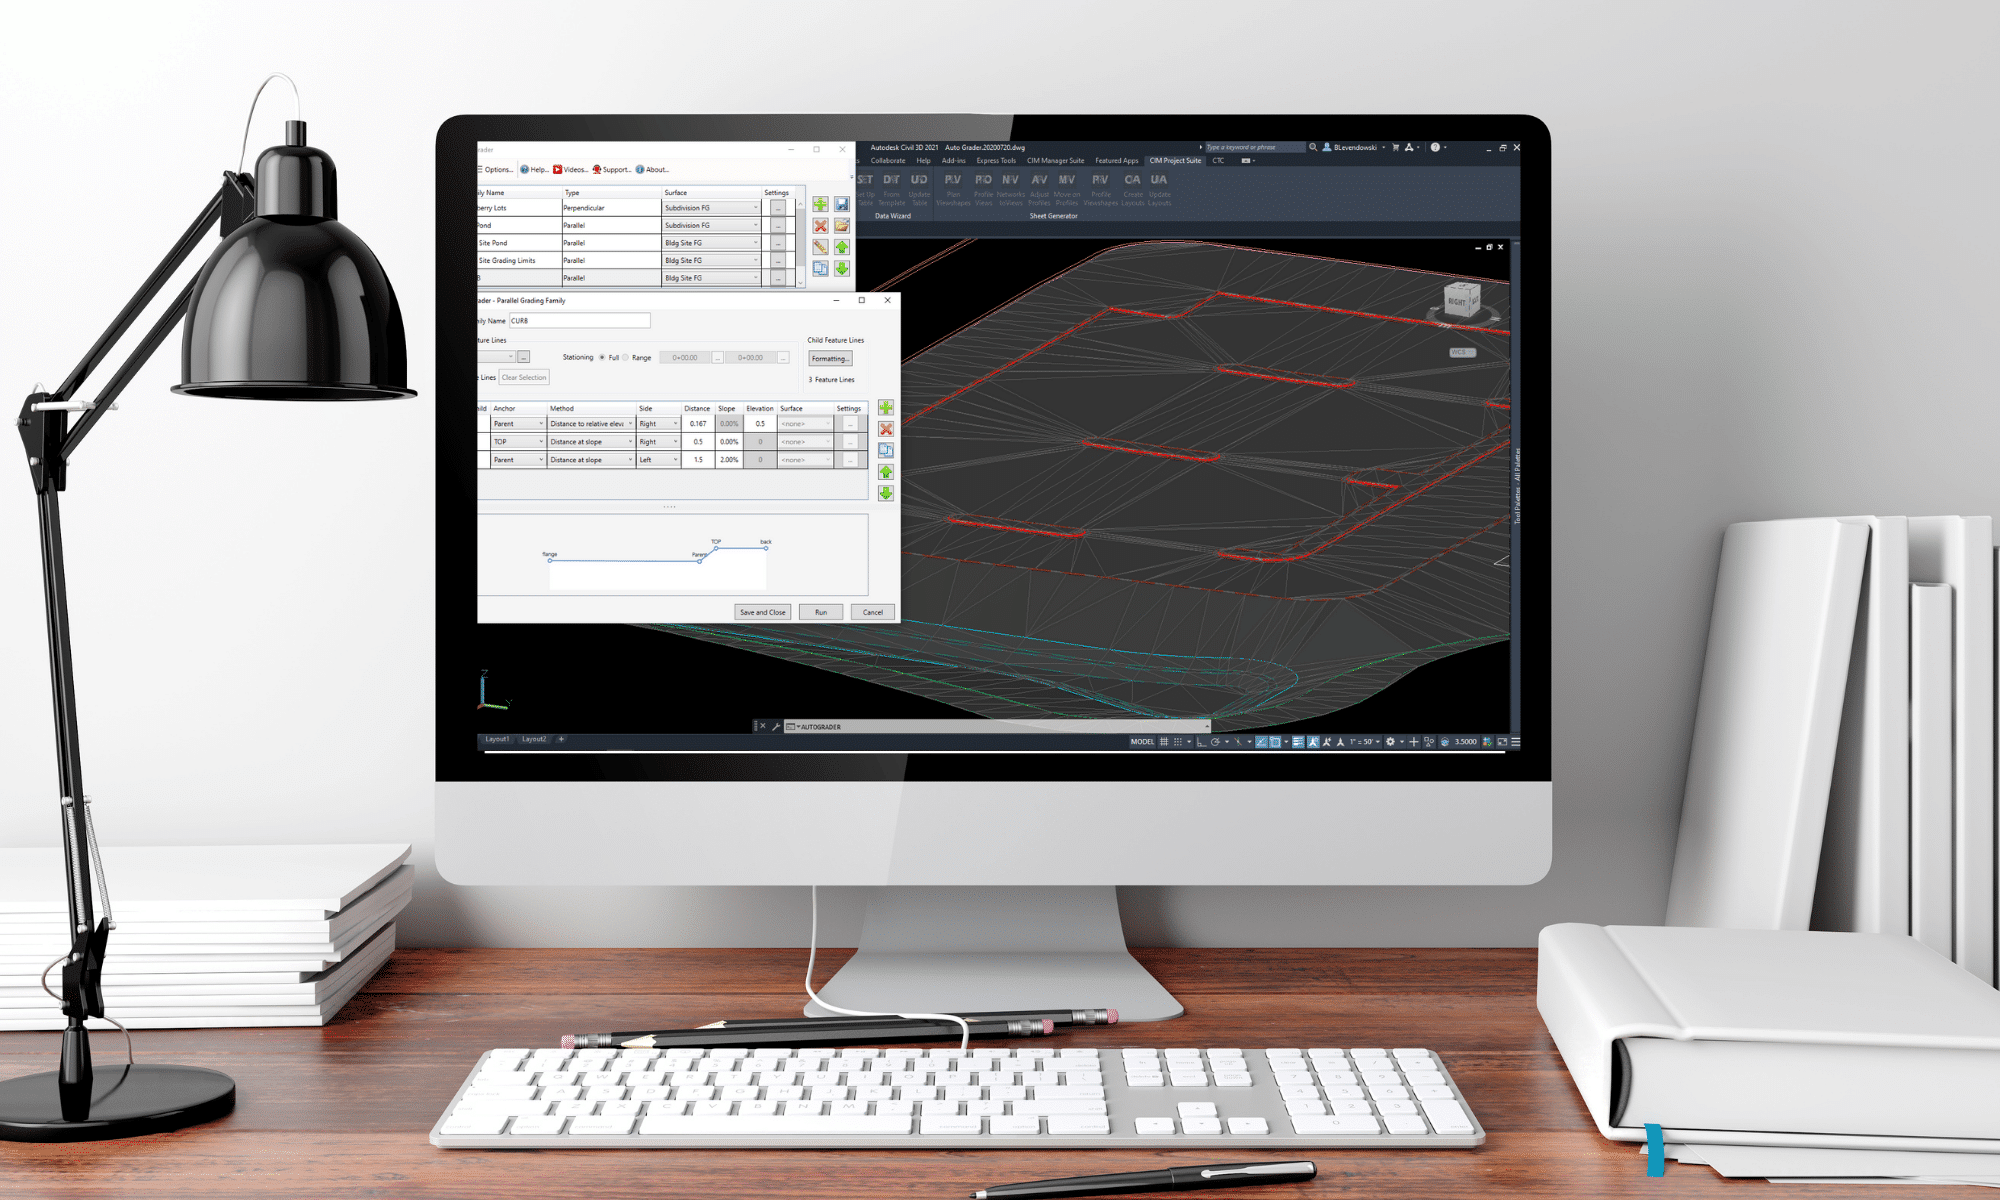
    Dépendamment de la complexité de vos designs (en lien direct avec le nombre de lignes de bases et de régions au même endroit), la liste de cibles possibles peut être gigantesque. Peu importe sa taille, le concepteur passera une bonne partie de son temps dans cette interface à gérer les subtilités de son design :

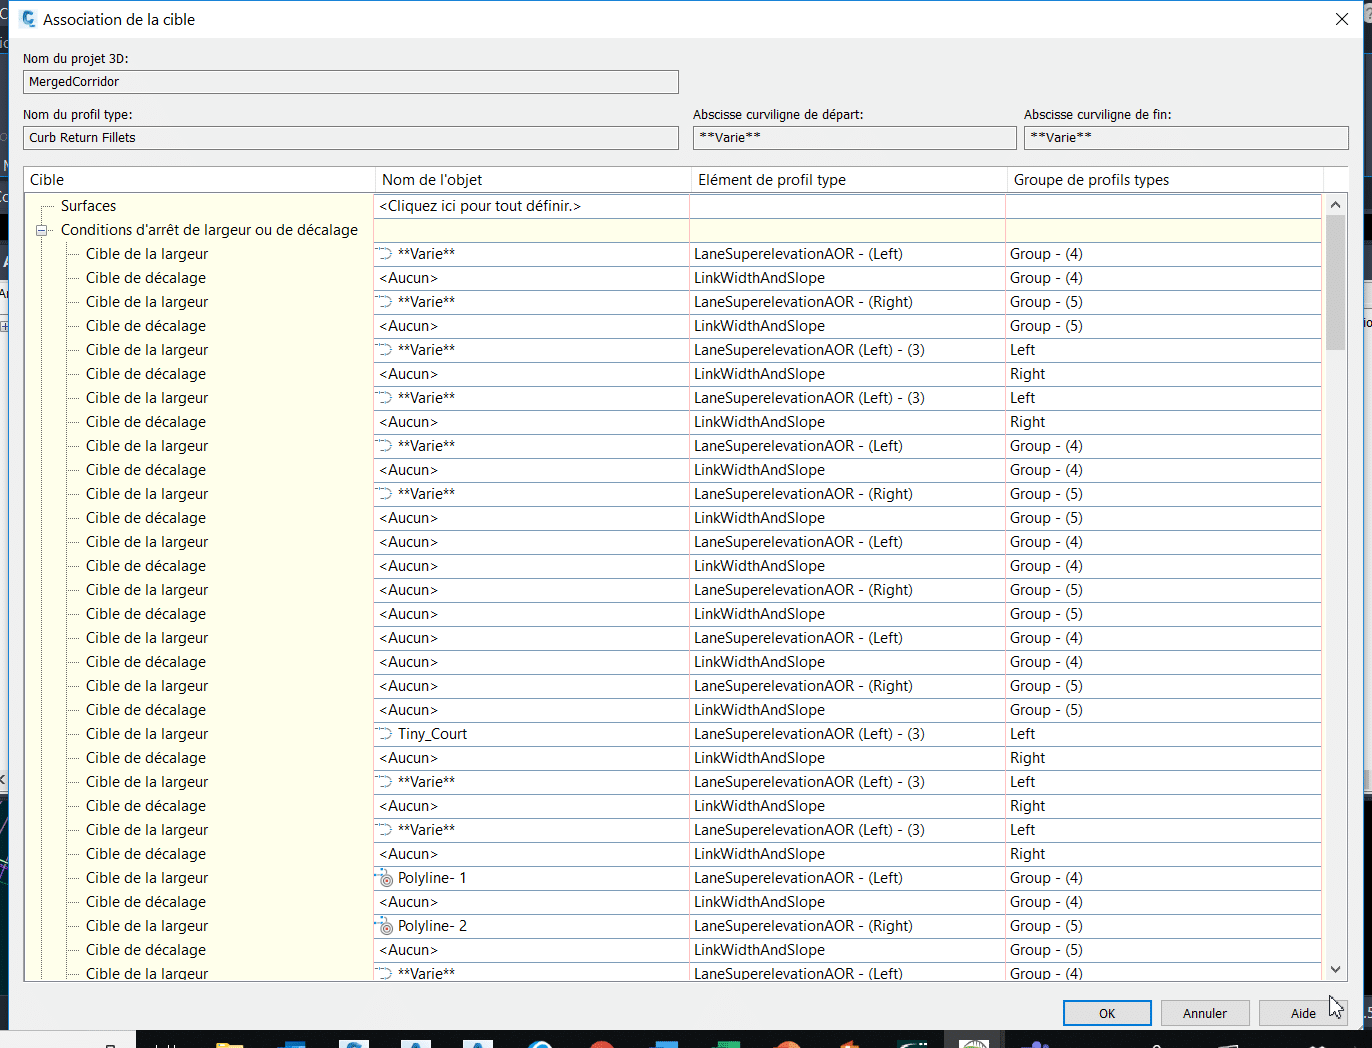
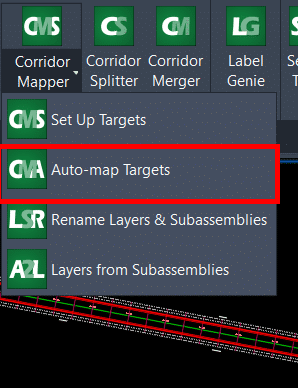
    CTC Software propose une alternative dans ses outils, appelée Corridor Mapper, pour sauver dramatiquement votre temps d’association de cibles, sans avoir passer par le menu précédent. Sa stratégie optimale, en fait, est d’associer des cibles situées sur des calques ayant les mêmes noms que les éléments de profils types, et ce dynamiquement (peu importe l’évolution du projet, si des cibles s’ajoutent, une simple mise à jour du lien remodélise le projet 3D).

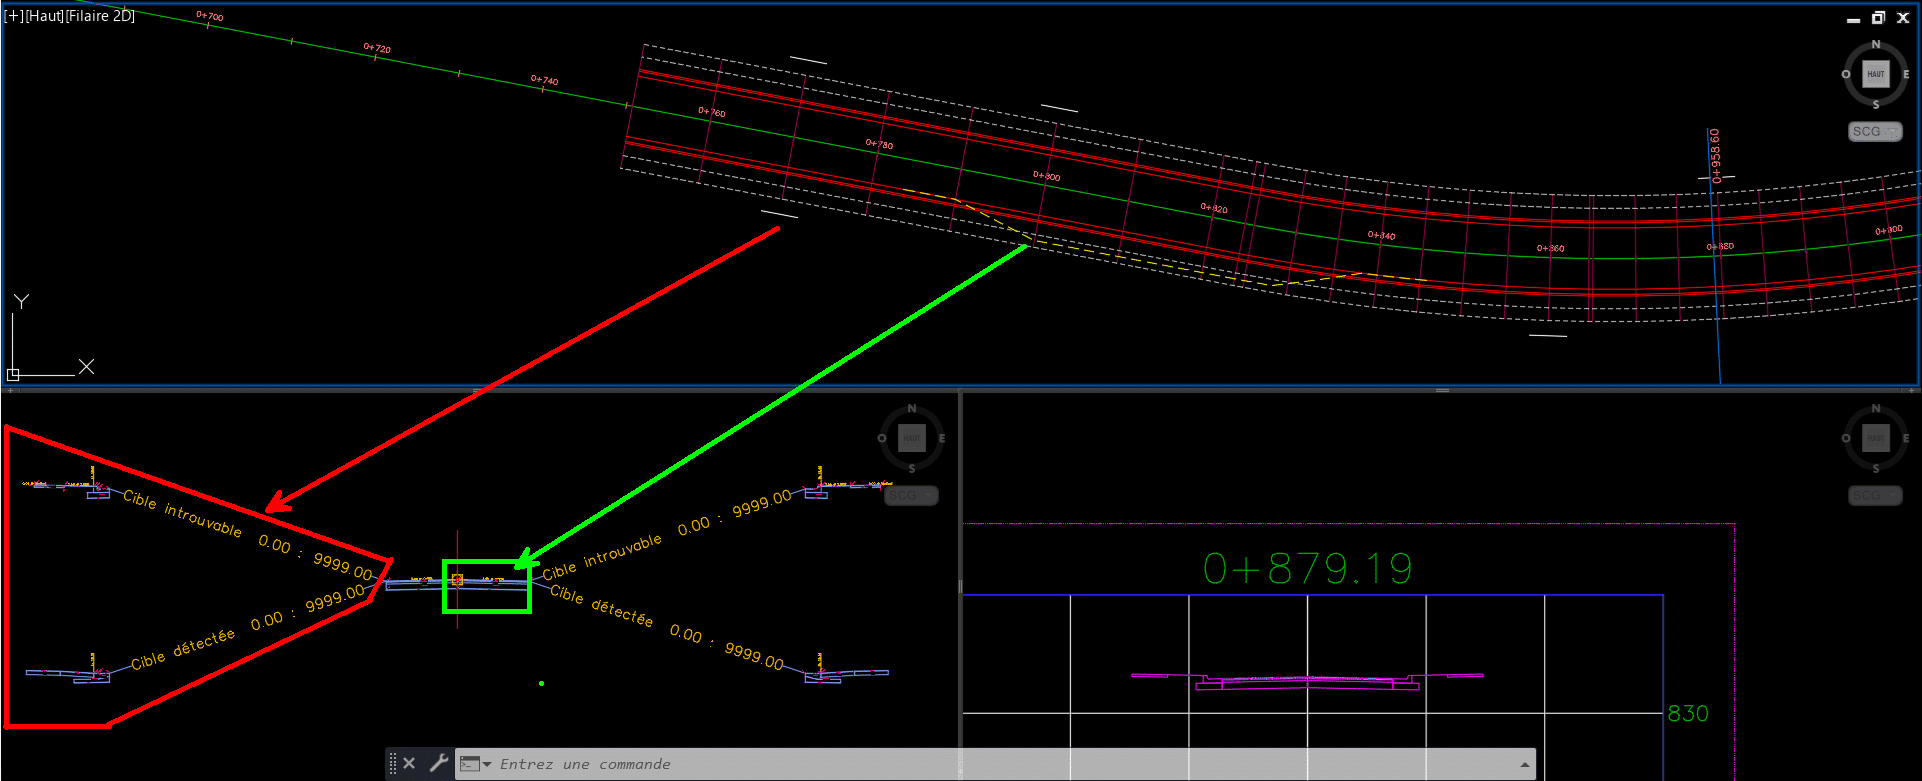
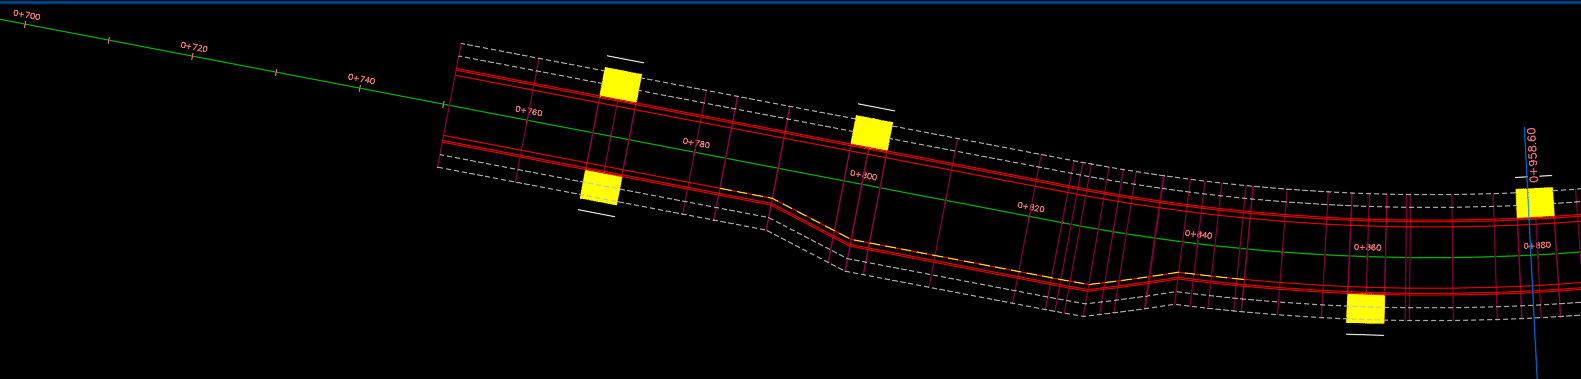
    Dans l’exemple suivant, j’ai un corridor avec une condition de détection d’entrée de cours pour abaisser la hauteur des bordures de béton automatiquement (en rouge), ainsi que des polylignes qui créeront des élargissements de voies (en vert) :

    Corridor Mapper liera le nom de chacun de ces éléments de profils types (pouvant être personnalisés à la guise de l’utilisateur) à toutes les cibles placées sur des calques prédéfinis :

    Si les calques à spécifier ont les mêmes noms que les éléments de profils types associés, les boutons Auto-Map Layers (en rouge dans l’image précédente) permettent de les lier automatiquement.

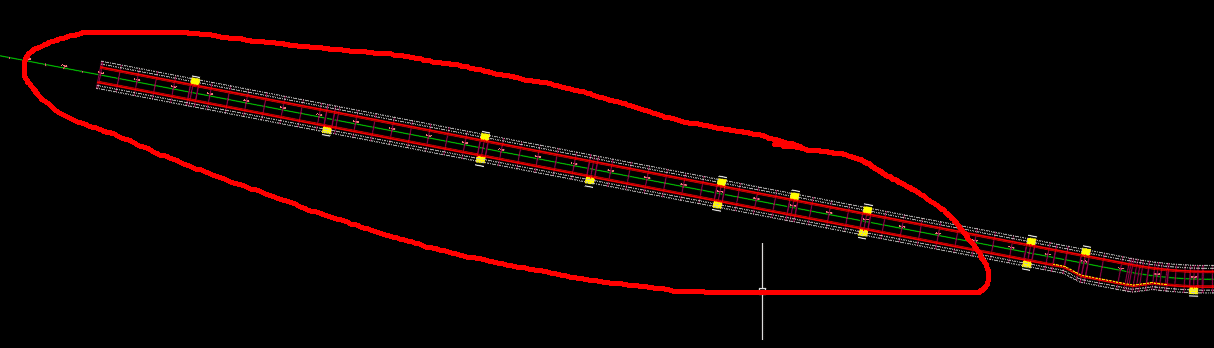
    En quelques clics, voici le résultat :

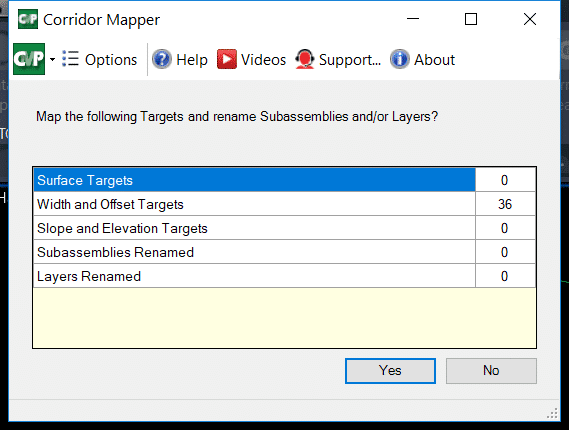
    Et si notre projet évolue en augmentant de taille, doit-on refaire des manœuvres répétitives pour reliées nos nouvelles cibles?

    Non! Un simple clic sur le bouton Auto-map Targets passe en revu le contenu changé sur les calques des cibles pour mettre à jour le corridor :

    Pour un concepteur, on vient de se sauver facilement « une ou deux crampes au bras » par année en termes d’actions répétitives éliminées de cette façon. Voici le résultat :

    Les outils « par défaut » de Civil 3D permettent également d’associer, à un temps donné, tous les objets sur un calque comme étant des cibles potentielles, mais les différences atouts qui démarquent Corridor Mapper sont :

    • La liaison facile et efficace de cibles sur des calques spécifiques, dans une interface simplifiée sans aller-retours entre plusieurs fenêtres de paramètres;
    • L’attribution automatisée de cette liaison lorsque les calques de cibles ont les mêmes noms que les éléments de profils types;
    • La liaison dynamique d’un calque de cible et de l’élément de profil type associé.

    Additionnellement, la fonction Corridor Cleanup permet de nettoyer les cibles d’un projet 3D en partie (soit par région, ligne de base ou même type de cible) ou en entièreté, permettant de partir sur de nouvelles bases lorsqu’on reprend un design que l’on souhaite altérer ou améliorer :
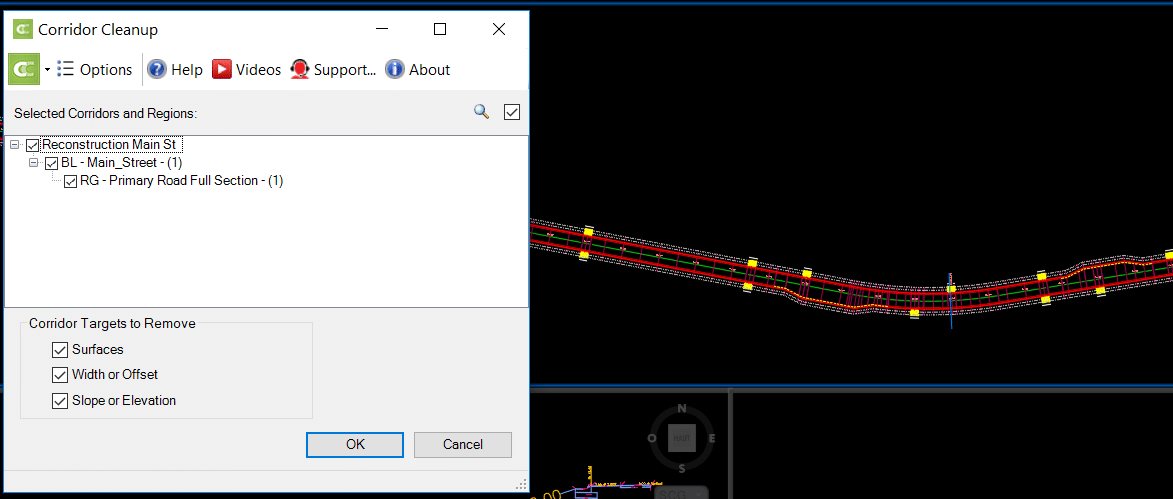
    Voilà le résultat :

    Conclusion

    Le volet Corridors des outils CIM Projets nous sauvent un temps important en réduisant les manipulations répétitives sur l’édition de nos projets 3D. Peu importe la taille, la complexité ou l’évolution dans le temps de votre projet 3D, ces outils spécialisés vous permettront d’adapter très rapidement vos conceptions en génie civil. Vos concepteurs et chargés de projet vous en remercieront!


    Pour en savoir plus sur la suite d’outils CIM Projects de CTC Software :

    https://www.ctcsoftware.com/product/cim-project-suite-2021/

    Vous trouverez également, au lien suivant, nos webinaires francophones en génie civil et infrastructures :

    https://www.youtube.com/playlist?list=PLAhehuVvm9ky6D0jDNPuUd0JQelxgv3i3

    Outil Civil 3D pour simplifier vos terrassements – CIM Project suite 2021

    L’article de blog d’aujourd’hui présentera des outils qui simplifieront vos designs de terrassement, en utilisant tout le potentiel des Lignes caractéristiques de terrain sans avoir à passer par les outils de Talus de Civil 3D.

    Cela dit, nous utiliserons l’outil Auto Grader de la suite d’outils CIM Project développée par CTC Software.

    Création de Talus par défaut dans Civil 3D, le pour et le contre

    Contre :

    • Tend à planter lorsqu’on projette en général des lignes caractéristiques de terrain trop lourdes en points d’intersections (souvent dû au drapage de ses élévations sur une surface trop détaillée);
    • Tend à planter lorsqu’on projette des lignes caractéristiques de terrain en talus vers des surfaces trop détaillées, nécessitant la simplification des surfaces;
    • Environnement de design peu visuel, et complexe dans son utilisation (comprenant la création de groupes de talus au préalable, la gestion de Sites rarement utilisés et l’élaboration de critères de talus dans le gabarit).
    • Petits bugs « anodins » présents depuis des années, comme la disparition des zones de remplissage lors du déplacement d’un projet/groupe de talus.
    • Travaille toujours en pentes fixes, bloquant certaines combinaisons d’entrées en terre, comme une distance fixe vers une surface (résultant potentiellement en une pente variable sur tout le terrain).

    Pour :

    • La création de transitions de pentes variables entre deux pentes fixes différentes est très efficace, le long d’une même ligne caractéristique de terrain.
    • Contient des outils de calculs de volumes et « d’optimisation » de design imbriqués au module de création de Talus.


    En résumé, si un sondage à tous les utilisateurs de Civil 3D demandait quel est l’outil de design le plus instable du produit, la grande majorité répondrait la création de Talus. Les « bonnes pratiques » dans son utilisation, comme la simplification des lignes caractéristiques de terrain et des surfaces de rattachement pour les entrées en terre, sont très efficaces pour contourner les « plantages », mais demande également de faire des compromis sur la qualité et la densité de notre donnée de base.


    Auto Grader, la solution à bien des maux de têtes en conception

    Vient à la rescousse la suite d’outils CIM Project de la compagnie CTC Software, avec son outil Auto Grader.

    Auto Grader est un outil de création de talus à part entière exploitant les lignes caractéristiques de terrain pour créer des designs de terrassement. Étant complètement indépendant des outils de création de Talus de Civil 3D, il a sa propre interface, ses propres combinaisons de critères de pentes et sa propre approche pour standardiser et reprendre des designs d’un dessin à un autre.

    L’interface d’accueil permet de gérer les Grading Families liées au dessin courant, et comprend notamment :

    • Leur création ,
    • Leur édition ,
    • Leur exportation en format .JSON, afin d’être partagés avec d’autres intervenants ou dans d’autres projets Civil 3D,
    • Un aperçu de la famille sélectionnée, en mode « vue de coupe »,
    • Des fonctions et paramètres d’ajout des Grading Families dans des surfaces Civil 3D spécifiées.

    Plan Production Workflow with CTC Tools: Sheet Sets

    Creating sheets has always been a time-consuming process and needs to be addressed quite early in the design for preliminary submissions.

    While sheet sets can help us with global information updates across sheets with the use of fields, they cannot alter or create layouts and viewports.

    Civil 3D does offer a solution for creating multiple sheets in one fell swoop. But, where these tools fall short is in flexibility and updating.

    CTC Software has come up with a set of tools to bridge this gap in flexibility and updating. This workflow can integrate seamlessly into a company standard with only the addition of 3 blocks and a few designated layers.

    Sheet Generator ties in with sheet sets for information updating, and has the power to update Plan & Profile sheets if the alignment or scope change throughout a project.

    Instead of View Frames spliced by matchlines, Plan Viewshapes inserts blocks as viewport area extents and closed polylines representing the actual shape of the viewports in layout sheets.

    Profile Views takes advantage of native tools to split up profiles for each sheet.

    Networks to Views adds all desired networks to profile views, but only assigns parts to the views they are visible in.

    Adjust & Move on Profiles allow for efficient tweaking of the profile views to best line up with Plan Viewshapes.

    Profile Viewshapes overlays the extents of the profile viewports onto the profile views for designers to make any last adjustments.

    Create Layouts takes the plan viewshapes and profile viewshapes, adds matchlines to either depending on settings, adds north arrows, and creates sheets that can be added to a new or existing sheet set.

    The true power of this tool set is the Update layouts command. As plan viewshapes change or shift this tool can write that change out to the affected layouts. It will adjust viewport shapes, north arrows, matchlines, layout names, and ripple through the sheet set.

    CTC also has great tutorials for all their tools on their Youtube Channel.

    Gravity Pipe Network Editing Best Practices using CTC Tools

    Today’s blog post will be focused on revealing the industry’s best practices for Civil 3D – Pipe Networks.

    Explore the techniques to build Civil 3D gravity pipe networks and edit them using the new CTC Pipe Designer, Part Tagger, and Part Swapper all from CTC’s CIM Suite.

    CIM Suite will help you to:

    • Improve sheet production with automated labeling, dynamic plan and profile sheets, and automatic legends
    • Create better grading models with dynamic site grading, corridor target automation, corridor splitting, and merging
    • Work more efficiently with pipe networks using a dynamic pipe run designer, multiple part swapping, and manhole schedule automation
    • Effectively manage multiple survey code standards, improve survey database workflows, and automate data prep for construction staking

    Subscribe to our YouTube Channel and Blog to stay up-to-date.

    CTC Tools for Civil 3D Best Practice Series: Grading

    This week’s post is all about the best practices series that is focused on revealing the industry’s best practices for Civil 3D Grading tools. It has been designed for Civil 3D 2020 users.  After watching the recording, you will be able to apply industry best practice techniques to the following Civil 3D features:

    • Feature line geometry and elevation editing
    • Feature Line from alignment and profile
    • Grading criteria and objects
    • Slope transitions
    • Sloped-bottom ponds
    • Grading from corridors
    • Parking lots

    Subscribe to our YouTube Channel and Blog to stay up-to-date.

    Program Validation with Spreadsheet Link and Room Family Manager – Part 2

    Posted CTC BIM Project Suite White Paper Library –  CTC Software

    End Result

    When the workflow is developed and implemented, the entire special program can be added to the Revit project in a matter of minutes. Design area versus actual modeled area can be compared and analyzed ondemand. Content for each space can be placed per room specifications, whether the families are loaded or not. If layouts change, or if equipment needs to be replaced, the process ca be completed in minutes instead of hours. Any user can utilize this workflow to import the program requirements into their projects, update the models, import the content and finish the design. This process speeds up a task that takes lots of time and removes lots of potential user error.

    Savings/Benefits

    Time savings can be applied to several different aspects of the project. Planners can continue to use Excel to generate the lists needed for the room import, pulling from defined lists of data instead of guessing or looking up the data themselves. They never have to open Revit if they do not want to. The manual, error prone process of reading data from one source, and entering it into another source can be eliminated. This allows the designers and Revit users to focus more on the actual design and layout of the project more than focusing on the data they have been retyping.

    Conclusion Spreadsheet Link and Room Family Manager from the CTC BIM Project Suite can help import the building program and assist with data comparison and with design changes. The process above is intended to be the starting point of a template that can be expanded upon to include additional information, making the process fit the needs of the project and the team. If taken a few steps further, most of the data and content needed can be managed with just a couple of Excel files. Both Revit users and non-Revit users can take part in this process, and still have their designs imprinted on the project.

    Program Validation with Spreadsheet Link and Room Family Manager – Part 1

    Posted from CTC BIM Project Suite White Paper Library –  CTC Software

    Issue

    When working on medium to large buildings, how are you managing your program requirements? How are you checking the intended design area? In what way do you capture the number of required elements in a specific space? How can you assist the designer with room layouts and making sure the required equipment is used in the correct space? What happens when the design or the requirements change? Is there a way to compare data and assist with these changes? This session will demonstrate a process that will answer these questions, using tools you may already have at your fingertips: Spreadsheet Link and Room Family Manager. These tools can be powerful assets when establishing building programs.

    Typical Workflow In manual workflows, many architectural firms will use an Excel® spreadsheet containing all the special requirements needed for the building. Occasionally, some firms will have a process to export the data from Revit® and linked directly into this spreadsheet. Most firms will export the room data from their Revit design models, and manually enter the data in their spreadsheets. But what happens on the return side? How this data gets back into Revit almost always is another manual process. There are a handful of Issue When working on medium to large buildings, how are you managing your program requirements? How are you checking the intended design area? In what way do you capture the number of required elements in a specific space? How can you assist the designer with room layouts and making sure the required equipment is used in the correct space? What happens when the design or the requirements change? Is there a way to compare data and assist with these changes? This session will demonstrate a process that will answer these questions, using tools you may already have at your fingertips: Spreadsheet Link and Room Family Manager. These tools can be powerful assets when establishing building programs. Dynamo workflows and paid Revit plugins that are meant for this process specifically, but they either take dedicated professionals to create and maintain, or they cost a lot of money to purchase. Unfortunately, these tools are not commonly used. Then what about the content required to be placed in each space? Often, a designer is reading from the spreadsheet, browsing through their Revit library and manually placing the content into their projects. If the design changes, or the requirements change, it all becomes a manual process, updating both the spreadsheets in Excel, and updating the models in Revit.

    Solution This entire workflow can be simplified by using a couple of tools that many firms already have: Spreadsheet Link and Room Family Manager, both from the CTC BIM Project Suite. A template can be created for the type of project and spaces that are being used, to assist with populating special data obtained in the building program. This data can be pushed into the Revit models, and a back-and-forth design process can begin. For the content to be placed within the rooms, Room Family Manager will help with defining the list of equipment required by each space, and help with populating each space with the defined list, and again another back-and-forth design process can begin.

    Subscribe to SolidCHAT blog for part 2.

    Civil 3D 2021.1 Update

    Autodesk has released the first update for Civil 3D 2021.  Find official documentation here.  Here are some highlights:

    • Feature Lines:
      • Easily insert elevation points or PIs on feature lines at their crossings with other feature lines.
      • Set grade or slope between multiple feature lines.  Use the previous new command to insert points first.
    • Pressure Networks:
      • Add/Move/Delete vertical bends from a pressure network.
      • Pipe run profile settings:
        • New overrides tab for specifying static or dynamic updates.
        • Profiles selection now includes a create from surface option.
      • You can now change a straight pipe to a curved pipe in profile view by grip editing, and change a curved pipe to a straight pipe.
    • BIM 360 Collaboration for Civil:  Support has been added for reference templates and sheet set data files.  You must install the latest update for the Desktop Connector.
    • ArcGIS:
      • You can add new objects that were created in Civil 3D to ArcGIS by moving them to an existing ArcGIS layer and then saving the layer back to ArcGIS. Changes to property set data are now saved back to ArcGIS along with the geometry.
      • Support has been added for exporting curves (instead of tessellated segments) to a file geodatabase.
    • Bridges
      • Support has been added for configuring layers for an existing bridge in a drawing.
      • Support has been added for assigning layers for bridge generic object subtypes.
    • Project Explorer: Autodesk Project Explorer for Civil 3D is an environment that allows you to review and analyze civil objects in the model. Here we will look at Alignments, Profiles, and Corridors.  See this YouTube playlist.  This is an extension which must be downloaded and  installed separately from 2021.1.


    Finally, plan and profile sheets that update after design changes

    Plan production tools in Civil 3D are great for creating plan and profile sheets, but what about when the inevitable design changes come and you need to update your sheets? You either update them manually or recreate all new sheets. With CTC Software’s Sheet Generator, you can create plan and profile sheets that update after designs change, including refreshing of viewports, north arrows, matchlines, sheet names and numbers, sheet set data, and more. Sheet Generator provides better control on Profile Views, more flexible sheet management workflows, and easily dovetails with your company standards.

    For more click here

    Create custom legends and QTO with Data Wizard

    Tabling, legend creation and QTO workflows leave a lot to be desired in Civil 3D, forcing to use many different subpar tools, or worse, performing the work manually. With Data Wizard you can scan any number of drawings for AutoCAD and Civil 3D objects to generate legends, tables, QTOs, and more, all to company standards, and all automatically. When drawings change, refresh tables to automatically incorporate updates. Save out templates for quick recreation of custom tables and legends.


    For more click here