One of the most essential features in Bluebeam that will help all users to organize themself is maybe one of the less known; Profiles.
Profiles in Bluebeam are important. It is not just about having a custom interface. It’s more about having an organized tool that will make you more efficient to work and you will be able to deploy at large in your department. In addition to the interface, by exporting a profile, you export everything you customized in Bluebeam (including Tool Sets and Markup list columns). So everybody is unified in their work.
How to create a profile
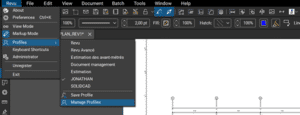
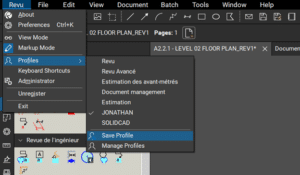
When you start Bluebeam, you will first go to the Revu menu and click to see the menu show up. Then go to Profiles and select Manage profiles:
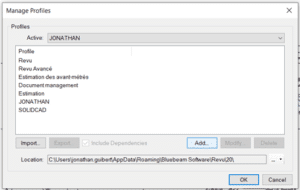
A dialog box will open, and you will be able to add a new profile:
Click on Add… and another window will open (don’t worry there is no more after that)
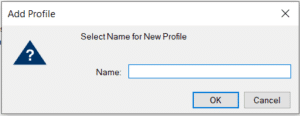
Add your name or your service/department name and click OK. Your screen will flash (don’t worry it is not exploding) and now you are in your profile.
You will notice it looks like the previous one you were in. That’s normal. Revu doesn’t want you to create everything from scratch so it uses the last profile as a canvas you will work on.
But the first step is done. Let’s customize it:
How to custom my interface?
Before customizing your profile, you will need to ask yourself what you need to do with Bluebeam. This little brainstorm will be valuable to know what we will show and we will hide.
From there you have 3 ways to do it.
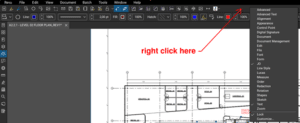
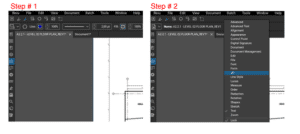
The first will simply consist of right-clicking where the current icons are to bring up the toolbar’s menu.
Then select from the available menu the toolbars you think you need. When you have done this, the selected bar will be displayed in your interface.
Now we will see how to create your own toolbar.
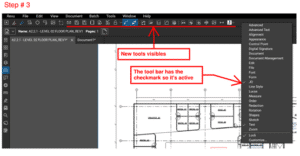
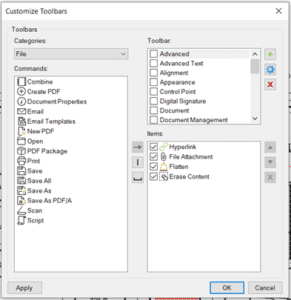
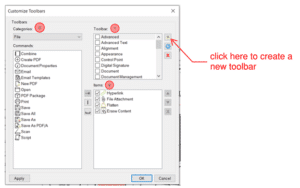
To do this, right-click at the top of the screen to bring up the toolbar menu and select Customize
A dialog box will open to allow you to customize existing toolbars and create your own toolbar
In order to facilitate the understanding of this part, we will identify each part and detail them:
1- Toolbars
These are all the toolbars that currently exist in Bluebeam and this is also where you will be able to create your own
2- Items
These are the tools which are the toolbars that we select in part 1.
3 – Orders (and Categories)
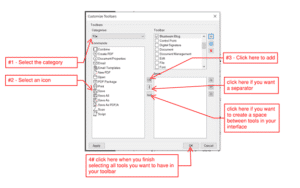
This is where all the tools Bluebeam offers are located. These are classified by category
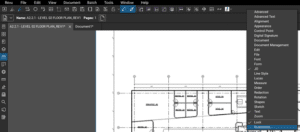
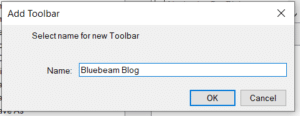
To create your own personalized toolbar, click on the icon and a window will show up
Name your toolbar as you wish and click OK
After that, we are going to select the tools that we are going to need for our most common tasks and add them to our custom bar.
The tools that we will put must be the ones we want to have at hand because they are the ones we will use most often
Finally, let’s see the 3rd and final way to add tools to your custom bar.
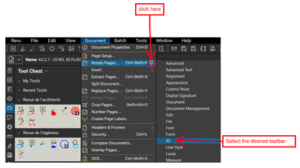
When you navigate the Bluebeam menus to choose a tool, you will notice a pushpin next to the name of the tool. Click on it to bring up the menu of toolbars.
Select where you want to add this tool (in which bar) and now the tool is available on your toolbar.
Remember to save everything by going in Revu →Profiles→ Save Profiles before closing Bluebeam.
Export a profile
To export a profile and everything in it, go to Revu → Profiles → Manage profiles.
Select the profiles to export and click on Export. Choose the location where your profile will be exported. Copy/paste it into an email and send it to everyone who will work with it from now on.
As many organizations across the globe begin to bring employees safely back into the office after months of remote work due to the COVID-19 pandemic, facilities managers are emerging as critical players in the transition. And Bluebeam Revu is essential in making it happen.
While employees have been busy adapting to working remotely, facilities leaders have been spending much of the last six months preparing for employees’ inevitable return to the office—whenever that may be.
For many, that day won’t come until later in 2021. Several large companies including Google, Facebook and Salesforce.com have announced that their employees won’t be required to return to company offices until as late as August 2021.
Others are considering embracing remote work indefinitely. Twitter is giving employees the green light to consider the option, which will allow many of its employees to permanently escape the high cost of living around the company’s home city of San Francisco. Facebook CEO Mark Zuckerberg, meanwhile, has said that the social media company will eventually move toward having half its workforce remote by 2030. The Menlo Park, California-based company also just hired a director of remote work as it plans for the shift.
Not everyone, however, is embracing the remote work movement. Reed Hastings, founder and co-chief executive of Netflix, recently told The Wall Street Journal that he hasn’t seen any positives from full-time remote work. “Not being able to get together in person, particularly internationally, is a pure negative,” he said.
A big, but manageable, undertaking
Organizations are anxious to get employees safely back into the workplace, and determining what that will look like is a complex process, according to Candice Stong, a project manager on Bluebeam’s facilities team. This team manages the construction technology company’s global office portfolio, including its Pasadena, California, headquarters as well as offices across the United States, Europe, the U.K. and Australia.
“To say it’s been crazy over the past six months is an understatement,” Stong said. “We all work from home now, but, eventually, we’re going to be back in the office. So, we have focused on what that will look like according to the requirements set forth in the various safety protocols.”
All workspaces are not created equal, and for most organizations, updating the workplace to meet the various public health protocols is necessary. In recent years, many companies embraced open, flexible, activity-based spaces, along with densely populated workstations with assigned seating. Others adopted a flex-work model using “hot-desking.”
These strategies, which allowed for increased density, have created a challenge given physical distancing requirements in a post-COVID environment. For Bluebeam, clusters of workstations situated closely together wouldn’t suffice to maintain the six-foot physical distance between employees necessary to meet public health protocols. Narrow hallways would have to be re-routed into one-way paths.
Rules around conference room occupancy and use would need to be instituted. In-office kitchen areas would need to be reimagined, along with the common areas and other informal gathering spaces.
Additionally, floor markers, as visual cues, ensuring physical distance requirements are met, as well as zones for temperature checks, are markings that were included on the return-to-office plan documents.
Enabling quick-and-nimble planning
As the early weeks of all-company remote work settled in, Stong began receiving inquiries from vendors offering to assist Bluebeam with workspace reconfigurations and occupancy management solutions considering the likely post-COVID requirements to come. “With access to Revu, utilizing outside resources to manage the return-to-office workspace planning didn’t seem to make sense,” Stong said she remembered thinking at the time.
Given the uncertainty of the pandemic and how our workspace would need to adapt to continuous changes in health protocols and government agency requirements, Stong said she needed to be more self-sufficient with creating relevant workspace plans and be swiftly responsive to changes.
“Being solely reliant on third-party vendors to map out the future of our workspace would take time and money,” she continued.
The larger situation surrounding COVID-19 was seemingly changing each day, which meant occupancy management and workspace reconfigurations required for a safe return would need a quick-and-nimble approach. An approved plan one week might become obsolete the next.
Even for facilities managers that choose to work with an outside resource, it would be smart for them to collaborate in the reconfiguration effort as much as possible. This way, if and when last-minute changes do come to light, the facilities manager can work with the plan documents themselves to institute the change—all without having to wait for the contractor or architect to respond under potentially tight approval deadlines with regulators.
“I think the challenge is facility teams now need to know their buildings better than ever,” said Ryan McGuinness, Bluebeam’s North American enterprise sales director, who interacts often with facilities managers at construction and architecture firms. “They’re trying to do whatever they can with the tools they have, but then they also need to communicate that information to the masses.”
What’s more, facilities managers’ ownership of the return-to-office plan and redesign allows them to take advantage of learning how to use some of the tools their architectural counterparts use to plan and plot out changes. Of course, becoming an expert in the tools architects use for design—like Revit or AutoCAD—is likely unrealistic. Luckily, there is another industry standard tool that is easy to adopt, putting the power in facilities managers’ hands.
Enter Bluebeam Revu
That tool is Bluebeam Revu, whose intuitive PDF markup and editing capabilities make it a manageable but powerful tool for facilities managers to learn when it comes to creating, managing and communicating return-to-office workspace plans.
Aside from detailed and industry specific reconfigurations and markups that will need to take place in workspace plan documents, it’s likely that many non-technical company stakeholders will eventually need to view and sign off on any final plans. This makes Studio in Revu, Bluebeam’s cloud-based document management and real-time collaboration portal, a valuable tool for accessible document communication and approvals.
“I see a lot of our customers being able to use Revu’s advanced markups to give a visual story of what’s going on with their current layout and with what needs to be changed,” McGuinness said. “And then also being able to communicate that through Studio to anyone involved. Studio is going to give you an audit trail of all those markups.”
Revu tools for facilities managers
There are specific tools and capabilities facilities managers should be using in Revu when embarking on return-to-office planning.
Basic Markup Tools: Simple markup tools like rectangles and circles, etc., can be used to identify and manage occupancy and physical distance requirements, with fill colors to designate, visualize and communicate various seat assignments. “You could do colored rectangles and place them over desks, but they can still have opacity,” said Andrew Gaer, Bluebeam’s technical account management director.
Custom Line Styles: Revu allows users to create custom line styles to designate different things. For instance, if a facilities manager wanted to present changes in “path of travel” on the return-to-work plan documents for specific hallway traffic, they can use a custom line style that has text in line with that, according to Omar Sheikh, Bluebeam’s senior professional services manager. “It could also be a text box even that says, ‘Temperature Check Station,’” Sheikh said.
Image Markups: Revu allows facilities managers to take photos of certain things in an office or use web-based images to indicate hand sanitization stations or floor markings and include them in the PDF for employees to view and reference. Gaer said this tool could be used to take pictures of temperature check or hand sanitation stations, for example, so office workers can see exactly where they should look for when they return to the office.
Sketch to Scale: This allows facilities managers to create shapes such as circles or rectangles to the exact scale needed for an office plan. If a facilities manager wanted to designate an area as off limits, for instance, they could use this tool to create a rectangle with the exact dimensions of the real-life area. Also, if a facilities manager wanted to create a circle designating six feet to mark up areas requiring strict physical distancing protocols, they can use this tool to do it.
Legends: The markups Legend is able to help facilities managers create a plan document that will ultimately be simple to understand for any collaborators or viewers either marking up, approving the plan document or using the plan when back in the office.
Calibration: This tool will allow facilities managers to determine the proper scale for the plan document. This will ensure all measurements moving forward will be accurate—an important element considering that proper distancing and spacing is required in a return-to-office plan document.
Studio: Once an initial draft of the return-to-office plan document is ready for review and additional collaboration, facilities managers can manage the document (or set of documents) in Studio Projects, Bluebeam’s cloud-based document management solution. They can then start a Studio Session to invite several different reviewers or collaborators to add notes and make markups of their own in real-time no matter their location.
Tool Set: Facilities managers will likely need to make changes to their plan for multiple locations within their organization, so they’ll want to add these newly created tools to a Tool Chest in Revu so they can easily be accessed for future use.
Digital dashboards offer teams a centralized, easily navigable hub for critical project documents and information. Don’t create one without making these considerations
Construction projects are loaded with complexity. Hundreds—sometimes thousands—of documents are assembled and distributed to scattered teams on frenzied jobsites, where dozens of subcontractors are hard at work building off carefully detailed plans.
Time is money in construction, which means clear, accurate and expedient transfer of information is paramount to a project’s success. Aside from the hordes of design plans (many now digital) construction workers need to efficiently complete their work, there are several additional resources that they need at their disposal, most of which live on the internet or in other cloud-based tools.
Thankfully, the evolution of construction technology, digital transformation and collaboration have made accessing and organizing this information more convenient. Bluebeam Revuis one of the tools that has grown to help construction, engineering and architecture workers in this area.
Revuallows users to create customized digital dashboards for their project teams so that all relevant construction documents and supplemental reference information can be neatly organized and accessed through Studio Projects—regardless of whether team members are in the field or in an office.
“The whole point of a digital dashboard is to eliminate that file hierarchy of folders and eliminate the time spent looking for files,” said Lillian Magallanes, Bluebeam’s industry alliances manager, who has extensive experience creating digital dashboards.
Building digital dashboards in Revu and providing collaborators access via Studio Projects can be as simple as hyperlinking to a few of a project’s most-relevant design documents or as comprehensive asoutfitting an intricate web of links using JavaScript to create a one-of-a-kind branded experience. The final product can beused not just by project teams during construction but also by owners and facilities managers throughout the building’s lifecycle.
Here are four considerations to keep in mind as users build out digital project dashboards:
Start with the end in mind
What type of worker will be using the dashboard to retrieve information?
Will they be architects or engineers in an office on a desktop computer or laptop? Or will they be field superintendents or subcontractors needing to track down a design spec in the middle of a hot, blistering day on a jobsite?
What’s more, aside from the user’s environment, what frame of mind might they be in when looking for the information linked in a digital dashboard?
Starting with this end in mind, according to Magallanes, is essential before starting to assemble a digital dashboard in Revu. “The last thing most people involved in a construction project want to do is have to learn something new that is complex just so they can find a file and send it to someone else,” Magallanes said.
Map out information and navigation
Once the frame of the end-user’s mind has been determined, then it’s time to map out the navigation of where the different hyperlinked buttons and elements of a dashboard will lead. Simple dashboards may only include a handful of buttons leading to the mostrelevant design documents.
More comprehensive digital dashboards, however, may involve a few different layers of navigation that allow users to find and access disparate pieces of information for a project in a few quick clicks, while also linking to tools and resources either found on the web or as part of other cloud-based digital applications.
“This is really going to help someone think what levels of information need to be brought up,” Magallanes said.
Understanding how information is presented—as well as the user experience of navigating through it—is essential when building an effective digital dashboard.
Bolster collaborator access with Studio Projects
Creating a simple-to-use project dashboard is only half of what makes it so valuable. The other half is ensuring that the people using it can access it easily and efficiently.
This is where Studio Projects, a document management capability in Revu, comes in. After creating and configuring a detailed dashboard in Revu, the mostefficient way to make the most out of it is to host it for both internal and external collaborators with ease through Studio Projects.
Hosting a project dashboard in Studio allows teams to access corresponding documents from the dashboard without having to leave the Studio environment. This makes accessing often-viewed documents faster since those documents are not hosted in a company’s protected server or other cloud-storage service but in a shared Studio Project.
Consider making design a priority
Some projects may see a digital dashboard as a simple, easy-to-access portal for a few significant project contributors on a jobsite. Others, meanwhile, may decide to build something expansive for a large build where dozens and dozens of subcontractors are using the tool, oftentimes jumping in at the mid-point of a project.
Still, for some general contractors, creating a comprehensive digital dashboard is an opportunity to create a branded experience—not just for the subcontractors collaborating on the project, but the building’s owners and facilities managers after the building is fully operational.
These situations might call for a more extensive and thoughtful digital dashboard design using enhanced graphic design and web-development tools.
“Larger contractors are definitely going to want to invest in creating something beautiful that’s aesthetically pleasing,” Magallanes said, “because that project dashboard is something that is going to the building’s owner, so it’s something that the owner and their team are going to use and remember.”
Smaller contractors, however, may not feel like they need to worry about design if they’re simply looking for something functional. But if the dashboard is going to be viewed by other contractors—or even owners—it might be worthwhile to ensure the dashboard is built with the end-user in mind. If the owner will eventually view it, design might be more critically important; if the dashboard is only for workers in the field, a basic setupmay be more acceptable.
Keep it simple
Above all, don’t be overly concerned with creating an expansive digital dashboard if the team or project doesn’t require it.
The goal of a digital dashboard is, after all, to reduce complexity and the amount of time workers spend looking for relevant project files. The less users have tothink when using the dashboard, the better.
“We’re reducing learning time, we’re reducing the time looking for files,” Magallanes said. “And we’re also just reducing the number of clicks that people have to get through. We’re trying to expedite the information for the right person at the right time.”
Now your project is created, you will need to upload all documents needed for your project which need to be shared with your team or your partners in the project.
To do so, select between adding a folder, a file or create a new folder with its own structure
Note: In this part, I strongly recommend using the same folder organization you are using usually in your company. Remember you are creating a copy of your documents where they will be updated. It does not mean it will automatically update the folder on your computer. Only the documents stocked in Project will be.
From now on, you have uploaded your project files and you are ready to collaborate with Project. But before starting, there are some rule you will need to know in order to understand how to work with it.
How to Use Projects and Projects with Sessions
As you should know now, we are working in a document management context. It means there are a bunch of securities and processes to protect every user. Check in / check out is part of it.
Basically, when you will need to use a document, you will have 3 choices; open it for viewing, open it for working on it, open it to work on it with collaborator.
The first one does not require to check out the document. As you will not change anything, there is no need to create a new version.
The 2 others will require every user to check out the document from project to work on it and, at the end of your work, check in the document as new version in order to quickly sum up what you’ve did.
Checking out a document means you lock the document for edition to other users the moment you are using it until you check in the document in Project.
When you check out the document, it will appear on the right side of Project’s interface as Pending
Click on it and start working.
You will notice a specific icon in your document’s tab. Depending of the status of your document, the icon will change. If you click in this icon while working in a check out document, you will access a menu.
If other users try to open the document when it is checked out, they will only have the possibility to download a copy on their computer, but they will not be able to overwrite your document (unless doing so manually by the administrator of the Project).
If you need to work with other people at the same time on a document hosted in project, it’s quite simple. Just, right click on your file and choose Add to a New Session
Now, Bluebeam will launch the dialog box of Session where you will name your session. You will be able to invite people with email address in the Session interface directly to work with you.
You will run this session like you did so when you create a Session directly (without using Project) and finish it as usual.
But this time, you will need to check in the document once the session is over in order to save the new version of your plan in Project. You have two ways to do this;
Once you finished the session, the icon of your tab will change from a whiteboard to a Check Out icon .
Click on it and select Check In. Then write a comment to explain what has been done and Check In.
Or, you can go back to your project interface and do the same with your document that will be in the right side of the interface under pending.
You know now how to start and set up a Project with Bluebeam. For sure, there are some advanced options we did not developed in this tutorial (creating group with different rights in the session, make some files viewable by certain user only, synchronizing documents, Managing and supporting Studio Session and Project with Studio Prime, connect Studio Session with BIM 360 …).
But we will see that in a future article depending of your comments and feedbacks
Quick FAQ
What type of document can I upload?
All type of document. Users who would need to access these files will have to own the software required to run / open the file (except for PDF which will open in Bluebeam)
What is the limitation of Studio Sessions and Studio Projects?
Description
Studio Projects
Studio Sessions
License Required
Host only
Host Only
Bluebeam ID required (free)
Yes
Yes
Formats supported
All types of files
PDF Only
Max file Size
Unlimited
1 Gb each document
Max files allowed
Unlimited
5000
Max space allowed
Unlimited
Unlimited
Max attendees at the same time
Unlimited
500
Scheduled Expiry
No
Yes
How much time my documents will be hosted on Bluebeam server after finishing and deleting my project?
90 days maximum unless you need more time. The save on Bluebeam Cloud Server are not accessible by anybody else (not even Bluebeam employee) and has been created to let user have a chance to download their document if they forgot to do so.
Why should I put an expiry date in my session?
It’s your choice to do so. It exists to be part of a process and avoid having to bump a limit because you forgot to close a session. Remember you could use Studio with partners outside your organization. Depending of the size of your project, 500 users can be easily reach. So, you better want to organize a process to avoid the situation.
Studio Project is a cloud-based light document management system that allows people to centralize and access their project data using Bluebeam Revu Interface. Files within Studio Project can be checked out for editing (ex: revisions) and checked back in to create different version of a single document instead of creating multiple duplicate of the same or, overwriting important data.
Before Starting
1ST STEP – Create a Bluebeam ID
In order to be able to use Bluebeam Studio services, you need to create a Bluebeam ID. It’s free and simple.
Basically, open your Bluebeam Revu, then go in Bluebeam Studio section and click on Sign In
Right after, the following dialog box will appear fill the form and finish by clicking on CREATE AN ACCOUNT button
You will have to review the terms of use and click the I ACCEPT button if you agree with these terms. A confirmation email will be sent after to confirm your Bluebeam ID.
Check your email (and spam box if you don’t see the email in your INBOX after 5 mins) and confirm your Bluebeam ID.
You are now set to start using Bluebeam Studio.
Part 1: Creating a Project
As previously written, Bluebeam Studio Project acts as a single source of truth for all your project documents. So, to maintain this statement, you will need to be able to understand what you can or cannot do with Studio Project. You will also need to know how to set up a project, to configure permissions and to share the information internally or externally.
To create a new project, go to Bluebeam Studio section and click connect. From there, you have 2 options: creating a Session or creating a Project.
Now, select Projects and then, click on the + (add) button (as circle in red) and select New Project as shown in the picture below
After doing so, a dialog box will appear, and you will be asked to name your Project
Let’s start from here. Most users are not familiar with Bluebeam Studio although it is becoming more and more useful and popular these days. So, let’s dig into to it and take a look at both Studio Session and Studio Project.
Studio Session:
A live collaboration tool that allows you to share and annotate your plan with your team with some restriction.
Studio Project:
A document management system that allows you to host, share and manage your document with an organized process and management tools.
So basically, you host your documents in Studio Project and use them in Studio Session to mark them up with your team. Not that complicated, eh?
Now, let’s jump in to see how to launch a Session and how to set your Project.
Creating a Session:
Go to Studio Icon –> Select Session
Click on + and select New Session or Join Session
If you decide to join an existing session, enter the Studio ID of this session and click OK
If you create a new Session, a dialog box will appear
From there, name your session, and upload one or multiple plans you need to work with.
Then, in Options, select what you allow your user to do with this (these) document(s) or even if you want, allowing them to upload documents. You can even set an expiration date and hour for the session.
Afterwards, your session will launch and this dialog box will appear
It will be here where you will need to invite users to join in your session. You can even add a message to give them a bit of a context.
If you are using Studio Project and already set Users groups, you can use them in Studio Session (even if the document is not hosted within project).
Last option, the Address Book. You can use your own address book to invite people.
Now your session is started, make sure to work on the right document. To check that, you need to have this icon before the name of your document in the tab like the picture below.
From there, you will be able to annotate and communicate within Studio Session. However, remember Sessions do not allow for changes to a PDF’s “core content ». It means you can place Markups and delete your own notes, but editing other attendee’s Markups is not allowed. You can think of this as, you are allowed to do “Surface Level” (adding a markup, editing a markup you added in the Session) changes to the PDF, but anything that goes deeper (form fields, adding pages) is not allowed. This is all to maintain the integrity of the PDF while multiple users are all collaborating in real time.
Note about sessions: you can be invited or initiate multiple session. To leave a session, click on the icon and select the session to go back in it.
Finishing the session:
You finalized your revision with your team and are ready to go so now, it’s time to finish your session to.
To do so, click on the icon (#1) and a Dialog box will open. From there, you can overwrite the existing plan or save as new version of your plan.
Also, don’t forget to generate the report of the session. It will keep all information that have been produced in this session (from markups to messages written in the chat)
FAQ’s:
What happens if I have a new version?
Close the actual session, export all markups (or only the ones you want to bring to the next session) and then re-upload the document in the session.
Can I erase markups of other users?
No. It is part of the process to not be able to erase other user’s markups. Remember, it’s also a tool to help you track every notes and changes on plans.
You will be able to erase markups outside of the session. But there will always be a trace within the Session log.
A font that’s installed on your computer doesn’t appear in Revu.
Causes
The font type isn’t compatible with Revu
Revu supports TrueType (.ttf) and OpenType (.otf) fonts; any other font type isn’t compatible.
The font file isn’t saved to the correct location
Revu uses fonts that are saved to the following folder: %SystemRoot%\fonts. If a font doesn’t appear in Revu, it may not be saved to the correct location.
Solution
Save the font file to the correct location
Try this solution after confirming the font type is TrueType or OpenType. You may need administrator privileges on your computer to complete these steps.
Many users create PDF files from AutoCAD products as PDF seems to be the standard digital format. There are three issues you may run into and some settings to consider if you use Bluebeam Revu as well as AutoCAD.
Viewports
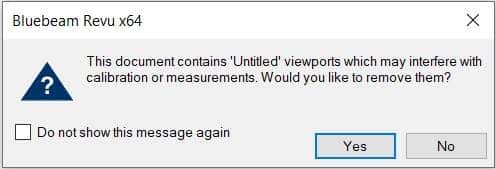
First, you may see this message when opening PDF files using Bluebeam Revu (not the free viewer) which were created from AutoCAD using Autodesk’s DWG to PDF print driver. These “viewports” are artifacts contained within the PDF file to which Bluebeam Revu alerts you when you open a file containing them. ALWAYS say yes to removing these artifacts. If you don’t, they will very likely affect the accuracy of any measurements you make in Revu. If you skip past this message without selecting Yes, the viewports can be removed from the PDF in Revu’s measurement panel.
Why do they exist in the first place? It seems to be an issue with Autodesk’s DWG to PDF.pc3 file. PDF’s created using Bluebeam’s PDF printer do not contain these anomalies. Here is an Autodesk discussion group thread discussing these viewports. Interestingly, it indicates that these viewports can cause an issue when measuring using Adobe Pro, but there appears not to be a solution there, where Revu does indeed catch the existence of them.
Searchable Text and SHX Fonts
The second issue is searchable text. Many AutoCAD users still use Autodesk SHX fonts. There are several reasons to avoid using SHX fonts; not the least of which is that when a PDF is created containing them, that text will not be searchable when opened in any PDF reader software. If you want your recipient to be able to search text, and you very likely should, do not use SHX fonts in AutoCAD. Use a True Type font, such as Arial instead. This is with one exception. With Bluebeam Revu, SHX text is in fact searchable, but you must enable “Search Markups”. More detail about this I the section below “Odd Markups”.
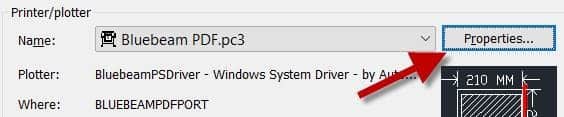
If you’re a Bluebeam Revu user with the CAD version or better, and you prefer to use its PDF print driver instead of Autodesk’s, there is an option to enable SHX fonts as outlined in this article. Better, do use a True Type font as mentioned above, but there is one more setting you must enable. A PC3 file must be created using the Bluebeam print driver and then this option set in the printer properties in AutoCAD. It defaults to TrueType as graphics and your text will not be searchable if it’s not changed.
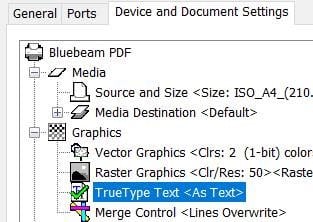
Odd Markups in Revu
Lastly, using Bluebeam Revu (not the free viewer) to open a PDF created by AutoCAD using its DWG to PDF printer, you may see “markups” already contained in the PDF. There will be one markup for each text object in the file, indicated by the AutoCAD SHX Text author. That adds up to a lot of markups if it’s a file with many text objects. This can affect the performance of the file within Revu and they will definitely be in the way when creating normal markups. These markups are only required if you need to search SHX text; they cannot be deleted with Revu tools. They can be Flattenedin Revu prior to adding your own usual markups, or they can simply be filtered out if you don’t wish to see them. Don’t worry, the text in the PDF will not disappear. I do not have access to Adobe Pro to see if this is an issue there as well.
These “markups” are created when printing from AutoCAD using the DWG to PDF driver and it is an Autodesk feature. In AutoCAD, there is a variable named PDFSHX. Turned on, a value of 1, enables these “markups” in the PDF file which results in searchable text. Turning it off will result in no “markups” and non-searchable SHX text. Here is an Autodesk document outlining this feature. SHX text may or may not be searchable depending on the PDF reader in use. For example, the Bluebeam Revu free viewer cannot search SHX text, but the paid version can.
This issue does not occur with PDFs created in AutoCAD using Bluebeam’s printer driver.
In light of many states’ stay at home orders in light of the nationwide COVID-19 pandemic, many professionals in the construction, architecture and engineering world have suddenly transitioned to working from home for the foreseeable future.
Construction is still considered an “essential” business in many states, meaning many field workers are still heading to jobsites each morning. However, industry workers who spend most of their time collaborating with coworkers in an office are now dealing with the new reality of remote collaboration on projects, presenting some new challenges—and advantages.
In an effort to share and highlight how industry professionals are making this transition, the Bluebeam Blog will be publishing a series of video interviews with individuals to see how their work-from-home transitions have gone so far.
In this first installment, we talked with Gautam Shenoy of Steinberg Hart. Here are the highlights from our conversation, along with time stamps of those parts of the video in case you want to skip ahead.
[00:30] Is the construction industry still working as “normal”?
“The industry is definitely humming along. … We haven’t seen a slowdown on projects that are in construction; we have seen a little bit of a change in the pace of projects that are ongoing but on the drawing board, so to speak.”
[01:15] What has changed most since working from home started?
“I think what’s changed the most is the way we communicate. We were so used to being in an office and emailing each other. I feel like it has really changed. I feel like working remotely has sparked video conferencing and teleconferencing and taken it to a new level. People are now wanting to constantly keep in touch with people even though there’s no physical presence.”
[02:07] How has working from home changed some job tasks?
“One of the things that I wanted to point out is that Bluebeam has always been ahead of the curve, and I say that as even before the idea of cloud-based collaboration was so mainstream as it is today. Regardless of where you are, with Bluebeam Studio you are able to keep working on a project. On a day-to-day standpoint, not only are we using Bluebeam as we always have, but we’re also using other platforms like Microsoft Teams to plan and track our goals.”
[04:21] “Designers have a completely different way of communicating. You have to understand that in the design realm, the way people communicate in the design phase is so different than when people are marking up drawings and tracking benchmarks. So, Bluebeam has become sort of a preferred methodology of communicating even in the design phase.”
The Batch Link® feature automatically creates hyperlinks for a group of PDFs, like when you’re working with a multi-drawings set or details on drawing sheets. You can specify the criteria used to create these hyperlinks or automate the process using filenames, page labels or the AutoMark function.
You can also use Batch Link to:
Create a navigational link on your title block that takes you to the sheet index.
Add Studio Project files to the Batch Link wizard.
Learn how to take your batch linking to the next level with these tips!
Use Batch Link to create a home button from the title block
If the set of files you’re going to batch link contains a title block, you can use it to create a navigational link that takes you back to the sheet index, similar to a home button. All you have to do is swap out the search term generated in the Batch Link wizard (usually the sheet number) for your project number. If you don’t have a project number, you may use any text string found on the title block of every page.
First, select your PDFs for Batch Link
Go to Batch > Link > New. The Batch Link wizard opens.
Add the PDFs to be processed.
Select Next. The second page of the Batch Link wizard opens.
To generate your list of search terms, choose the Page Region option, then click Select.
Next, define a region on the PDF and generate Search Terms
Click and drag to define a region on the PDF. When the region has been defined, the AutoMark dialog box appears. Click OK when finished.
When the correct sheet number displays next to Search Term in the Scan Preview section, click Generate. The Manage Links list is automatically populated.
Lastly, look through the Search Terms and edit destination
Look though the generated list of search terms to ensure they match their correct destination.
Change the search term for your project number (or any text string from the title block).
Select OK, then Run.
Now you have a link on your title block that takes you back to the sheet index.
How to enable Studio Project files for Batch Link
Have you ever wanted to Batch Link your Studio Project? You can do this by adjusting your Studio Preferences.
To enable Studio Project files for Batch Link:
Go to Revu > Preferences (Ctrl+K).
From the sidebar, select Studio and then Options.
Clear the Open and save files to Studio from toolbar only check box.
Open the Project file.
Go to Batch > Link> New.
Select Add Files and add your Project files.
Now you can add your Project files to the Batch Link wizard.