• How Concrete Contractors Can Best Use Bluebeam Revu

    This story was originally published by Troy Degroot on the Bluebeam Blog.

    I’m a firm believer that every specialty contractor could benefit from implementing Bluebeam Revu in their everyday workflows. For this article, I’d like to highlight a concrete contractor’s position from bid to built.

    There are a few important objectives we find in any construction project. I’d like to walk through how Revu meets those requirements. If you’re interested in learning more about how these can be done in Revu, have a look at “5 Ways Concrete Contractors Get the Most Out of Bluebeam Revu.”

    Every company is different in how it approaches projects. In this article, I want to highlight the possibilities so you can see where Revu fits and what customizations may be required to make it fit your unique needs.

    Let’s look at those project objectives.

    From the first time you open the request for proposal (RFP), there are things a project manager starts to think about even before they open the drawings—and even more as the plans rollout.

    Project Location: Do we have crews in the project location, or do we need to accommodate for travel expenses? While Revu may not have a “location cost” built into the available tools, it is possible to develop these. Perhaps you want to have a pulldown menu with specific cities or areas where you perform work regularly. Along with the locations in a pulldown, you could also associate a percentage markup to account for that area based on historical project data.

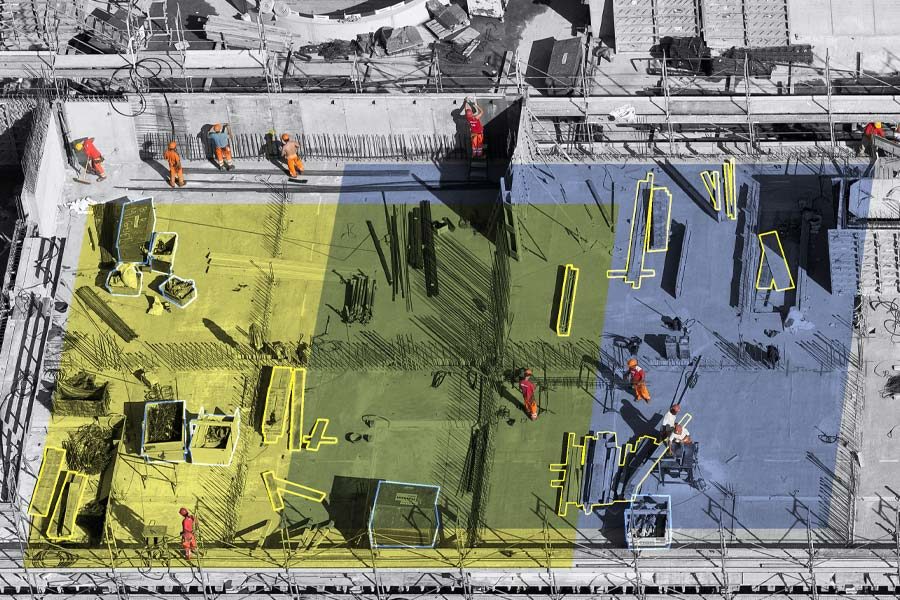
    Pour Dates and Schedule: Do we have crews available to meet dates and project phases? For large development projects with phases, we can use the Spaces feature in Revu. Simply draw a Space shape around an area of work and name it “Phase II.” By doing so all the slabs, curbs, etc., will be categorized in the markups list under the Phase name. This makes it easier to allocate crews, materials and equipment based on the specific requirements of each phase. We can also track the progress using the built-in Status column where crews can mark each day’s progress on what slabs, walls or foundations were completed.

    Equipment Required: Just like labor availability, we need to consider equipment availability for things like forms, trucks, curb or cross pan machines. Creating custom tools in Revu, you can place a symbol within a “Phase” indicating what equipment is required. You can even allocate a rental price per day for the equipment cost estimate.

    Estimate: There are great measurement tools included in Revu allowing you to calculate area of slabs, volume of isolated pad footings or linear footage of strip footings. The versatility of Revu and our ability to customize tools opens the door to personalizing your markups and what data is generated. We can differentiate types of pours by color, linestyle and hatch patterns, or even add labels to display a description right on the drawing. We can also add parameters like design mix, hand vs. machine, or whether fiber mesh or WWF is required. In some cases, we could even estimate the rebar required or the number of trucks need to be scheduled based on cubic yards.

    Finish Requirements: We need a clear understanding of finishes like construction/control joint layouts, stamped design, smooth or broomed, color stained or saw cut requirements. Applying different colors or hatch patterns to the markups will clearly identify those areas in a clear and visual way for the estimator and the crew in the field. A custom line tool representing saw cuts allows you to trace them on plan and quickly apply labor and equipment costs based on a linear footage collected in the markups.

    QA/QC: As a final walk through you can do a punch list noting any damage cause by other trades. You can easily incorporate images or video documenting these damages and what it will cost to fix them.

    Revisions and Scope Changes: Every project has delays for weather, site and utility prep. Often projects have design changes as well and we need to not only stay current but also track and communicate scope changes. These can often change cost and pricing as the scope begins to creep after the original estimate. Revu also has tools called Document Compare and Overlay Pages that will look at two drawings and quickly point out the differences. Document Compare is going to automatically draw clouds around all the changes. Overlay Pages is like the old light tables we used to place physical drawings over one another and see what was different. After finding the changes, your takeoff markups can quickly be stretched or moved rather than starting over. At that point, you have tangible evidence of scope changes for cost updates.

    After reading these objectives and possibilities, you could have one of three responses. One, this article helped evaluate Bluebeam Revu as a solution. Two, you already use Revu, but the article sparked ideas on how your current use could improve. Or three, we confirmed you’re already getting the most out of your software investment.

    How Sets in Revu Simplifies Document Management

    This story was originally published by Rob Dunn on the Bluebeam Blog.

    Digitally creating PDF drawings and sharing them for review and markups through the cloud saves lots of time for professionals in the architecture, engineering, and construction (AEC) industry. But constantly organizing and tracking the huge volume of files and folders created daily is a challenge.

    When team leaders or project managers need the right set of drawings in the right hands in a quick and organized fashion, that can require picking through hundreds of drawings in dozens of folders and sorting or tagging those files into an entirely new folder—which might be replaced next week anyway. And, if anyone errs in updating a drawing or folder, that can cost time to discover and correct.

    Deepak Maini, national technical manager at Cadgroup Australia, is an expert on Bluebeam Revu, as well as a strong advocate for using Sets.

    Maini described Sets as “a collection of multiple PDF files, organized, categorized and displayed in a single view.” He continued: “So, all of the PDFs could be located in separate folders, but the Sets feature allows the document to be displayed as a single document in specified sort order. It’s the most efficient way to work with drawings that cannot be merged because of digital signature or other PDF security reasons.”

    Think of how many sources for drawings go into a project; you’ll probably immediately think of the structural team, the services team, and the architectural team—but that’s leaving out quality and safety, inspections, BIM collaboration, document management, and many other teams that need to access or provide drawings.

    It’s imperative that every team is clear on which drawings and files are the most up to date when they need them, without every team having to continually track changes and revisions for every document.

    Sets organize files without refiling

    Sets in Revu offer a straightforward solution to this challenge that eliminates the need to constantly create new folders to organize files—or the endless clicking that can go into checking what files are up to date across different folders.

    Sets allow users to quickly add and organize PDF files according to both preset categories such as Architectural, Mechanical, Plumbing (MEP), and others, as well as create custom categories.

    Individual files or entire folders can be added, as can files that can’t be merged due to digital signatures or PDF security, because you’re not actually merging the PDFs into a new file. Each drawing remains in its original folder, but the Sets function allows users to view files or make changes (depending on permissions) without creating any further information infrastructure.

    Simply put, you can view or alter files across numerous folders from a single column or window, and you don’t have to endlessly find, drag and organize drawings into new folders.

    You can use Sets to add individual Files, entire Folders, or Folders with selected Subheaders.

    Using sets is simple

    To use Sets in Revu, open the Sets function to create New Sets. Add individual files, and then choose from the Options menu how you want your files organized as thumbnails—by file name or preview, which you can change anytime.

    Next, choose the Categories under which your files fall; built-in categories include General, Civil, Landscape, Structural, and others that are universal to the building and design industries, or you can create your own.

    Once you’ve created your Set and assigned Categories, it’s time for Tags. This is where Sets offer a tremendous advantage in organizing your files.

    You can add as many Tags as you like to files in a Set. So, you might Tag a drawing or file for the purpose of sharing with a particular field installer, or to keep track of drawings for teams coming on different days of the week, or to organize drawings for the review of a safety inspector. Again, drawings can have numerous Tags, but they never leave their original file; they’re simply viewed and edited through Sets.

    Select your own Tags to customize your Sets for unique purposes or viewers and attach as many Tags as necessary to files in your Set.

    The Sets advantage

    Once you’ve created a Set, you have an easily navigable and sortable group with thumbnails, and you’re ready to put your Set to work. The primary functions of Sets include:

    • Uploading a PDF file in a Set to Studio Projects in Revu and setting permissions for viewing or editing
    • Marking up or revising drawings and PDF drawings
    • Incorporating new drawings or PDF drawings
    • Superseding drawings, which are automatically Stamped as SUPERSEDED in their original folders, so there are no issues of drawing redundancy or errors over which drawings are most current
    • Allowing comparisons and overlaying of PDF versions of the same drawings, and tracking changes
    • Exporting the markups list as PDF, CSV or XLS, or printing PDF drawings
    • Creating a drawing log as a PDF, CSV or Excel file, saving time from the tedious process of creating and maintaining one manually
    • A drawing is automatically stamped as SUPERSEDED when changes are made

    Sets have so many useful functions that Maini is surprised its use isn’t more widespread.

    As Maini described it: “I just think that this is one of those features, it’s actually really powerful. Within five to seven minutes, I was able to put together an entire drawing set. In the real world, if people are trying to access all these drawings, they must go through different folders. They must look at all these files. Plus, making sure that they always have access to the latest version of the documents, especially when they must print them, is an absolute nightmare. Whereas this feature, it’s a powerful feature, but not too many people use this and not too many people are aware of this.”


    8 Ways Layers Create Clarity in Revu

    This story was originally published by Troy DeGroot on the Bluebeam Blog.

    ne powerful feature in Bluebeam Revu I think everyone should be using in some capacity is Layers.

    If you come to Revu with a CAD background, you probably understand and use Layers already. For those who don’t, you just don’t know what you don’t know. I hope this article helps shed light on a new opportunity to add flexibility, organization and clarity to your PDF workflows.

    For those old enough, Layers could be described like this: Remember in grade school when the teacher used the overhead projector to show things on the wall or pull-down screen? The surface of the overhead is the PDF when you open it. The clear film they write and draw on is a layer. That layer can be taken off or hidden, turned back on, or you could overlay several different layers to see them all on the screen.

    In Revu, we can isolate categories of markups or flatten them. If you’re not familiar with the Flatten function, refer back to this previous blog post.

    You might be asking: “Where do we find Layers?” There are a few places.

    First, let’s look at the Panels on the sides of the Revu interface. You should see a black vertical bar on the side with several panel tabs toward the top. Right-click below the tools and hover over “Show.”


    There, you’ll then see a list of Panels; click on the Layers option. When it turns blue, that means it’s visible.

    Another place you will see Layers is, when you open a document printed from drafting/design tools, they will often transfer from the original file. To quickly see what Layers look like and how they can be powerful, try the Overlay Pages tool. If you’re not already using Overlay Pages when revisions cross your desk, brace yourself.

    Here are some quick definitions of how Layers could be used for different phases of the project lifecycle.

    Planning: When planning a new construction development, you might use Layers to break down different elements of design requirements. For example, you might have individual Layers for building area, parking, green space, etc.

    Design Review: During the design and review phase, you might have Layers and colors indicating markups needing to be added to the drawings, markups which are just comments to the drafter for reference or internal notes for design intent. You might even have Layers to track first-round markups and another for additional comments after the backcheck.

    Estimating: When I build custom tools for estimating, I like to always include Layers to break down systems or material types. I always reverse engineer the tools and think about how I might manipulate the Layers when the sheet is full of markups. You might want to turn off all the flooring area measurements so you can see all the transition strips.

    Hiding all the concrete slabs will make it easier to see and select the isolated footing, or maybe you only want to see the continuous strip footings. Layers allow you to isolate materials so you can build out the estimate without having all material Layers on at the same time.

    Site Preparation: On the civil design side, you might want to get quantities and differentiate cut-and-fill areas indicating what materials can be reused someplace else on site. If you’re recording progress with site images or survey points, you might organize those by date as well.

    Construction: During construction, we can use Layers to break down your schedule. Looking at the estimating markups, you could determine how many concrete trucks come each day and isolate the curbs, slabs and footing accordingly. You could also use it for site logistics locating material deliveries, job trailers and portable toilets on site with a date layer. Knowing what needs to move on site as the project progresses can keep everyone informed on expectations.

    As-Builts: When on site recording existing conditions, P&ID or verifying installation, Layers can be used to indicate new vs. existing, supply vs. return, gas vs. water piping or to indicate valves that need to be replaced.

    Facility Management: When tracking so many systems in a facility, it can help to keep them all in one drawing and use Layers to organize them. When all the Layers are on, it might seem like an organized mess, but when you isolate the low voltage layer to investigate a network problem, suddenly it’s clean and precise. After you solve that emergency, you might switch Layers for a plumbing issue or verify the dates on fire extinguishers.

    Extra Credit: Incorporate Layers so those markups you do early in a project are still used downstream, eliminating redundant work. I’ve worked with several specialty contractors building tools for the sales team to layout while walking a site with the owner. All the devices are built with pricing, so they immediately have an estimate.

    Those same markups are moved and revised by the engineering team back in the office, with the estimate being updated automatically. When revisions pass through, they have direct visuals of scope creep and price increases. These markups can also be used by the installation team on site, changing the status of each device as they complete the install. In Studio Sessions in Revu, the project manager knows in real time how much work remains on site, helping him schedule the next project.

    As you can see, there are many powerful ways to use Layers throughout all phases of a construction project. I hope you found this introduction to Layers in Revu helpful and you have some new ideas of how you might implement them into your workflows.

    To learn more about layers check out my other blog post, “Understanding Revu Layers Like a Pro.”


    How to Build a Digital Project Dashboard for Plan Documents

    This story was originally published by Bluebeam, Inc. on the Bluebeam Blog.

    Digitizing plan documents is only as effective as your ability to access them as you work. Digital dashboards in Bluebeam Revu make it easy to do both


    While completely digitizing document management remains among the construction industry’s determined priorities, the challenges of truly becoming fully digital don’t stop there.

    Once a contractor completes its transition from paper-based workflows and processes to a 100% digital document environment, the next challenge often is determining the quickest and most efficient way to facilitate the proper distribution of plan documents to all project stakeholders during its lifecycle.

    Even though having an entirely digital document management system is inherently more organized and efficient than a paper-based one, issues around folder structure, file access and viewing permissions are tedious and painstaking problems to solve.

    Enter digital dashboards.

    A digital dashboard is a visual interface that allows for easy access and navigation to a project’s digital document ecosystem. Whether someone is working in an office, jobsite trailer or in the field, digital dashboards allow all project participants a simple way to find, access and view relevant plan documents at the point of need—without having to navigate complicated folder and file structures.

    Digital dashboards are especially powerful for users of Bluebeam Revu, as the platform’s features for viewing, marking up, storing and collaborating on construction documents are made even more optimal by adding the proper visual interface.

    Michael Echave, a senior AEC technical specialist with industry consultancy ATG USA, is a big advocate of digital dashboards. He’s worked with clients in a variety of subsectors in the industry as they seek to finalize their digital document transformations by integrating visual interfaces to make project documents more accessible to workers spread across big and complex jobsites.

    Keep the end in mind

    According to Echave, there are many ways to create a digital dashboard to serve as a project’s document and reference materials navigation hub. Essentially, a dashboard is a hyperlinked page in itself where designers can create buttons and other interface elements to lead users to find plan documents stored in folders in a platform like Studio Projects in Revu, Bluebeam’s document storage capability.

    “You want your end goal in mind when you start to build a dashboard, and then you start peeling back those layers,” Echave said.

    There’s also a lot of flexibility in where dashboards are built. Of course, Bluebeam Revu is one option, using the markup tools to create navigable buttons that link to subfolders within Studio Projects or other document storage systems.

    An ATG project dashboard homepage.

    Once construction professionals have determined the program they’ll use to build the dashboard, it’s important to determine how many layers of navigation the dashboard will include. Dashboards can be as simple as having one homepage with several links to single-layered subfolders, or they can include several layers of complex subfolders that lead to different types of documents and reference materials, such as websites or other online resources.

    What’s more, a project may have multiple dashboards. For instance, field workers might work off a simplified dashboard for easy access, while engineers, designers or architects in the office may decide to have a more complex dashboard at their fingertips.

    Regardless, Echave said every dashboard will include a home page that features different links, or “actions,” that serve as clickable buttons. These buttons bring users to different subpages that help them refine their document search. Buttons can lead to PDF documents or entirely different applications or websites. The image below is an example of an ATG digital dashboard home page:

    Each subpage will include more interactive links, allowing users to navigate to even more subpages in the dashboard. The free storage in Bluebeam Studio Projects makes the possibilities of layers and subpages virtually endless.

    Critical steps to building a dashboard

    Pick a background

    Digital dashboards can be elegantly designed with compelling visuals or made simple with solid color backgrounds. Consider who the user will be for the dashboard when determining its design. Workers in the field may prefer a more straightforward design, Echave said, while architects or design professionals may find more complex design elements more engaging.

    Echave said when building dashboards, he typically uses an 8.5 X 11 for his border size. Then he inserts a logo.

    Use markup tools

    Next, Echave advises using markup tools such as rectangle, ellipse or polygon to place shapes that are colored and filled.

    Ultimately, this is the opportunity to consider how the dashboard’s subpages will be organized, which will inform the layout of the home page. Also keep in mind that the homepage will also serve as a template for the different subpages.

    Create links

    Using the text box markup in Revu, create links to different subfolders. Echave said images can also be used as links. Make sure that interactive icons and clear fonts are used as well, Echave said; this keeps the dashboard visually appealing for users.

    With the layout complete, add links to the static actions. For instance, the area highlighted in the image below will never change in any of the dashboard’s subpages. Users can also add static popup windows.

    Copy page to add multiple subpages

    Once this initial template is built, it can be copied via the thumbnails panel in Revu. Echave said to create as many subpages as needed to organize the digital dashboard. Users can also save text boxes or any markup into the Tool Chest as a custom Tool Set to allow users to replace them later on or on future dashboards.


    Once the outline has been copied for the dashboard’s intended page count, Echave said users can then start to reorganize each subpage, such as Site Plan and Submittals.

    After all subpages have been reorganized, Echave said it’s now time to add the link to the text boxes or images.

    Avoid broken links

    Avoid broken links by double-checking that every link works. One thing to keep in mind: if links go to local files on a computer, other users won’t be able to access them. Cloud-based storage like Studio Projects in Revu is ideal.

    When using Studio Projects, Echave said it’s important to set the proper project folder permissions. Project partners who do not have access to Revu can use a free 30-day trial to collaborate in the dashboard; after that, Revu will convert to view mode, allowing users to continue accessing Studio.

    Finally, if dashboards are created in Studio, construction professionals can send out email invitations to different project partners, giving them access to the digital dashboard.

    Maintain throughout project

    Once the dashboard is fully deployed on a project, Echave said it’s critical that it is maintained throughout the project’s duration. Keep it updated by refreshing it with the latest documents while ensuring that no links have been broken along the way.


    The Bluebeam Stapler—Making Working Life a Little Less Complicated

    This story was originally published by Bluebeam, Inc. on the Bluebeam Blog.

    Working on a job that requires numerous PDF files to be collated into one manageable document? It’s easy with Bluebeam Stapler.

    What is Bluebeam Stapler? Among other things, it’s a tool that helps users combine individual PDF documents into a single PDF. It can also batch convert a variety of document types, such as PDFs, Word docs, and Excel spreadsheets, into a single PDF file.

    If you’re working on a job that requires numerous PDF files to be collated into one manageable document or master file, and you’d like those files to be added to or amended, Bluebeam Stapler makes the tasks easier.

    Settings and the organization of the individual PDF files can be saved as a stapled job for future use, saving time and resources.

    Illustration by Nico Abbasi


    Making life simple

    Once a file has been established, updates to individual PDFs—which would usually involve creating a combined PDF again—can be done by opening up the previously created staple job, organizing the documents in the way you wish, hitting “staple”—and voila.

    Using Bluebeam Stapler helps your working life be more straightforward. It means not having to worry about slip-sheeting individual PDFs into the original PDF to replace outdated pages.

    It’s really useful when compiling a large document, such as a calculation package comprising many component PDFs.

    Easy to use

    The system’s interface is easy to use. One of the easiest ways to use it is “drag and drop.” You can take the files that you want to combine into a single PDF, select them, drag them over to the window, where you will see the normal Bluebeam combined PDF dialog.

    Naming PDFs using a numerical prefix makes identifying the files easier, as does showing the date that each file was last updated.

    Once you have everything where you want it, you just hit “staple.” The system automatically combines those PDFs, uses the file names of the individual PDFs and can bookmark those for you. Settings are also saved.

    If you want to update a couple of these files in the future, all you need to do is open up the file using the staple job file. It will automatically combine all those files in that single PDF again.

    Combination benefits

    You can create a master file, which will have a combined PDF package and can be easily bookmarked for future use. You can have as many or as few bookmarks as you like.

    Combining PDF documents used to take hours, not least when a document had possibly hundreds of individual PDFs that needed to be brought together.

    Using Bluebeam Stapler speeds up the process and helps increase efficiency. It’s that simple.

    Bluebeam Revu Update 20.2

    The latest update for Bluebeam Revu has recently been released; you can find the release notes at this link.

    Independent Length Measurement units.  In previous versions, a user would calibrate a page, say in feet and inches, and all length measurements would be locked to that unit.  Length measurements can now be set to any preferred unit.  Create a measurement and change the unit in the properties.
    TIP:  if the default measurement is not in the desired unit, change the unit then set that as the new default by right-clicking.

    A refined Calibration tool.  The name has been changed from Calibrate to Set Scale.  After the tool has been launched, the dialog is a little different.  In previous versions, the Pick Points calibration window would appear first.  Now, the Apply Scales page appears first.  The user chooses either preset or custom scales, or they choose to calibrate using selected points.  Also, in this same form, the user can choose to apply the scale to a selected range of pages and add the custom scale to a preset for later use.
    TIP:  to remove a preset, click the garbage can icon in the Measurement tab.

    5 Revu Workflows for Civil Designers, Contractors

    This article was originally published by Troy DeGroot and Bluebeam, Inc. on the Bluebeam Blog.

    Awhile back I was teaching a Bluebeam Revu basics class for a group of civil engineers and designers. An issue quickly came up that changed the way I teach, and it was so obvious.

    I was using the same data sets in all my basics classes to show markups and measurements, but it wasn’t relevant to the civil discipline in the architecture, engineering and construction (AEC) industry. So, I quickly collected some new data sets and drew back on my industry experience to develop training tailored to those users.

    As a complement to my last post, 11 Tools to Ease the Punch Walk Process, I want to discuss five tools or workflows you may not be aware of that specifically apply—but aren’t limited to—the world of civil design and construction.

    First, let’s look at some of the differences between civil drawings and other disciplines like architectural, structure, MEP, fire, etc.

    Starting with the obvious, civil drawings are drawn at a much smaller scale. Because of the size of many jobsites, developments and roadways, drawings are showing a much larger area on each sheet.

    Also, most civil drawings don’t include dimensions or measurements. This might give some the illusion they’re not drawn to scale, but that couldn’t be more wrong. Those curvy contour lines are located very specifically.

    Obviously, everyone regardless of occupation can use the Markup tools in Bluebeam Revu to make comments on drawings and documents. I’ll skip over those and get right to my favorite five innovative ways to use Bluebeam Revu as a civil designer or engineer.

    Overlay satellite imagery

    Whether you do a screenshot or some other method for acquiring satellite images, be sure to include the scale in the image. This will make it easier to calibrate the image. If the scale isn’t available, you’re still in luck. Maybe you know the curb-to-curb dimension or a building footprint; you can calibrate from that also. Once you have the image calibrated, you can start to overlay markups for easements, utilities, signage or even site staging material and equipment. If you’re doing resurfacing or flatwork, you could even do material estimates.

    Calibrating Plan & Profile drawings with different X-Y scales 

    If you’re working with plan and profile drawings for roadways or power distribution, often the horizontal scale is drastically different from the vertical scale, making it difficult to rely on any accuracy in measurements. In the Measurement Panel in Revu, you will find the ability to calibrate the X and Y scales separately. Now you can do measurements and allow Revu to do all the complicated math for you.

    Ideas for Cut & Fill calculations

    The contour lines on a civil plan represent the vertical grade change. Depending on the size of the plan or map, this could be one foot or 1,000. To estimate cut and fill quantities, you can create volume measurements using those contours and average depths. (Maybe this video will explain it better.)

    Combining several PDFs into one large area map

    I’ve been asked this several times from the mechanical, electrical and plumbing teams as well. How can we do line-based length measurements when the material starts on one sheet and continues onto another?

    If you start a new PDF with an oversized blank sheet, you can use the Snapshot tool to collect portions of separate sheets, pasting them onto the new document. When using Snapshot, the image comes in at the same scale it was taken from, so you can easily piece them all together like a puzzle. I suggest grouping them once you have the puzzle together so you don’t accidentally move something.

    Bidding and tracking field survey projects 

    Maybe you have a last-minute bid due for a scanning or survey project and don’t have access to the site. Using the sequence or count tools in Revu, you can quickly mark all the locations you’ll need to perform a scan.

    Each mark represents a setup, scan, takedown and processing, allowing you to estimate the time needed. Using different colors or layers, you could assign different time estimates if you have to remove ceiling tiles or drudge through the mud to capture the required data.

    Use the same bid drawing when performing those scans on site. Quickly change the Status of the Markup to Complete and, if needed, attach an image of the equipment setup. In the field, you might even use different colors if you’re running several scanners at the same time. The more data the better, in case the scope changes unexpectedly.

    I know all these functions are possible in advanced software created for design. My intent is to show that you don’t need expensive CAD software to get information out of the PDF drawings. If you like these tips and want to see the technical steps, check out my YouTube Playlist.

    Hopefully, you’re inspired to look a little deeper into the civil workflows possible in Bluebeam Revu. How are you using Revu in your workflows? I’d love to hear your feedback or any new ideas you may have had while reading. You can find and message me on LinkedIn.

    11 Revu Tools to Ease the Punch Walk Process

    This article was originally published by Troy DeGroot and Bluebeam, Inc. on the Bluebeam Blog.

    Today I want to talk about Punch Walks, QA/QC, or whatever you might call it when you collect field data during or after construction.

    I started my career detailing structural steel. As a result, I was often required to juggle large plan rolls, tape measures, pens, and a level to measure existing conditions.

    These measurements would then be brought back to the office to make sure the railings and stairs fit perfectly when fabricated. Obviously, this was before emerging technologies like building information modeling (BIM) and laser scanning.

    So, how has Bluebeam Revu improved field data documentation?

    Here are 11 of my favorite Revu tools that ease field data collection and distribution.

    Standardizing plan symbology will replace long, written notes—increasing consistency, legibility and speed. These symbols are manually created ahead of time or on the fly. To save the most time, I suggest building your symbol list in Microsoft Excel. Importing the CSV file automatically generates large lists of symbols, along with the associated comment.

    Embed images, 360-degree images, or even videos with audio giving a clear description of the field conditions. The Flipbook is a clean way to add many images directly where they apply on the plan rather than off to the side someplace with a reference number.

    Create a template PDF form to quickly fill in the information needed. Before I save the template, I like to add a blank page after the form. This provides a place to drop a related image or Snapshot from a plan or detail, including clouds and other markups. Save this to your template folder for quick access every time.

    Speaking of the Snapshot, quickly grab a screenshot of the affected area of the drawing, saving it directly to the Clipboard. Paste this image on your RFI form, in a written report, or directly into an email. Your markups will come over, assuring the form matches exactly what’s on the large plan.

    Use Studio Projects to keep data organized and available to all stakeholders. A Digital Dashboard is a great way to organize everything in a visual format, similar to a website.

    Before each site walk, create a layer naming it with the date, then set it to Current. This will record all the markups on an isolated layer. Turning layers on and off allows you to track inspection progress.

    Create Spaces to track where on the plan your markups are located. If you walk into a room on-site and want to know all the information associated with that room, simply sort your markups List by Spaces.

    Create custom Columns to track individuals or maybe subcontractors who are “Responsible” for changes or fixes.

    Create custom Statuses to track progress on your projects, whether you use them to mark things complete for yourself internally or the general contractor who owns the documents. Changing a Status will automatically stamp the time, date and author. These status updates cannot be edited or removed by anyone.

    A custom Legend is a great way to represent the Markups List visually directly on the sheet. This could include a description of the symbol or even the number of times it was placed.

    Finally, Summary Reports are extremely powerful using Bluebeam Revu. Creating a PDF Summary report of all the markups on the drawing can be a clean and easy way to transfer information to others on the team. This is especially true when including a Capture Media Summary, which will embed all the images into the document.

    You may be using some of these tips already. I hope you learned a few more to streamline and improve the quality of your Punch Walks, QA/QC or whatever you might call it when you collect field data during or after construction.

    If you like these tips and want to see the technical steps, check out my YouTube playlist from last summer.

    A Document Management Workflow for the Modern Construction Project

    This story was originally published by Bluebeam, Inc. on Built, the Bluebeam Blog.

    Most construction projects are massive undertakings. Teams of architects and engineers work tirelessly preparing large volumes of design documents before they ultimately make their way onto a construction jobsite, where workers labor vigorously to build off those plans down to the tiniest details.

    The evolution of technology in the construction industry has made the arduous task of managing the flow of such large project document loads easier. Once initial plans are made, multiple rounds of revisions must take place among varying project stakeholders before they’re ultimately pushed out to the field, where more revisions may occur as new challenges emerge.

    Pablo Giraldo, an assistant construction technology manager with The Walsh Group in Atlanta, Georgia, is one among a crowd of passionate and tech-savvy construction professionals who have embraced digital transformation in the industry. Giraldo has spent a lot of time, including through his own growing YouTube channel, figuring out how to make digital transformation of document management work on his projects.

    Here is a breakdown of how Giraldo leads document management using the varying tools within Bluebeam Revu, based on his recent presentation as part of Bluebeam’s ongoing virtual events series.

    Create Sets

    The first thing Giraldo does to initiate his document management workflow is to create document Sets in Revu.

    Sets allow Revu users to open a collection of plan documents as if they were a single file. Pages in a Set are organized in a specific and sorted order, including any revisions. Sets ultimately allow users to navigate through multiple files in Revu as if they were one document.

    Publishing the latest Set ultimately allows files to load faster for workers in the field; it also allows a check-out/check-in system that allows users to check-in/out a document one person at a time.

    https://youtu.be/XOmzLYnW3gk 

    Batch Link

    Next, Giraldo Batch Links his Set. Batch Link in Revu automatically creates navigational hyperlinks within a particular group of documents based on user-defined criteria. Batch Link, which is only available in the eXtreme edition of Revu, can be run against multiple PDFs or a single, multi-paged PDF.

    “This is beneficial as you’re going through the drawings to easily flip back and forth through different documents,” Giraldo said.

    This is particularly helpful for workers in the field, Giraldo said, as they can transition between different documents on their iPads, looking at different sections of drawings as they spot important details while working on the jobsite.

    Hyperlink drawings

    In addition to Batch Linking document Sets, Giraldo often uses hyperlinks throughout different documents in other ways to help provide field workers and other collaborators with easy ways to find and reference critical project information as they work.

    Links, which can be placed on anything in a PDF, including markups, can include anything from linking to other project documents to reference websites to any other important, web-accessible information.

    https://youtu.be/gjRN4JM03ms 

    Publish

    Once Giraldo has set up all his Sets, Batched Linked and set up hyperlinks to other documents or resources throughout the documents, now it’s time to publish the Sets and send them out to workers in the field. There, workers will use the Bluebeam app on iPads to sync to the latest document Sets to reference and work off while in the field.

    Anytime a worker in the field can connect to the internet, either via WiFi or cellular connectivity, they can hit “Sync” in the Bluebeam app. Then all the documents will automatically download the latest set of drawings, Giraldo said.

    Create dashboard

    One of the powerful ways to help everyone collaborating on documents—whether they’re in-office engineers approving plans or field workers implementing them—is to create a digital project dashboard in Revu. Digital dashboards are hyperlinked, button-enabled PDFs that can be configured and designed such that users have a simple place for reference for all project documents and resources, alleviating the need for anyone to have to navigate through complex folder structures to find documents.

    Giraldo said once he’s completed the above steps, he ultimately creates two project dashboards: one for workers who interact with documents in the office, and another for workers in the field. The dashboard for workers in the office is slightly more robust, with multiple buttons directing workers to key documents and resources. The dashboard for field workers is less detailed, allowing them a simple and easy-to-understand interface as they need to review documents while working on hectic jobsites.

    https://youtu.be/knTzovEw5Fs?list=PLJ7Sea2rdFrlbonLl3F3u3-w35nkIXLdh

    Create Studio groups

    Studio, which provides users with document management and real-time collaboration capabilities, is another tool Giraldo uses on his projects. Creating groups within Studio allows the administrator—in this case Giraldo—the ability to provide different users access to different documents within the Studio Project as well as the ability to collaborate on document review in Studio Sessions.

    Users can have three levels of permissions within Studio: read, read/write and read/write/delete. “This can function as your server,” Giraldo said of Studio Projects, although most larger firms ultimately store their files elsewhere. “I’ve seen small companies rely on Studio Projects entirely for their document management.”

    Bluebeam for iPad

    A major asset for Giraldo’s document management implementation with his projects has been use of iPad in the field. The Revu for iPad app, in addition to giving field workers access to view project documents nearly like an in-office worker would on a desktop computer, is especially great when it comes to project tracking, Giraldo said.

    Moreover, Giraldo has used tablets in the field to take pictures of completed work to store in the document, such that workers can view project elements as they’re installed within the drawings as construction progresses. Giraldo has also taken to dictating notes using the audio recording capability within the iPad app to make notes on certain markups within drawings while out in the field.

    Track work with statuses

    Lastly, the Markups List in Revu includes a Status column that allows Giraldo and other users the ability to track the progress of different project elements. What’s more, the status column is followed by a color column that allows users to color-code different statuses.

    Giraldo on a recent project, for instance, had three different statuses displaying what stage a series of pre-cast panels were at: ordered, delivered, installed. To set a status, users can right click on a markup, click “Set a Status,” then pick the project element. This can be done both in the field on a tablet and in an office on a desktop.

    Streamlined efficiency

    Overall, this digital document management workflow has helped Giraldo and the rest of his project team cut down on printing and use of paper documents, which often led to confusion and disorganization on jobsites. It has also helped field workers be more efficient, Giraldo said, as they no longer must account for and reference rolls of paper documents.

    Thanks to these tools provided by Revu, as well as construction professionals like Giraldo who are willing to figure out the connective elements of establishing a fully functional digital document workflow, construction workers have an example of how to store, organize, track and find important project documents and resources digitally, making the office-to-field document flow easier to manage.

    What Makes Digital Collaboration in Construction Possible?

    This article was originally published by Bluebeam, Inc. on the Bluebeam Blog.

    ne of the downstream effects of the 2020 COVID-19 pandemic has been a strong projected uptick in cloud software conversions. With employees increasingly working remotely, software needs to be available anytime, anywhere. Software doesn’t have to be cloud-based to be remotely accessible, but many chief information officers (CIO), even at midsize companies, have had cloud transformation on their roadmaps, and the pandemic has provided the occasion to ask: if not now, when?

    Moving key software applications to the cloud, which has already taken place across the construction industry, will have significant implications for the organisation – most obviously on the IT team that has been maintaining the software on-premises. In financial terms, the cloud-based construction management software transformation is a change from licensing software and paying annual maintenance fees to an on-demand and pay-as-you-go model. You rent the application instead of buying it.

    For end-users, a smooth cloud migration may be almost imperceptible. For instance, a user logs in to their cloud-based construction software application, works with colleagues on finalising a set of documents for a large office building project and passes them on for approval without even a hint of consideration of the technology making that series of interactions possible.

    Here are answers to common questions construction professionals may have about cloud collaboration in the construction industry and the technology behind it.

    Where’s my software?

    It’s not on your computer anymore. It’s on a remote server, being delivered to you whenever and wherever you need it. Is that something to be concerned about?

    According to Jim Prothe, marketing director at Magenium, an IT solutions consulting firm based in Glen Ellyn, Illinois, there are good reasons to be excited about the change.

    ‘A friend of mine has a business that rents an office in a Chicago suburb’, Prothe said. ‘Last summer, another tenant in their building had a fire over a weekend. All the sprinkler systems turned on, and the application server was toast. They had to spend the next two weeks rebuilding that server from month-old tape backups. So, they lost a month of data, including all their billings. If they’d been operating in a cloud environment that had an outage in a region, they’d have had built-in failover capacity; they would have been able to spin up capacity in another region, and their business would never miss a beat.’

    Where is this server?

    It’s no longer in the company’s server room – or, in cloud computing parlance, it’s no longer ‘on-premise’. Where it’s situated depends on where your business is located and what kind of cloud you’re using.

    What kind of cloud?

    There are at least three different kinds of cloud service infrastructure that drives cloud collaboration in the construction industry:

    • Public cloud: You, the end-user company, are renting services from a large vendor, perhaps even a global enterprise like Microsoft Azure, Amazon Web Services or RackSpace. Typically, your company is sharing the rented infrastructure with other companies (what the vendor calls ‘tenants’). Your applications and your data are architecturally walled off from those of other tenants, but the bits are located on shared machines. In the early days of cloud adoption, some tenants worried about the possibility of proprietary data bleeding over into other tenants’ spaces. But growing confidence in providers and in cloud technology has generally done away with that concern.
    • Private cloud: This generally refers to an infrastructure with all the characteristics of cloud architecture, but one built and maintained by your company. Large enterprises may prefer a private cloud for extremely sensitive data. It’s an exceptional situation for a mid-sized architecture, engineering or construction firm.
    • Hybrid cloud: Some organisations maintain applications in both public and private cloud infrastructures.

    As an end-user, the type of cloud probably won’t affect the availability or performance of the software.

    What are we getting from the server?

    There are at least three different levels of commitment your company could make to its cloud transformation:

    • Infrastructure as a Service (IaaS): Your company rents physical space on the provider’s servers and relies on the provider to keep them running. But that’s it – your own IT people set up and maintain all the software.
    • Platform as a Service (PaaS): In addition to the hardware, the provider maintains the operating system and all the other architectural features of the environment. Your people still maintain the applications.
    • Software as a Service (SaaS): The provider maintains everything from the operating system to the applications; your company pays to use these services on an as-needed basis.

    Where’s my data?

    Some of it is local – but the bulk of it is in the cloud. The physical location of the server generally makes little or no difference to the end-user, other than in exceptional circumstances involving regulatory compliance. Under Sarbanes-Oxley regulations, enacted after the Enron accounting scandal in the early 2000s, financial services firms often need to be able to specify to regulators where their account data is being stored. Other regulations come into play if they operate internationally. You can ensure, contractually, that your data stays within a certain region or on a certain server.

    The server’s physical location isn’t entirely irrelevant when it comes to cloud collaboration in the construction industry. The speed at which data packets travel their tortuous routes across the internet is breathtaking, but if the server is far enough away, the end-user will experience a noticeable performance lag. This is why public cloud providers – and large organisations that host their own private clouds – have multiple, redundant servers distributed among regions. The infrastructure will be designed to route your data through the nearest server and to reroute to the next-nearest server if your region’s system goes down.

    ‘Generally, the large cloud service providers give you the option to choose the region where your primary servers will be located’, Prothe said. ‘Nearly every metropolitan area will have its own dedicated servers.’

    Why are we using cloud software?

    In the short run, it’s cheaper to rent than to buy. The SaaS provider can price services inexpensively because it enjoys huge economies of scale.

    From an accounting standpoint, there are benefits in reducing capital costs and increasing operating expenditures. Cloud service contracts generally come under operating expenditures. ‘During the 2008 financial crisis, capital budgets evaporated’, Prothe said. ‘Businesses still had to operate and moving applications to the cloud was one way to keep going. In some industries, we’re seeing the same thing happen because of COVID.’

    Renting cloud software reduces the burden on a company’s IT services, because it has less infrastructure to maintain. ‘A friend of mine who runs an HVAC engineering company complains about the burden of supporting on-premises software’, Prothe said. ‘It constantly needs to be patched, and each time that introduces a new security vulnerability. The investment in IT resources to manage those changes is pretty daunting for a small engineering firm.’

    Isn’t this risky for our secret stuff?

    Some companies express concerns about their most sensitive data, but the cloud can be more secure than having your own data centres.

    A global company like Amazon Web Services or Microsoft may have thousands of full-time security people, assisted by artificial intelligence tools designed to spot or even prevent service interruptions or hacker intrusions. Their automation tools can detect unusual activity across the network, such as odd data traffic, and analyse it quickly to size it up as a potential threat. And, of course, traffic over cloud networks is encrypted end to end. The provider’s reputation is riding on the strength of that encryption.

    ‘Your instinct may tell you to maintain close control over important applications’, Prothe said. ‘But you need to ask yourself who is better at maintaining a secure infrastructure – a cloud service provider whose survival depends on their reputation for security, or your IT guys?’

    There must be a downside to cloud adoption, right?

    There is one, obvious downside: users need to have a reliable internet connection.

    Still, start-up costs are cheaper, although cloud software can cost more in the long run. ‘We have a lot of companies move applications from on-premises to the cloud, and they often need help optimising their spend’, Prothe said.’“You can spend a lot of money quickly in the cloud. You spin up a lot of power, and you pay for it on a monthly basis, so you may not notice it. You can often dial down the power you consume during off-hours when people are less likely to be online.’

    If the data structure in the cloud application is different from that of the on-premises software, the data may have to be cleaned up, restructured and normalised. Migrating data to the cloud can be expensive, cumbersome and risky if undertaken without expert help.

    Is everybody moving to cloud software?

    It depends. Some companies are using only the basic applications like email in the cloud; some are ‘cloud-first’ – the default, when introducing a new application, is to adopt the cloud version.

    It also depends on the application. Many software companies are themselves moving to a cloud-first product development roadmap, gradually transitioning their long-time customers from on-premises installations to their cloud offerings. Many new software vendors are likely to be cloud-only.

    So, the next time you log on to use any cloud-based application to review a design or communicate a set of document changes, now you know how the technology behind those transactions truly works.