• Civil 3D: Plan Production Styles

    Do you use Civil 3D’s plan production tools?  Do you wonder where the styles come from, the design file, the production template?  Read on to find out.

    If you’re not familiar with Civil 3D’s plan production tools, here are the Cole’s notes.

    • Paper space layouts complete with your company’s title block and plan and/or profile viewports are created automatically along the entire length of a selected alignment.
    • A plan production template must be selected which contains a layout configured for use with this feature.
    • These layouts can be created in one of three places:
      • In the current drawing.
      • In new drawings, one layout per drawing.
      • All layouts in a single new drawing.

    When the option to create layouts in a single new drawing or multiple drawings is chosen, there are three files in play.

    • The design file
    • The selected plan production template
    • The production sheet file the tool creates

    Both the design file and the selected template can contain styles.  They could be the same styles, or they may be different.  When creating the new drawings, which of these two files does Civil 3D use as the template: the starting point?  Where do the styles and settings come from?

    The answer is both, sort of.  Here is what happens:

    1. Civil 3D uses the design file as the template.  All styles and settings come from this file.
    2. Any styles present in the production template are then duplicated into the new production sheet drawing.
    3. If there are any styles in the production template that are the same name as the design file, they are ignored.  The design file styles are maintained.

    Note that Style 3 is present in the Design and Template files.  In the Sheet file, Style 3 is the same as the Design file.

    Civil 3D: Profile Grade Intersections

    The goal in this example is to design the profile where each grade is an even number.  It’s not as obvious as you might think.  Thanks to my colleagues Dave Hill and Jae Kwon for pointing out the proper tool.

    Read on to learn more…

    Begin by modelling the first 2 segments.  I’ll assume you know the best tools for this, but I’ll give you a hint.  Use the Grid View; it’s your friend here.


    To model the last 5% grade is not entirely obvious.  Yes, a 5% tangent can be drawn from the end of the 1% grade, but it doesn’t end in the right place.

    We sort of want to draw backwards from the end of the red profile and then extend the 1% grade.

    Use this tool and follow the prompts.  First select the 1% grade, then pick Station and Elevation and the tie-in point.  Then enter the grade, in this case -5% (the grade from the intersected PVI).


    C’est voilà.


    Civil 3D: Model Existing Underground Utilities Efficiently

    Civil 3D: Model Existing Underground Utilities Efficiently

    Must you draw existing gas, tel, and other similar underground utilities for your projects?  If you’re not using the technique described below, you’re using too much time!  Read on to find out more.

    Join us at Infrastructure University, session 3, on October 20th for more information about this technique. For now:

    Facts:

    1. For nearly every civil engineering project, we must identify existing features on our construction drawings so they may not be disturbed during construction and so we may design proposed works without conflicting with these existing features. They must appear in both plan and profile.
    2. It can take considerable time to draw and label them in the plan, and even more project them into profile.
    3. When there is an edit to the alignment, the profile locations must be recalculated, taking more time.
    4. Experiments have shown that it can take 84 seconds to draw each utility. Then 26 more seconds each when the alignment is edited.
    5. Using the technique described below, the time is reduced from 84 seconds to 20 seconds. But 0 seconds when the alignment is edited.
    6. For 160 utilities:
      1. 3.7 hours using the manual technique.                   69 minutes each time the alignment is edited.
      2. 53 minutes using the automated technique.         No extra time when the alignment is edited.

    Method

    1. Create pressure network parts lists, one for each utility. Assign styles accordingly.
    2. Create pressure networks, one for each utility. Assign the parts list and label styles accordingly.
    3. Model the existing utilities as pressure networks and project them into profile. The depth below ground can be automated.

    Civil 3D: Pipes not Extending to Structures

    Have you seen this before?  This is how Civil 3D’s pipes sometimes appear before and after the current annotation scale has been changed.  Not good.

    Read on to learn more…

    What is the cause?  This setting in the structure style.  You will find it in the Plan tab in the style editor.

    How to fix this?  There are several methods.

    • Never change the scale!  Easy to say, not so easy to implement.
    • Turn off that setting.  Problem is, you get this.

    • Swap each structure.  Choose the same structure.  What if there are 200 of them?  Too much time.

    • Grip-edit each structure and move them back onto their original positions.  Same problem as previous, too much time.
    • Add a wipeout to the block being used AND turn off that setting.  Our first real potential solution.  Some users report black blobs when printing to PDF when using wipeouts, however.
    • Use Project Explorer.  Select all the structures, right click, and choose the following option.  Then just click OK.  This kicks the structures in the butt and the pipes extend themselves properly.  Of course, next time the scale is changed, this must be redone but this only takes about 5 seconds.

    I prefer the wipeout option because it is permanent.  No other workarounds necessary.  If this is not an option for you, then the Project Explorer trick is likely the best option.

    Bluebeam Transition to Subscription

    null

    Bluebeam Transition to Subscription

    Starting September 20th, 2022, Bluebeam is Moving from Perpetual Standalone Licensing to Subscription 

    New subscription packages:

    • Bluebeam Basics
    • Bluebeam Core
    • Bluebeam Complete

    Benefits of Subscription:

    • Work anywhere with Bluebeam Revu Desktop and Bluebeam Cloud
    • Better manage and administer licenses across entire organization
    • Global rights – use in any country
    • Access to Bluebeam Desktop Revu v21 & Bluebeam Cloud and future releases/updates
    • Bluebeam University included for free
    • Use work, home or in the field and on any device under one Bluebeam
    • Named-Users model – login with Bluebeam ID (BBID) or supported single sign-on (SSO) provider (Okta AD or Microsoft Azure AD)
    Policy Update: VALID ORDERS MUST BE SUBMITTED TO BLUEBEAM PRIOR TO
    JANUARY 31, 2023
     

    Bluebeam will allow Perpetual Paid Upgrades if active Maintenance is purchased. Existing customers without active Maintenance will NOT be allowed to purchase a Paid Upgrade to Perpetual ONLY. Customers without active Maintenance must purchase a Paid Upgrade and Maintenance simultaneously; they will then would be in the normal pool of customers with active maintenance.

    Customers must purchase active Maintenance with their Paid Upgrade to Revu 20. Once a customer upgrades to Revu 20, they will be able to add new Perpetual seats until September 30, 2023


    Contact your sales rep to learn more about the transition to subscription and available plans!

    Contact

    null


    CTC Licensing Model Change – What you need to know!


    With the release of the 23.0.0 version of all the CTC Software tools, CTC has taken the opportunity to update its licensing model.

    Licensing for any of the CTC suites of tools was broken up into tiers of licensing with maintenance attached or differences depending on how many employees were in the company. It was tedious to explain, and not too efficient to implement.

    Starting with the 23.0.0 release of the suites, CTC is moving to a CSL model of licensing. This Cloud Shared Licensing is much more in line with the SaS model of software delivery. However, this is deliberately not the named user licensing that Autodesk has moved to. The CSL model is intended to simplify access to the tools while maintaining the flexibility of the network licensing style of license.

    Put simply, the CSL model is a cloud-hosted version of the network licensing most of us are familiar with. This means there is no need for installing license managers on local servers, all users need is internet access to use the CTC tools. The CSL is hosted on the new CTC website that was launched in conjunction with the 23.0.0 suite releases.

    With the new website, there have been additional efficiencies added by automating tasks like the option to renew automatically and automatic fulfilment of orders. The new website will also give administrators detailed insight into their teams’ suite usage and the ability to control the allocation of licenses with the creation of Groups of users on the website.

    The move to CSL was done for efficiency for everyone. It simplifies and standardizes access to the tools, allows for instant license allocation, offers to report on the usage of suites and tools, and simplifies pricing models.

    One thing to note is that the 2022 and older versions of the CTC Suites still only work with the legacy licensing and cannot use the CSL model.


    Want to learn about this licensing in more detail? Visit: View Recording (gotowebinar.com).

     If you have questions regarding this new licensing model for the CTC Software, your SolidCAD Account Manager will be more than happy to help!


    Ten Essential Features of an Electronic Document Management Solution (EDMS)

    Does your company need an Electronic Document Management System (EDMS) with the ability to manage your Corporate, Contractor, Project, Vendor, Operations, and Maintenance data and documents while continuing to practice consistent Information Management practices.

    The following features are a must.
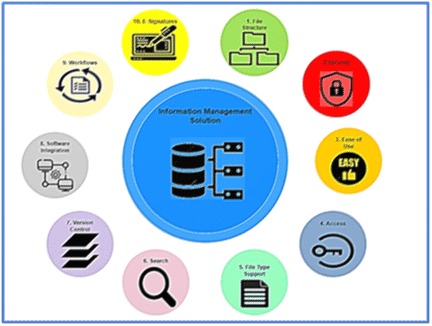
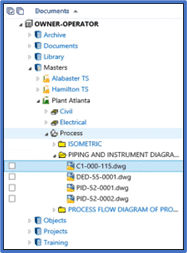
    1. File Structure

    Consistency matters. Like navigating around your house, it’s nice to know where everything is and that items are placed in a logical order (hopefully your kitchenware isn’t found in your bathroom). The same holds true for managing your data and documents. Knowing where your data and documents are, and how to locate it leads to streamlined processes, productivity, shareability and consistency across multiple projects and facilities.

    How you organize your file structure and where the data and documents are stored is seen as an overall map to your Electronic Document Management System (EDMS).

    2. Security

    Your vital data and documents should not only be stored but also protected. An Electronic Document Management System (EDMS) with the capability to provide security roles allow your users to perform specific actions on specific data and documents. Security roles are named sets of security privileges. Each security privilege controls a specific command or function that can be either granted or revoked. Your users or groups are assigned to security roles for specific folders in a project or facility.

    By default, your users can perform the same actions on data and documents. If additional control is required, the privileges of security roles can be updated by the folder and document type.

    3. Ease of Use

    Ease of Use is a subjective topic. Your users will find an Electronic Document Management System (EDMS) easy-to-use by reducing the number of “clicks” used to manage the data and document information.

    The Electronic Document Management System (EDMS) – Meridian creates a rendition (copy of a document in a format other than the original) Typically, the rendition is in a noneditable format and is distributed only for reference or hard copy printing while the original, editable source document is not distributed outside of the organization. Examples of rendition formats are Portable Document Format (PDF) and Autodesk Drawing Web Format (DWF). Renditions can often be created by the same application that is used to edit the original document or they can be created by a different application. In some cases, the renditions are stored in a separate project or Electronic Document Management System (EDMS)

    4. Access

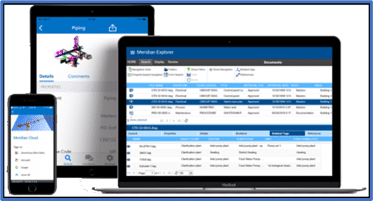
    More than 70% of the population is continuing to work remotely, an Electronic Document Management System (EDMS) solution should offer a great remote and mobile user experience. This will ensure tasks and transactions are continued when remote or on-the-go.

    The Electronic Document Management System (EDMS) – Meridian online access allows users this great mobile experience to see your data and related documents at once from any device.

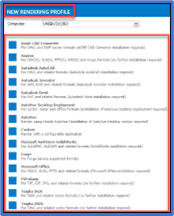
    5. File Type Support

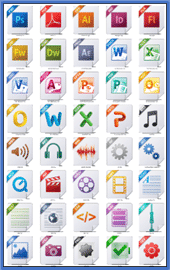
    A robust file type support is a key Electronic Document Management System (EDMS) feature allowing a wide range of support from various applications like AutoCAD, AutoDesk and other design applications to common file types like Word, PDF, JPEG, PNG, TIF, and more. Additionally with the emerging file formats like 3D, panoramic, virtual reality, and augmented reality an Electronic Document Management System (EDMS) must have the capabilities to support them.

    6. Search

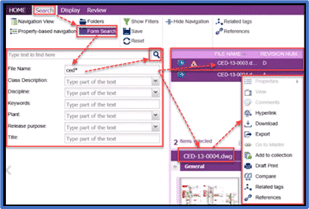
    Have you ever tried shuffling through a disorganized stack of papers and folders, you know how much time is wasted doing the cumbersome task. The Electronic Document Management System (EDMS) – Meridian  makes organizing, searching, and managing data and documents easier to ease the painful process.

    Meridian’s optical character recognition technology and global search capabilities enhance the data and document searchability based on their attributes such as the name and title. The data and documents can also be stored using their name, title, number, and type attributes as well as others. This increases the search and retrieval speed by utilizing a full-text search and attribute categories criteria.
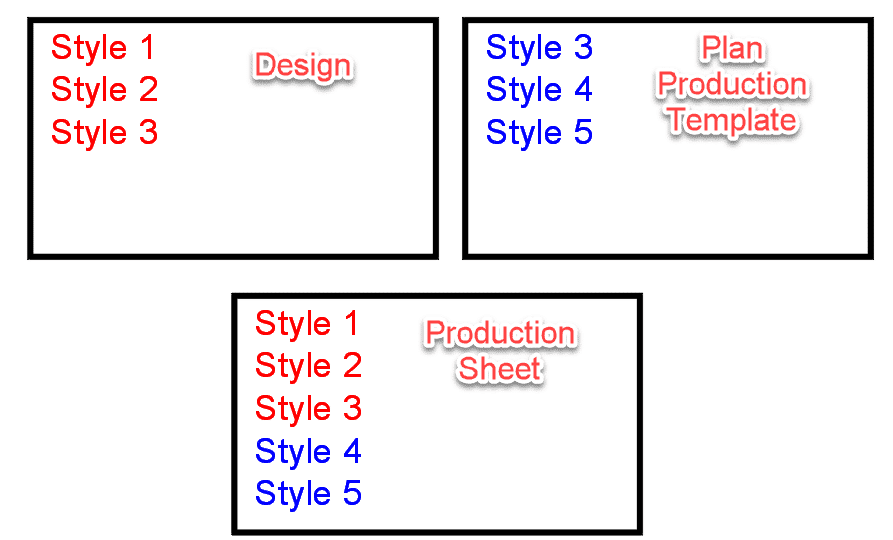
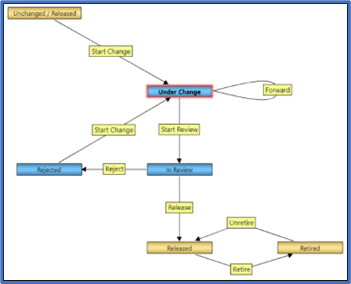
    7. Version Control

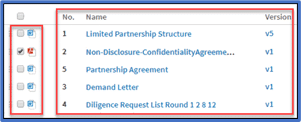
    Version control is a method of organizing the file structure, so your data and documents are filed in an easy-to-trace order. Version control allows your employees to track and monitor document changes by creating updated versions of the document each time it’s modified. It enables you to track how the document has been modified and evolved. The version control number is updated when a document is edited, indicating that you see the most recent version.

    Version control is extremely useful when several of your employees are working on the same document simultaneously. In addition, it enables each document modifier to understand the review process and see how a document has changed and who has made modifications in the past.

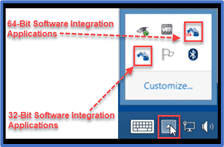
    8. Software Integration

    A robust software integration service can boost your company’s overall efficiency. Integration with software such as AutoCAD, Revit, MicroStation, SAP and 3rd party Construction Maintenance Management Software.

    Like when you prune a plant, pruning your outdated software can lead to better, more efficient growth. When your outdated or broken software pieces aren’t taking up your company’s storage capacity anymore, you’ll get to work at faster speeds. As a result, you’ll be able to accomplish more with your software. Furthermore, you can also get rid of other inefficiencies like data and document duplication. Synchronize your data and documents using Electronic Document Management System (EDMS) – Meridian this will mean fewer mistakes and better accuracy, which will also contribute to your business efficiency.


    9. Workflows

    More than 70% of the population is working remotely, and to accommodate, 75% of businesses are already using applications with workflows. While we were still working from the office, it was easier to define, track and remind your team members of their daily tasks. But it became difficult with the implementation of the work from home model. Now even post-pandemic, the world still prefers working from home or a hybrid model of working. So how do you track or remind your team members of outstanding tasks?

    The answer is simple; you can track the daily activities by using a workflow. The Electronic Document Management System (EDMS) – Meridian contains ad hoc workflow requirements in an environment to support work processes, including concurrent document modification practices, batch plotting, created work packages and multiple files.
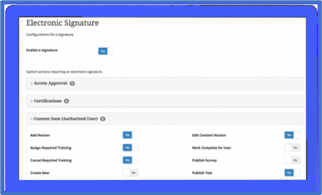
    10. E-Signatures

    Do you think you waste too much time signing papers or documents? Your employees format a document, print it, sign it, and scan into the computer. It takes both time and money. In this digital age, there are new software innovations, like e-signatures. E-signature lets your employees sign documents in seconds. The business world acknowledges the advantages of these techniques for digital signatures. It is a comfortable and effective way to sign electronic documents. E-signatures prevent unnecessary delays also; it is a secure way to sign documents because traditional signatures can be forged or copied.

    The Electronic Document Management System (EDMS) – Meridian  e-signature provides a fast service to you and your company. This feature allows you to sign documents in seconds and enables you to send the signed documents without the need of envelopes, stamps, or delivery costs. It’s time to quit your traditional ink pen signature method. With the e-signature, it cuts down turnaround time by more than 80%.

    Final Thoughts

    Inefficient processes can lead to severe inefficiencies with your Corporate, Contractor, Project, Vendor, Operations, and Maintenance data and documents. You need a robust electronic document management system (EDMS) to make your processes efficient. The Electronic Document Management System (EDMS) – Meridian features provide robust capabilities for your enterprise-wide data and documents needs while also meeting your compliance requirements.

    The next step is to determine the right Electronic Document Management System (EDMS) which was determined by your current Data and Document Management review and identified pain points and needs.

    To learn more about Meridian solutions (EDMS and CMMS) and how they can help your team, don’t hesitate to get in touch with the SolidCAD Meridian team.

    Updated Version: Quantity Takeoffs Are the Best Kept Secret in Bluebeam Revu

    This story was originally published on the Bluebeam Blog.

    Deepak Maini, a 20-year qualified mechanical engineer, shares tips and tricks for using QTO software (From 2019)

    Watch the video here.

    Upon buying a home many years ago, a homeowner provided the contractor with a PDF for wooden flooring installation. The contractor vowed to take off the quantities, but also required a home visit so they could do an onsite measurement check as well.

    Baffled, the homeowner questioned the firm as to why the home visit was needed. The explanation: “You’ll see when we get there.”

    The firm measured on-site and found out that its takeoffs were 22% more than the initial estimate.

    “I realized that they didn’t have the right tools,” the homeowner said. “Had I known about Revu back then, I would have told them, ‘You are not only wasting your time, you’re also wasting my time. If you use this tool, you’ll be a lot more accurate.’”

    That homeowner was Deepak Maini, a 20-year qualified mechanical engineer who not only knows about Bluebeam Revu now, but swears by it for accurate quantity takeoffs.

    Now a national technical manager at Cadgroup Australia, Deepak strongly advocates for the use of Revu to accomplish accurate quantity takeoffs. Using the digital tools in Revu helps to avoid costly mistakes from paper-generated processes, especially when dealing with large or complex projects.

    Deepak’s QTO Tips and Tricks in Revu

    • Calibrate the PDF – Don’t rely on the drawings to be in proper scale. This process ensures that your measurements are accurate.
    • Create Custom tool sets – Align all project collaborators by creating and deploying a tool set for takeoffs that can be used and standardized throughout your company and on future projects.
    • Use Custom Columns – Why not have an immediate cost breakdown? Columns in the Markups List are highly customizable. With values plugged into your Custom Columns, users can instantly see the materials and price estimates.
    • Use VisualSearch – Using this feature, you can find the total count of light fixtures or electrical outlets quickly within your entire bid package by using Revu to search for a visual cue or object.

    Calibrate the PDF

    Using Bluebeam Revu quantity takeoff software

    “You don’t always know whether those sheets have been printed to the right scale or not,” Deepak said. “Calibration ensures that we use the right scale and we get the right measurements.”

    Revu includes automatic prompts for setting scale and can calibrate a PDF to a single scale or to separate X and Y scales as needed, as well as setting multiple measurement scales on the same PDF using viewports. “When it comes to taking off regions and areas and so on, it’s got some really smart tools that let you snap onto the corner points of the areas and you can really easily take off those quantities,” Deepak added.

    Custom tool sets

    Taking off building quantities can be a repetitive process, and if you have multiple people working on several bid packages at once, having a standard set of tools makes work consistent and efficient among everyone. Markups, like colored hatch patterns, and symbols, like lighting fixtures, can be saved as a custom tool set in Revu and even shared with other users.

    Civil 3D: Alignment Creation – Free Entities

    Alignments are created in Civil 3D by selecting AutoCAD objects or by using specialized tools.  Sometimes selecting objects is appropriate, but when the alignment is required to be very flexible in terms of editability, utilizing those specialized tools can be critical.


    There are three types of Alignment segments present within those specialized tools: Fixed, Floating, and Free.  The use of these tools is not always obvious, so we have created 3 video which explains the use of them.


    The last of the three videos, Free Entities, can be viewed at this link or below.

    Four Things Municipalities Should Do When Taking Plan Check Digital

    This story was originally published on the Bluebeam Blog.

    Cities and municipalities transitioning their plan check process from paper to digital have a lot to look forward to.

    Moving the paper-based process of reviewing and approving plan documents for local-area building projects can improve your efficiency in the digital era. But that doesn’t mean making the transition from paper to digital is always easy. There are many considerations—some of them not so obvious—that need to be taken into account when moving the plan review process from paper to digital using Bluebeam.

    Whether approving plans for a single-family home or a robust, skyline-defining high-rise skyscraper, there are several process-oriented tips cities should follow to ensure a smooth transition to digital.

    Here are four things cities and municipalities would be wise to consider as they undergo their paper-to-digital plan check transformations.

    Appoint a leader

    No matter the size of your city or municipality plan check review team, it’s critical when preparing to undergo a paper-to-digital transformation with Bluebeam that there is someone on the team leading the effort internally. This person, typically someone who has at least modest experience using Bluebeam, will act as the liaison between the city or municipality and the Bluebeam implementation team.

    Channeling communication through an internal point person will alleviate potential blockers in the process of getting the rest of the team up to speed on using Bluebeam. It will also help other team members have an internal “expert” to go to when minor questions arise.

    Consider process, not just software

    Bluebeam Revu is an extremely malleable software that users can customize to suit their specific needs. So when preparing to use Bluebeam to transition a city’s plan check review process to digital, it’s important to consider the workflow first and then how Revu fits in it.

    Luckily, Bluebeam’s professional services team can help customize Revu for each city’s particular workflow. Preparing documents ahead of the official review cycle in Revu—through software features like page labelsOCR and batch link, as well as setting up a Studio Session—can make the broader transition much easier to digest.

    Simplify transition

    Change is hard. From comfort level with technology to experience with digital tools, every team member is going to approach digitization differently. That’s why cities and municipalities that are going digital with their plan review process should work to simplify the process using Revu as much as possible. Start small by focusing on the easy wins that benefit the entire team. Once their knowledge of Revu expands, add more in-depth elements.

    Begin with features like Profiles and Tool Sets in Revu to customize and standardize the review workflow process, making it as easy as possible for those involved.

    With Profiles, cities and municipalities can eliminate toolbars and panel icons in Revu that won’t be needed. This keeps Revu’s interface simple and clean, and easier to use for team members and collaborators.

    Tool Sets give the ability to create custom tools in Revu for each department that is reviewing documents, even using different colors to distinguish each department’s tools. Additionally, you can create tools in Revu that contain commonly used comments; this way each user doesn’t need to manually type them in every time.

    Think beyond initial training

    When it comes to learning Bluebeam Revu, process is just as important as training—and this applies to cities and municipalities embracing Revu for plan check as well.

    Indeed, eventually team members will receive the training they need to use the software, but an equally important consideration when initially implementing it is the high-level process, or workflow, that the team needs the software to exist under.

    How does the ideal plan check review process work? What stakeholders are involved? What sorts of reviews or markups are they conducting? What approval stamps need to be digitized? The Bluebeam professional services team can help you work out these questions and develop a process that meets your team’s specific needs.

    Looking forward

    No matter where cities are in their digital review journey, there are always industry consultants at Bluebeam available to help ease the transition. Revu is a powerful, comprehensive tool for the full spectrum of users across the architecture, engineering and construction industry. But that doesn’t mean that implementing Revu for the highly specific needs of a municipal plan check process needs to use the full scope of the software’s capabilities.

    Simplifying Revu’s tools and streamlining how it’s used in a workflow will ensure that the transition from paper to digital is as beneficial—and easy—as possible.