• Vault Pro 2024, new job processor functions!

    With the release of Vault Professional 2024, Autodesk add two new job process into their job processor tool.

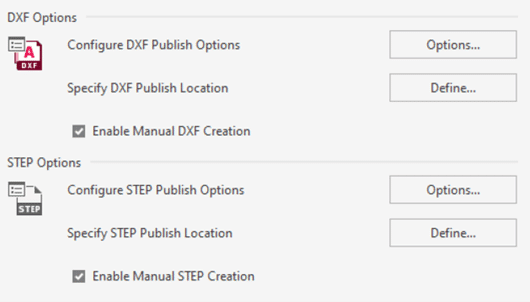
    STEP and DXF are now added to the current PDF functionality. These new functionalities could be done by lifecycles states or manually on demand.

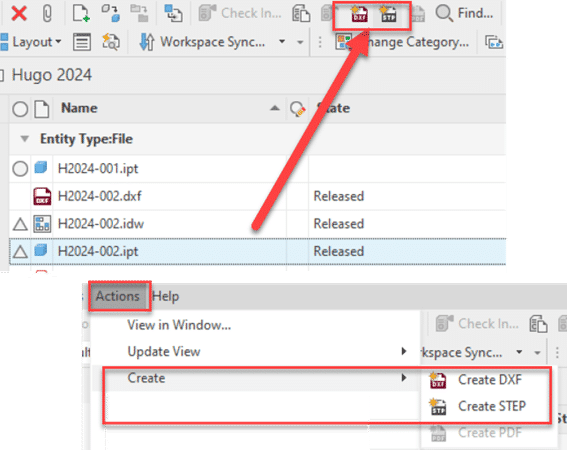
    On demand function will appear into the standard Vault Toolbar or also into the action menu

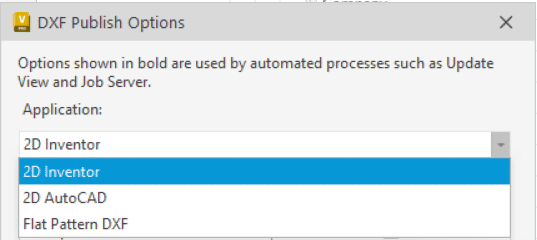
    DXF Options is available for 3 file types, 2D Inventor, 2D Autocad and Inventor 3D Flat pattern.

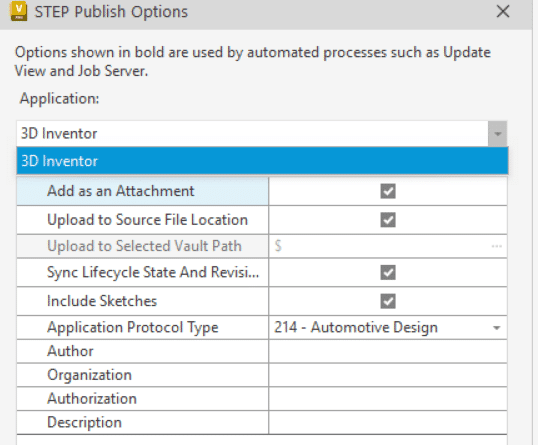
    STEP file option is only for Inventor .IPT and .IAM files.

    As the actual PDF option, you can specify publish options inside or outside the Vault. But take note that for the DXF Flat pattern, it’s impossible to specify a custom .ini file to generate the DXF with your custom configuration! We expect that this functionality will be added in a next available service pack or a possible workflow to modify the generic setup. I will keep you updated with another post when a solution will be available.

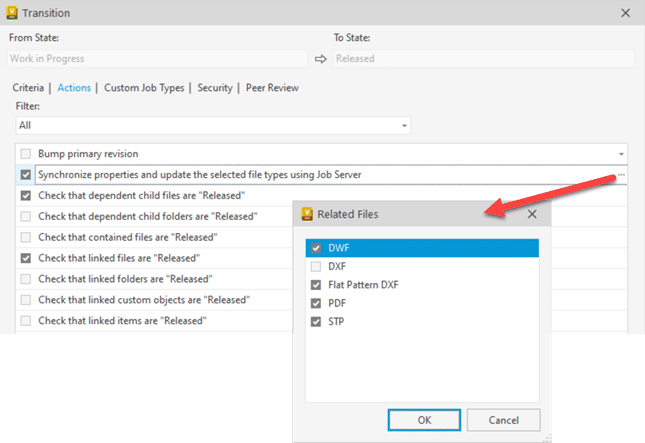
    For Lifecycle change state options you will find these options into the transition action Tab and the three small dots on the “Synchronize properties and update the selected file types using the Job Server”.

    Take note that if you choose the two DXF options you will have by default two .DXF files. By default the Vault naming rules are the “filename + actual file extension + .dxf”.

    Ex: if you have a file name as part 123.ipt with drawing 123.idw you will have 123.ipt.dxf and 123.idw.dxf.

    If you prefer to don’t have the original file extension into your .dxf, please don’t add two DXF options in same time.


    Now, how to change the DXF or STEP file naming default?

    As the actual PDF, you simply need to modify or add this following line into the JobProcessor.exe.config file.

    1.1)    <add key=”DesignRepresentation.Naming” value=”\.(idw|dwg|ipt|iam)$/&lt;_name_&gt;”/>

    I suggest this link to see more about file naming options: https://help.autodesk.com/view/VAULT/2024/ENU/?guid=GUID-F05BFEAF-A362-4070-BBA6-F3A74602967E

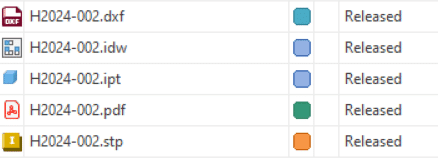
    The suggested line in 1.1 will create STEP, DXF & PDF without file extension. And it will be applied for .ipt, .iam, .dwf and .idw files.

    It’s why you see in yellow below the value added in the option (not mentioned into the Autodesk help)
    value=”\.(idw|dwg|ipt|iam)$/&lt;_name_&gt;”/>

    Example of the result:

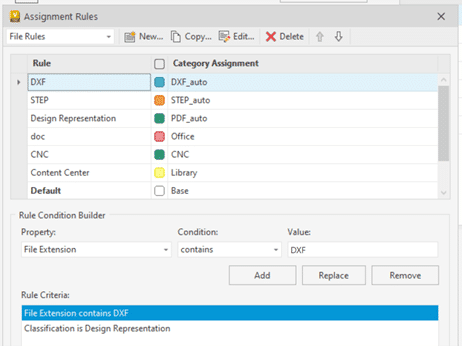
    All files generated by the job processor (PDF, DXF & STEP) are Design Representation and you can easily assign specific categories to them.

    All these files have a specific property because they are created by the Job Processor. The property is “Classification” and type is “Design Representation”. So if you add this into your rules and the file extension, you will be able to automate other category for STEP, DXF or PDF not generated with the job processor.

    Enjoy the new tool and see more info into the Vault 2024 help!

    Hugo Trepanier

    Free your Drives: Using Relative Paths in your Automated Models

    Here’s the scene: You’re 18 months deep into building automated models and templates for your production team, and everything is working as well as you can hope – but the IT team has an upgrade plan in the works. You and your team of designers are now sporting brand new laptops, better in almost every way from what you were using before, with one small caveat: the hard drives are now a small SSD solely for Operating system usage (C:\) and a large storage drive for everything else (D:\).

    To anyone who is not knee-deep in the automating trenches, this may not seem like a problem at all. You might be thinking, “Well, more space is great!”; but there’s always a ghost in the machine when you’re bootstrapping something like an automated workflow. The main challenge that I’ve seen (and have personally fallen victim to) is that users will hard-code a specific drive into their automated templates when a file path is needed – something that isn’t wrong, but can lead to challenges down the road.

    So, how do we fix it? We’re going to take a look at three options, one of which you may have already considered:

    • Manually Changing the Drive Letter
    • Referencing the Drive Letter via Document Location
    • Referencing the Drive Letter via Project Workspace Location


    Manually Changing the Drive Letter

    Let’s start with the simplest, but least robust choice: manually updating the drive letter in your models. Take a look at this snippet of code:

    If Parameter("Location") = "Front"
    Components.Add("FRONT MOUNT CLIP", "C:\BDL_Vault\DeskStorage\Designs\Standard Mounting\133092.ipt")
    Else
    Components.Add("REAR MOUNT CLIP", "C:\BDL_Vault\DeskStorage\Designs\Standard Mounting\133088.ipt")
    End If

    This is a direct reference to a specific folder on my C:\ drive, a distinct location that I’m using to store that specific standard file. Following this concept, you would simply edit each string to look like this:

    If Parameter("Location") = "Front"
    Components.Add("FRONT MOUNT CLIP", "D:\BDL_Vault\DeskStorage\Designs\Standard Mounting\133092.ipt")
    Else
    Components.Add("REAR MOUNT CLIP", "D:\BDL_Vault\DeskStorage\Designs\Standard Mounting\133088.ipt")
    End If

    At this point, your template is updated. The main drawbacks to this method are that the location is still hard-coded (albeit to a new drive letter), and you will need to update each template individually each time this needs to happen.

    Referencing the Drive Letter via Document Location

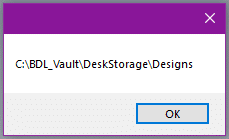
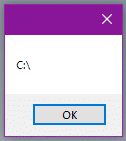
    When a file is saved, the folder path is stored as a piece of background data that is accessible via iLogic – meaning we can grab this information and pare it down to find the drive the file is stored on. A simple way to access (and display) this information is here:

    Dim DocPath As String
    DocPath = ThisDoc.Path
    MessageBox.Show(DocPath)


    Figure 1: Saved Document Path


    After finding the path with the above line of code, we’ll need to find the root of the path, which can be done using the .NET GetPathRoot method:

    Dim RootLetter As String
    RootLetter = System.IO.Path.GetPathRoot(DocPath)
    MessageBox.Show(RootLetter)


    Figure 2: Root Drive


    Now that we have the drive letter stored in a local variable, we can use that to build out the string we want to use to locate our file, like this:

    Dim StandardLocation As String
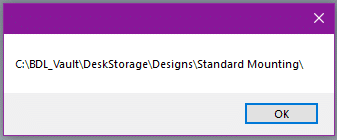
    StandardLocation = RootLetter & "BDL_Vault\DeskStorage\Designs\Standard Mounting\"
    MessageBox.Show(StandardLocation)
    Figure 3: New File Location


    The main downside to this method is that locating the drive will be entirely dependent on where you’ve saved the file that this rule is going to run in. If you have multiple storage drives and you’ve saved this file on a very specific drive (G:\, for example) then this method will return G:\ as the root drive, which may not be where you mean to look.


    Referencing the Drive Letter via Project Workspace Location

    This method is the most variable of the three I’ve mentioned so far, as it relies specifically on where your project file’s Workspace folder is located. The steps to get the drive letter are almost identical to the previous method, but with a slightly different input required. I’ll show you three ways to get the data we want in the snippet below:

    Dim WSPath As String
    WSPath = ThisApplication.DesignProjectManager.ActiveDesignProject.WorkspacePath
    WSPath = ThisServer.DesignProjectManager.ActiveDesignProject.WorkspacePath
    WSPath = ThisDoc.WorkspacePath


    The first line of code references the DesignProjectManager object within the context of the Inventor Application. From accessing that object, we can specify that we want to look at the current active project, and then grab the Workspace path from there.

    The second line of code is the same as the first, but rather than referencing the Inventor Application, it references the Inventor Server. Functionally, this will operate the same way when run on the desktop Inventor application, but if you are eventually going to export your models to a cloud-based service (such as SolidCAD’s VARIANT configurator) you will need to reference this Server object instead.

    The final line of code is the simplest, directly referencing the current document, and searching for the Workspace of the currently active project.

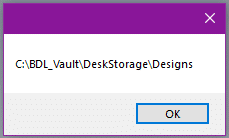
    All of the above options will result in a string that looks something like this, when printed inside a message box:


    Figure 4: Workspace Path

    After choosing your method (I would recommend #3, personally) you can then take the same steps to get the root of the Workspace and build out your file path:

    Dim RootLetter As String
    RootLetter = System.IO.Path.GetPathRoot(WSPath)
    MessageBox.Show(RootLetter)
    Dim StandardLocation As String
    StandardLocation = RootLetter & "BDL_Vault\DeskStorage\Designs\Standard Mounting\"
    MessageBox.Show(StandardLocation)


    Figure 5: Root Drive and New File Path


    This method will ensure that you are always referencing the same drive that your workspace exists on, which is commonly where any automated templates or standard components will be located.


    What Does This Actually Look Like?

    Here is an example of a very short conditional rule that makes use of the third method to locate the drive and replace a component based on the triggering parameter:

    Dim WSPath As String
    Dim RootLetter As String
    Dim StandardPath As String
    WSPath = ThisServer.DesignProjectManager.ActiveDesignProject.WorkspacePath
    RootLetter = System.IO.Path.GetPathRoot(WSPath)
    StandardPath = RootLetter & "BDL_Vault\DeskStorage\Designs\Standard Mounting\"
    ThisAssembly.BeginManage("Mounting Clips")
    Select Case Parameter("Location")
    Case "Front"
        Components.Add("FRONT MOUNT CLIP", StandardPath & "133092.ipt")
    Case "Rear"
        Components.Add("REAR MOUNT CLIP", StandardPath & "133088.ipt")
    Case "Left"
        Components.Add("LEFT MOUNT CLIP", StandardPath & "133090.ipt")
    Case "Right"
        Components.Add("RIGHT MOUNT CLIP", StandardPath & "133077.ipt")\
    Case Else
        'No Clip, should never happen
    End Select
    ThisAssembly.EndManage("Mounting Clips")
    InventorVb.DocumentUpdate(True)

    As you can see in context, this doesn’t add very many lines to your overall rule (even less if you initialize the variables with their end values), and it helps to future-proof your code in the case that you will be using different drives over time.

    If you’d like to learn more about iLogic and how to use it, you can continue checking out the articles here on the SolidCHAT blog, or if you’re looking for a more structured or in-depth learning approach, we offer standard and custom training for iLogic and other Autodesk products here at SolidCAD.

    Until next time!

    Civil 3D 2024: Custom Subassembly Help

    Do you create custom subassemblies for Civil 3D? PKT files? Do you write your own help files (you should)? If so, read on for this new, very welcome feature.

    TLDR: In Civil 3D 2024, right clicking your custom subassembly Help button in the tool palette opens whichever help file is embedded into your PKT. In previous versions, this did not work unless you used a CHM-type of help file.

    Detailed answer:

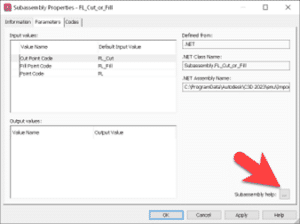
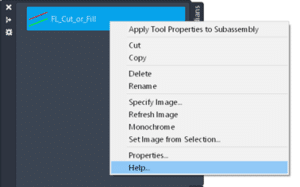
    Accessing subassembly help is easy…so long as you try to get help using out of the box subassemblies, like this DaylightBasin.

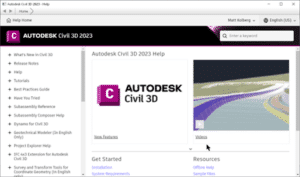
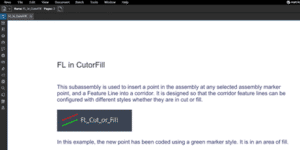
    In all Civil 3D versions up to now, getting help from your custom PKT files is not as easy. Click help, like the image above, gets you this generic help page. It does not open the PDF, or MS Word file that you have embedded into the PKT. If you create a CHM file, then it DOES open. But creating these is not as straightforward as you may wish. You can get the help, but you add the subassembly and then go to subassembly help.

    Now, in 2024, there seems to be new functionality that I’ve just experienced which does not appear to be documented. I developed a PKT for a customer last week and I right clicked Help in the tool palette…AND IT WORKED! The PDF opened right away.

    To learn more about Civil 3D, feel free to contact us.

    Enjoy!

    AutoCAD Resources: In the Autodesk Cloud

    If you customize AutoCAD across your design team and you use the Autodesk Construction Cloud (ACC), read on…

    I’ll define AutoCAD resources as files that AutoCAD uses to support design content. Here are several common file types that are customized.

    • Plot Style Tables (CTB/STB)
    • Fonts (SHX)
    • Printer Files (PC3/PMP)
    • User Interface (CUIX)
    • Linetypes (LIN)
    • Tool Palettes

    Many organizations store these files in a folder on a network-shared folder and point the users’ AutoCAD settings to this folder. This is good since there is a single location (single source of truth) for these files. When a CAD Manager updates are adds a file, users will instantly have access to it. Some firms have experienced performance degradation with this method.

    Some organizations copy these resource files to the users’ computers and use synchronization software to manage changes to them. This can be good for AutoCAD performance since the files are stored on their physical computer and not across the network. Files typically do not syn until the computer has been restarted, however.

    With the Autodesk Cloud, we can have the best of both worlds. Install Autodesk Desktop Connector (ADC) v16 or later to make for the best experience. I’ll describe exactly why later in this article.

    1. Create a new ACC project and invite your users to it. I named mine CAD Resources and I created subfolders for each data type. Copy your resources to the appropriate folders in the cloud.

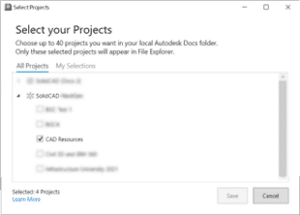
    2. In the Desktop Connector on each user’s computer, ensure that this project is visible.


    3. Also on each user’s computer, turn on this option for the resources folder. This is what ADC v16 is for. In v15, this was not an option. It is critical that the files physically reside on the user’s computers when AutoCAD is run. This setting ensures that.

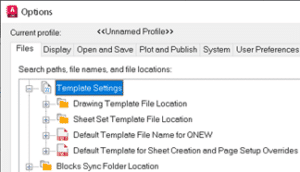
    4. Lastly, configure your AutoCAD product’s settings (Options) to point to these location.

    Stay tuned for the next article where printing with the Sheet Set Manager for Web uses CTB files stored in this same CAD Resources project.

    To learn more about AutoCAD or the Autodesk Construction Cloud (ACC), feel free to  contact us and one of our representatives will reach out to you shortly.

    D-Wave

    Success Stories

    D-Wave

    D-Wave Article

    © Copyright D-wave

    D-Wave Quantum Inc. (D-Wave) is the leader in the development and delivery of quantum computing systems, software, and services. It is the only quantum computing company building both annealing and gate model quantum computers and offers quantum systems, cloud services, application development tools, and professional services to support the end-to-end quantum journey. From its inception, D-Wave has focused on delivering products and services that provide the fastest path to practical, real-world quantum and quantum-hybrid applications with customer value. Its solutions are used to tackle optimization problems spanning a multitude of industries, including manufacturing and logistics, financial services, life sciences, retail and many more. Its broad portfolio of enterprise customers—such as Mastercard, Volkswagen, Pattison Food Group, DENSO, Toyota, BBVA, NEC, Deloitte, and Lockheed Martin—have built hundreds of early quantum applications in diverse areas such as resource scheduling, mobility, logistics, drug discovery, portfolio optimization, manufacturing processes, among others.

    Improving Bill Of Materials Management And ERP Integration With PLM

    The Challenge

    As a leader in the development of quantum computing systems, D-Wave prioritizes building high-quality systems, software, and services for its customers. With growing needs for increased cross-enterprise collaboration and heightened demand from customers, D-Wave recognized that it needed to improve its current Product Lifecycle Management (PLM). It was particularly looking for a solution that would increase the efficiency of its processes. D-Wave required to solve the following challenges in order to meet its business goals:

    • Bill of Materials (BOM) management and collaboration.
    • Manual BOM and data input into ERP.
    • Lack of integration, automation, and API capabilities of the system in place.
    • Manual change control and change management.
    The Solution

    SolidCAD and D-Wave teams worked closely to create the best strategy that would meet D-Wave’s business requirements. The solution was to:

    • Implement Autodesk’s PLM solution, Fusion 360 Manage platform.
    • Create a bi-directional integration between Fusion 360 Manage and NetSuite ERP.
    The Results

    Today, D-Wave uses PLM to manage Supply Chain, BOMs and Changes. The live and bi-directional integration between PLM and NetSuite ERP allows D-Wave to gain efficiency and ensure consistent knowledge-sharing by using PLM as the single source of data. The result of SolidCAD and D-Wave’s collaboration was a solution that allowed D-Wave to:

    • Replace its existing systems with Autodesk Fusion 360 Manage PLM, one modern centralized platform.
    • Manage BOMs and supply chain needs.
    • Streamline the management of: Vendors, Vendor Part Numbers, Manufactures and Manufacturers Part Numbers.
    • Centralize Change Management processes. PLM has empowered D-Wave to proactively keep track of changes.
    • Make more informed decisions by having access to all the necessary data in one location. The integration between NetSuite ERP and PLM has enabled the engineering and purchasing teams to increase their work efficiency

    Testimonial

    The main increase in functionality we have seen is the synchronization of the Fusion 360 Manage PLM database with our ERP database.

    The ability to add custom filtering to searches is much superior to our old system. For example, I can look for parts I created in the last 43 days that have the word “Nut” in the description and are not released to production.

    As it comes to time savings, we were able to:
    • Configure the part numbering system to match our existing method, saving thousands of hours of engineering work.
    • Remove around 8 manual processes/workarounds with Excel to move data around and supply data to our engineers.
    • Configure the Item Master sheet to be able to see all the fields that our engineers care about on one screen. No more flipping back and forth between tabs or scrolling up and down.
    As it comes to ERP integration, automation with scripts were able to help us with:
    • On-Creation of a new part; automatically pushes the data to our ERP system.
    • On-Save of a pre-release part; automatically pushes the data to our ERP system every time we edit a part.
    • On-Transaction-in-ERP: pulls data on quantity, on-order, price, and stock location from our ERP back to Fusion. No need for a second license to get the information from the ERP system.
    • Third party middleware: link the two databases bi-directionally. No waiting until midnight for them to sync up.
    • Add-hidden fields for database internal IDs: the middleware can make changes in the other database directly.
    • Links between the part supplier and part manufacturing workspaces to allow them to be linked together and pushed to our ERP system.
    As it comes to Engineering Change Order (ECO) process:
    • Creates very simplified part release that allows for low overhead to our engineers and enables very fast prototyping.
    • Creates more complex workflow for released production parts and assemblies
    – Dave Bruce, Principal Mechanical Engineer at D-Wave

    Products & Services Used

    • Fusion 360 Manage.
    • Implementation, Integration and Project Management.
    • Post Go-Live Support.

    Similar Projects

    3D-P

    3D-P consists of a team of mining and positioning technology experts. It was created to bring innovative thinking and new technologies to the mining industry. They have since evolved to bring this approach to several…

    Starline Windows

    Starline Windows is an industry leader in the design and manufacturing of architectural aluminum window systems, as well as residential vinyl windows and doors for over 50 years. They have completed thousands of contracts and…

    CMAC-Thyssen

    CMAC-Thyssen Mining Group is a contractor and mining equipment manufacturer offering a diverse range of fully integrated services with contracts carried out across multiple continents and over 850 employees worldwide. CMAC-Thyssen Mining Group makes the…

    How Technology Can Help Construction Amid Economic Uncertainty

    This story was originally published by JAMES CHAMBERS on the Bluebeam Blog.

    Technology has the potential to eliminate redundant work and streamline mundane-yet-critical tasks, easing the burden on construction firms as they face a possibly challenging economy ahead.

    onths of political and economic uncertainty point to a potentially bleak outlook for the construction industry in 2023.

    According to the latest Autumn Construction Forecasts 2022–2024 from the Construction Products Association (CPA), construction output is expected to fall by 3.9% in 2023.

    As real wages plummet and further rises in interest rates are expected, demand for private housing new build and repair, maintenance and improvement (RM&I) is likely to fall as well.

    What’s more, those working in commercial and infrastructure are increasingly concerned about inflation driving up construction costs during a recession.

    While adopting new technologies can be daunting for any business, it would be remiss to rule anything out as the industry faces turbulent times. There are many ways in which technology can help businesses survive a construction recession.

    Mitigating the impact of a recession on the construction industry

    Building information modeling (BIM) has been around for a while, but the construction industry has generally been slow to embrace the digital world and what it has to offer.

    However, the COVID-19 pandemic accelerated digital transformation in several industries, including construction, forcing companies to review their processes, operations and procedures, many of which were outdated and no longer fit for purpose.

    Organizations were given the opportunity to identify gaps that could be filled through digitalization, and embracing new technologies has enabled them to adopt solutions that might otherwise have taken years to integrate.

    Here are some ways in which technology can help the construction industry in a recession:

    1. It aids sustainability efforts

    One of technology’s biggest appeals relates to sustainability in that it enables businesses to become paperless, thus eradicating printing costs.

    Plus, having everything processed digitally not only reduces carbon footprints but also facilitates remote working – something many businesses had to adapt to for the first time during the pandemic.

    1. It improves collaboration

    Cloud technology makes it easier to share information even when you’re not physically in the same location; real-time data can be shared from any device at any time, so everyone has access to the latest information. This can help avoid unnecessary delays, saving time and resources.

    1. It streamlines processes and saves money

    There is a myriad of software that can be used to automate processes that have typically drained people’s time and energy. From payroll to scheduling to project management, there is a wide range of construction software out there that can help businesses save valuable time and money.

    1. It supports training

    It’s important to retain as many employees as possible, especially during a downturn and as the construction industry already struggles with recruitment. Technology can help connect your teams and offer access to flexible, up-to-date training.

    1. It minimizes re-work

    Re-work is one of the most common reasons construction companies lose money during projects. Not only does it extend the project schedule and risk late delivery, but it also impacts your company’s reputation, impacting the number of bids secured. Software can help track progress and bring the whole team together, making mistakes and problems less likely.

    Embracing digital construction during a recession

    Technology helps to boost productivity in the construction industry by streamlining and automating processes, and despite having a long way to go before being completely digitalized, firms that take advantage of its power have an opportunity to stand above competitors that are slow to adapt.

    Autodesk Desktop App: Replaced

    The Autodesk Desktop App (ADA) gets installed on users’ computers when Autodesk applications are installed. Its purpose is to read which Autodesk software is installed on the user’s machine and provide information about which updates and add-ins are available. It uses the user’s Autodesk login credentials to determine what applications and services to which the user is entitled.

    March 16, 2023, a new Application, Autodesk Access (AA), was made available which will replace ADA. Read this Autodesk document for more information. It accomplished essentially the same goals as ADA.

    Why this change?

    • AA will provide a simpler and more streamlines update experience for the users.
    • AA is more secure than ADA.
    • AA will be expanded in the future with more features.

    What does this mean for you?

    • When installing the Autodesk 2024 applications, ADA will be removed, and AA will be installed in its place.
    • Unlike ADA, AA cannot be uninstalled. Only when the last Autodesk product on the machine is removed, will AA be removed.
    • If you need to disable users’ abilities to install updates via Autodesk Access, click here for the registry key you must set.

    To learn more about Autodesk applications, feel free to contact us and one of our representatives will reach out to you shortly.

    Sheet Set Manager for Web: Printing in the Cloud

    This is a follow-up to my previous article discussing using ACC for the storage of AutoCAD Resource files. If you’re using the Autodesk Construction Cloud (ACC) and publishing using the Sheet Set Manager (SSM), read on…

    A little history first. The Sheet Set Manager has been available for many years, and it solves many AutoCAD organizations and efficiency problems. When Autodesk Docs and ACC were made available, and users stored their files in the cloud, they experienced significant issues with the good-old SSM. This document outlines the issues and their solutions.

    Then we got the SSM for Web: a new cloud-based version of the SSM. At first, it was limited in what it could do, but with the latest version for AutoCAD 2023, it is much more robust.

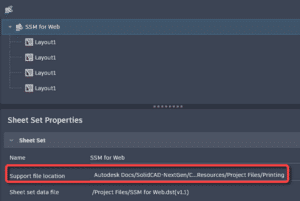
    Enough about history, how does the SSM for Web publish? Here is the SSM for Web with 4 sheets. Note the area surrounded in red, the Support file location. I have set this to a separate ACC project named CAD Resources. It has a sub folder that contains CTB files.

    When you publish using the SSM, the publish action occurs online, not locally on a user’s computer. It’s not even publishing in the background. It just happens in the cloud. Understandably, your CTB files, and any other potential files AutoCAD needs when printing, must reside in the cloud and the SSM support location must be set to this folder.

    Warning: even if your installation of AutoCAD uses a non-cloud CTB file, when publishing from the SSM for Web, it WILL use the one in the cloud. You MUST have a CTB file in the cloud.

    Pro tip: Give the system plenty of time to synchronize changes to the CTB. Like, maybe 10-15 minutes. Do not expect changes to be as fast as drawing edits. Restarting AutoCAD after editing the CTB seems to help.

    To learn more about the Autodesk Construction Cloud (ACC), feel free to contact us and one of our representatives will reach out to you shortly.

    Civil 3D 2024

    Well, it’s that time of year again when Autodesk bestows us with the latest release of their flagship Civil Design application. Click here for Autodesk’s documentation. Read on to see which features speak to this blogger.

    File Format

    This is probably the most-asked question, and I’m happy to say that there is yet again, no format change. We are still on the 2018 format. Good news for everyone!

    Performance

    Considerable improvements have been made to:

    • Installation
    • Switching between paper space layout tabs
    • Corridors

    ArcGIS Connector

    We can now save configurations for importing data. Arc objects can now be imported. Objects can be imported as AutoCAD entities if required.

    IFC

    IFC 4.3, which has been available for 2022, is now available for 2024.

    Project Explorer

    This tool is now native to Civil 3D. No need to download and install separate from Civil 3D.

    Subassemblies

    A major change has been made regarding managing custom subassemblies (PKT files).

    • PKT files can be saved to a shared folder on a network or even a cloud service such as Autodesk Docs. Civil 3D accesses these in place, no longer in C:\Program Data.
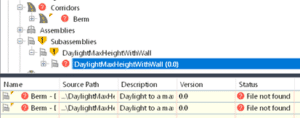
    • If a PKT file cannot be found, Civil 3D will notify you.

    • Tool palettes containing custom subassemblies are far easier to manage now and they are less error prone.
    • Subassembly versioning was added in 2023, but there was no obvious reason for it. Well, now we have a reason. PKT versions can be managed in Civil 3D and new versions can be reloaded and implemented WITHOUT restarting Civil 3D.

    • Since we are on the subject, the eTransmit tool still DOES NOT recognize custom PKT files. Click here to upvote this wish list item.

    Pressure Networks

    • Fitting and appurtenance styles now have an annotative option. Pro Tip: spend some time considering the options. Sizing may not be what you expect. Contact us for some advice when you’re ready.
                                         
    • Fitting and appurtenance styles now support hatching.


    • Pipe runs can be merged and broken.
    • Pipe segments can quickly be toggled between line or an arc.


    • Bend styles now have a vertical bend option for visibility in plan view.


    Point Clouds

    • Recap can now automatically classify points for any scan type.
    • Point clouds can be manipulated in Autodesk Docs; measured, linear curb features extracted, before inserting into a drawing.


    To learn more about Civil 3D, feel free to contact us.

    Document Management vs. Content Management

     Document Management and Content Management

    Are they really the Same?


    Businesses generally have several software systems to manage their assets, content, data, and documents. Two software systems that often intersect are the Document Management (DMS) and Content Management (CMS) systems. Your greatest Business need will determine the type of system you invest in to manage your assets, content, data, and documents.

    Document management and content management are closely related and appear to be the same thing, however when you begin to analyze DMS  vs CMS, you begin to see the differences.

    Businesses researching options should focus on the type of challenge they are trying to resolve, secondly focus on technologies to address these challenges. If the core challenge is about the long-term preservation of your assets, content, data, and documents electronically, some form of a DMS system would be a likely candidate.

    On the other hand, if the file content is more fluid, typically presented on a web-based interface, then a CMS is the more likely candidate.


    WHAT IS DOCUMENT MANAGEMENT (DM)?


    Document Management (DM) is a system or process used to capture, track and store electronic documents, such as Adobe, AutoCAD, MS Office files along with digital images of paper-based content.

    Document management can save your business time and money. It provides assets, content, data, and document security, access control, centralized storage, audit trails and streamlined search and retrieval.


    WHAT IS A DOCUMENT MANAGEMENT SYSTEM (DMS)?


    Document Management (DMS) to capture, store, manage, retain, assets, data, document content and its related metadata to allow for   regulatory compliance and workflow management. They include the functionality such as create, draft, generate templates, version, collaborate, secure, metadata, access rights, approvals, distribution, search, repository organization, archiving and retention policy management, along with reporting and auditing on these functions.

    The more advanced capabilities in a DMS can include object relationships, workflow, external sharing, auditing, record retention capabilities, co-authoring and more. Your IT team, Information Management team and others tasked with storing and managing your sensitive business information will be the owners of these systems.

    In review, your industry, environment, data, and documents requirements are extremely important when

    choosing a DMS system. An example are the highly regulated industries such as Energy, Health Care,  Government, Manufacturing and Pharmaceutical, these industries require a highly functional, and easily configurable system like MERIDIAN.

    In review, a DMS is used for collaboration or transactional functions to capture digital documents and store paper documents electronically.


    WHAT IS CONTENT MANAGEMENT (CM)?


    Content Management (CM) is a system or process used to assemble, organize, deliver, retrieve, and govern websites or enterprise business content.


    WHAT IS A CONTENT MANAGEMENT SYSTEM (CMS)?


    A Content Management (CMS) helps store, manage, personalize, and publish content digitally such as websites and other digital media. These are either integrated with other applications or separate applications sharing common Application Programming Interfaces (APIs) and repositories.

    A CMS is one software component among a variety to manage a businesses digital asset management, customer data platforms, e-commerce, social media management, marketing automation and CRM requirements. The integration of these systems is described as a digital transformation platform. A CMS offers control over storage, access, and distribution of key content like logos, videos, audio file and documents.

    CMS is like a DMS system however it’s designed to focus on content type management like audio, images, web pages, video and other types like XML, HTML and JSON content.


    DIFFERENCES BETWEEN DOCUMENT AND CONTENT MANAGEMENT


    DATA TYPES

    DMS: Manages structured assets, content, data, and documents and is focused on the formats such as Adobe Acrobat (pdf), ASCII (aim), AutoCAD (dwg), Excel (xlsx), Word (docx), PowerPoint (ppt), Notepad (txt).

    CMS: Manages structured and unstructured data and is focused on formats such as web content Hypertext Markup Language (HTM, HTML), Adobe Acrobat (pdf) files and Digital Assets (images, audio and video) files.

    KEY PURPOSES

    DMS: To capture, store, manage, retain, assets, data, document content and its related metadata to allow for   regulatory compliance and workflow management.

    CMS: To store, store, manage, personalize, and publish content digitally such as websites and other digital media.

    BONUS FEATURES

    DMS: Advanced imaging, rendition, scanning capabilities such as Optical Character Recognition (OCR), Handpoint Character Recognition (HCR), and Optical Mark Recognition (OMR).

    CMS: To provide a custom Virtual Reality (VR) and Augmented Reality (AR) experience in digital arenas such as kiosks, or personalized spaces.

    INTEGRATIONS

    DMS: Enterprise Systems: Enterprise Resource Planning (ERP), Customer Relationship Management (CRM) and Supply Chain Management (SCM).

    CMS: Digital Asset Management: Bynder, Writer, Brandfolder, DemoUp and 4ALLPORTAL

    The differences between a DMS vs CMS are subtle and depend on how your business will use them.

    A DMS excels at the preservation and organization of the businesses content, data, and documents.

    CMS is often focused on the content presented at websites, which is not specific to individual documents. An example is the difference between a business’s corporate documents and their company web pages. The corporate documents potentially have legal, regulatory or contractual consequences where each change in the documents are captured like a snap shot in time. The business web pages are constantly updated with new content by authored by various sources. A DMS tracks the documents from cradle to grave and the CMS offers web-based tools to collaborate, edit and maintain content.


    WHAT A DMS AND CMS LOOK LIKE IN REAL LIFE


    Due to their shared functionality, DMS and CMS systems are theoretically similar but what about in real life? Let’s compare DMS and CMS systems that co-exist in one business. The business employs 1,500 employees and implemented a DMS and CMS platform.


    Document Management (DMS)

    The DMS is utilized to create and manage various document types (corporate, equipment, facility project, and maintenance). It contains Optical Character Recognition (OCR) capabilities automating the creation of the related document meta data. It also has the automated document workflow functionality to notify the relevant personnel when review and approval is required. This allows for real-time collaboration when the documents are created and edited.

    The DMS offers document version control and audit trail tracking required for environmental, legal, and regulatory obligations. This ensures long-term management of the documents with ability to retrieve current or pervious versions of the documents at anytime.


    Content Management (CMS)

    The CMS provides the indexing and categorization of various content types (contracts, invoices, notes, purchase orders, reports and requisitions) providing the ability to store and structure accurately.

    To support easy retrieval of the information from multiple sources the CMS supports integration with other applications. It also supports the creation and publishing of analytic data, reports, internal business, marketing material and employee procedures. The content is in web-focused formats with built-in audio and video capabilities.

    This real life example shows us a DMS and CMS focus on different items: The DMS involves digitizing files, complying with environmental, legal, and regulatory obligations and guiding structured documents and their related meta-data through the whole document lifecycle from cradle to grave. The main purpose of the CMS is proper organization of both structured and unstructured digital assets to support accurate storage, easy retrieval and publishing of digital content.


    CONCLUSION

    So rather than view Document Management (DM) and Content Management (CM) as the same, view them as complementary. Together or alone, they can help your business effectively manage digital information. To learn more about Meridian solutions (EDMS and CMMS) and how they can help your team, don’t hesitate to get in touch with the SolidCAD Meridian Team.