• 30 AutoCAD Tips & Tricks for Civil Infrastructure prof

    Ready to power up your AutoCAD skills?

    You can do this with one simple step: download this free AutoCAD eBook for Civil Infrastructure Professionals to discover popular tips from pros from the industry.

    This book is made possible by a number of SolidCAD expert power users in collaboration with Autodesk, and it covers everything you need to know about Printing, Configuration and Performance, Efficiency, Accuracy, and Blocks and XREFs, Annotations, and more.

    These time-saving tips will change the way you work, and help you uncover command options, keyboard combos, and new functionality to work more efficiently, save time and automate your workload.

    Download today by filling out the following form below.

    Contact

    null


    Default Hotkeys: What’s the Pattern?

    This story was originally published by  on the Bluebeam Blog.

    Bluebeam has a document that shows Revu’s hotkeys for various features, located here.

    Starting with the basic hotkeys, we can type single-letter commands mainly for drawing tools. Most of these are intuitive, with “r” for rectangle, “l” for line, “e” for ellipse, etc. But once we run out of letters in the alphabet, we have to get a little more creative. Snapshot can’t be “s,” because stamp is “s”—therefore snapshot uses “g” (think of grab or get snapshot if it helps). Cloud is “c,” so callout moves to “q”—which is easier to understand with a Boston accent.

    All of these simple drawing hotkeys have default settings that come preloaded when you install Bluebeam Revu. For example, pressing “r” for rectangle will draw a red rectangle with a line thickness of 1. Pressing “l” for line will draw a red line segment with a line thickness of 1.

    Default drawing hotkeys can be reformatted however you like each time by using the “Properties” tab. If you have a format that you use frequently, you can draw the object, format it, then while it is selected, click “Set as Default” from the “Properties” tab.

    Now, every time you draw that object, it will default to what you set up. If you later desire to change it, just redraw, reformat and click “Set as Default” again. Revu will remember this default every time you use the program.

    In addition to the many one-key hotkeys, there are far more combinations once you consider modifier keys (i.e., ctrl, alt, shift). These are somewhat loose associations, but will speed up the memorization and implementation of most hotkeys:

    Shift:

    Many of these hotkeys exist because we only have 26 letters to work with. So drawing a curve (or arc) can’t be “c,” because cloud is “c,” so “shift + c” draws a curve. The pen tool uses “p,” so we have to use “shift + p” to draw a polygon and “shift + n” for polyline. These items are easily learned with some regular use.

    The shift modifier is one you’ll use heavily for markups. AutoCAD has “ortho” and “polar” modes that modify the way that you draw objects on the fly, and Revu uses “shift” to achieve similar functionality and more. For example, “r” draws a rectangle, but “r + shift” draws a special kind of rectangle: a square.

    Holding “shift” while drawing a line makes it snap to 45 degree increments. Holding “shift” while drawing an ellipse draws a special ellipse: a circle. “Shift” also forces markup stretches using the handles to stay at 45 degree or 90 degree increments, depending on the markup—but that’s not the focus of this article.

    Ctrl:

    These follow the standard Microsoft Windows hotkeys where “ctrl + c” is copy, “ctrl + v” is paste, “ctrl + x” is cut, etc. A very powerful function Revu offers is to hold “shift” while pasting something so that it will paste in exactly the same place on the page from where it was copied. So if you have something you want in the same place on every page, you can copy it and then press “shift + ctrl + v” to paste it in the same position.

    For those like myself in structural engineering, I can copy a post on the third floor plan of a drawing set and then paste it in exactly the same place on the second floor plan to trace objects and loads down floor to floor. I can copy a shop drawing review stamp or page number and then paste it in exactly the same spot on the next page.

    Some non-standard hotkeys using the “ctrl” key are moving objects to the front or back or affecting the view of the page (e.g., “ctrl + h” splits the view horizontally between two documents).

    Alt:

    These hotkeys are for opening the various tabs. I find it easier to right click one of the tabs and select which ones I want to see. Then I keep the most pertinent ones open while I work and only open less commonly used tabs, like Studio in Revu, once in a while. As an engineer, I live in the properties and measurement tabs.

    For big projects, the layers tabs help me navigate busy plans, and the bookmarks tab help me navigate long calculation packages. The toolbox tab is where I store my pre-drawn markups for detailing and plan work.

    Shift + alt:

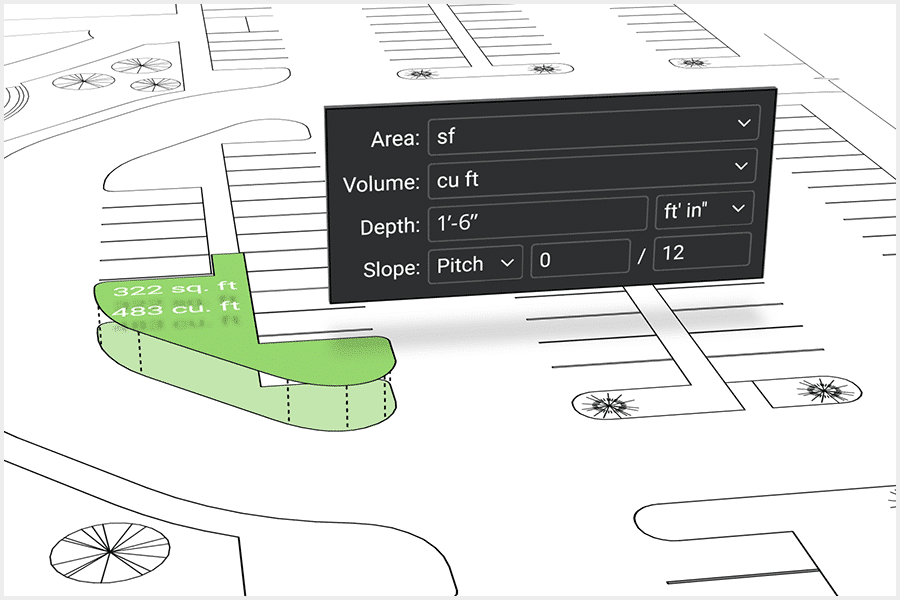
    The measurement hotkeys live in this domain, such as measuring length, area, volume, angles, etc. For example, “shift + alt + l” measures length.

    Ctrl + alt:

    These hotkeys are used for aligning and flipping objects. Objects can be flipped vertically or horizontally, and aligned with other objects’ tops, bottoms, left edge, right edge or center in either direction.

    Ctrl + shift:

    These commands generally affect the document itself, rather than the content within the document. You can rotate the page or pages, insert a blank page, close tabs, flatten the document and much more.

    Ctrl + shift + alt:

    The Bluebeam team has pitied your mortal five-fingered hands. There are no hotkeys that require three key modifiers. Whew!

    Obviously, there are lots of functions that don’t perfectly fit in one category or another, but these are generally infrequently used. This article should help you get up to speed on learning the many hotkeys and functions that Bluebeam Revu offers. I find that the things I practice day to day in Bluebeam are very intuitive, and I hope you will too.

    How Roofing Contractors Increase Efficiency with Bluebeam Revu

    This story was originally published by  on the Bluebeam Blog.

    It’s been fun over the past couple of articles highlighting ways concrete and framing contractors are using Bluebeam Revu.

    To continue with this series highlighting specialty contractors, I want to focus on the roofing contractor. Let’s look again at a few creative ways Revu is being used in the industry.

    Whether you’re roofing single-family homes, multi-family residential or large commercial properties, this article will focus on ways we measure flat and sloped quantities on drawings. Perhaps more important, these tools will allow us to safely measure existing roofs when we don’t have drawings and little to no access on-site. If this gets you thinking about possibilities, check out my article, “How Roofing Contractors Capture Hard-To-Get Measurements Using Bluebeam Revu,” where I go into greater technical detail.

    Using satellite imagery

    I live in a northwest suburb of Minneapolis, a part of the country that sees all sorts of crazy weather, including tornadoes, wind and hail—not to mention a good amount of snow. Several years ago, a hailstorm damaged many homes in our area. When the insurance adjuster came out to take measurements of our roof, he was scared to go on the roof and made no effort to hide his fear.

    I gladly followed him around drawing the roof faces with ridgelines and valleys until we came to the back half of the house. We live in a split-level house with a walk-out basement, so the roof is two stories on the back side. He affectionately called it the “scary side.” Needless to say, he was the one drawing at that point while I looked for damage to report.

    What I wanted to do was invite him into the house, where I could easily get a roof layout from a satellite image online.

    Looking at mapping applications or apps like Google Earth, a contractor could quickly enter the project address and zoom to an aerial view. Often, these applications provide a bar scale somewhere on the image. Make sure you include this scale when capturing the screenshot. Opening the image in Bluebeam Revu, we’re able to use the bar scale, parking spaces or a known building edge to calibrate the image to the correct scale.

    Versatile Revu features

    With a properly scaled image, we can now use the area measurement tools to trace the outline of the building along the soffit or parapet. In different areas, we might use the Cutout tool to remove material for a rooftop unit or other special conditions. Obviously, the same workflow is easily done if drawings are provided; I just wanted to mention a workflow where we might be able to eliminate a site visit, travel time, coordinating roof access and nasty winter conditions.

    What about residential projects with sloped roofs?

    The same process can be used to collect the square footage of the roof layout. In this case, however, you can add an 8/12 pitch to the area measurement and Revu will do the math for you, updating the square footage. Revu also has great tools for measuring facia, soffits and sloped ridge and valley materials.

    In the case where drawings are outdated or not available at all (and aerial images also aren’t available), we still have options for collecting field information. Revu allows us to start a fresh new PDF of any size. You can include an engineer grid to help draw to scale as you measure. If you need measurements to be a little more precise, there are Sketch To Scale tools where you can draw the exact length and shape.

    With the versatile markups in Revu, you can record any roof penetrations, piping or curbs needing special materials or labor. If you do this regularly, create a PDF template with your company title block. Use Form Fields for project information.

    Whether you quantify square footage, squares for shingles or need the number of sheets of plywood, formulas can be embedded to collect all the important information quickly and accurately—and maybe even help avoid the “scary side” of the roof.

    If you’re a roofing contractor working on residential or commercial construction, or an insurance adjuster dreaming of working safely from home, hopefully I’ve sparked some new ideas to increase accuracy, efficiency and safety to your current workflows.

    5 Top Tools To Help Onboard Your Team With Construction Software

    This story was originally published by  on the Bluebeam Blog.

    One of the concerns people cite when it comes to digital transformation in their organizations is around onboarding teams without disrupting ongoing construction projects and processes.

    Our own research bears this out. According to a survey we carried out with DCW Connect earlier in the year, one in three construction businesses actively avoid investing in technology because of perceived challenges around training and change management.

    In our experience, this can be overcome through a robust communications plan that engages teams every step of the way and demonstrates how the tool will help the organization meet its objectives (more on this here).

    Of course, it helps if you have a construction technology provider that is a good cultural fit for your business and has the processes and tools in place to help you to get up and running as soon as possible.

    Here are five ways in which Bluebeam makes this transition as easy as possible:

    Tool 1: Plugins and integrations

    To help simplify the transition period, Revu supports a variety of plugins and integrations. This allows users to continue with legacy tools where needed and integrate Revu with their wider software stack.

    They divide into three key areas:

    • Plugins for AutoCAD, Revit, Navisworks, Sketchup and more support the collaboration between architects or engineers in the office and contractors and subcontractors in the field, so everyone has access to the right data at the right time (read more).
    • Integrations designed to simplify the transition between other software providers and Revu. Whether you’re working with other BIM technologies or need to connect to your project management solution, check out our list of active integration partners here.
    • Integrations supporting business operations, such as our SharePoint integration, which helps with better document and file management, keeping everything in one place and limiting risk.

    Tool 2: Deployment configurator

    The Revu Configuration Editor is designed to help IT teams roll out Revu to their organization in a standardized way and is part of the Deployment Packages (MSI).

    It is an optional tool that allows you to easily configure scripts for your Revu MSI deployment, MSP patch update or create scripts for post-installation deployments of custom assets, such as profiles, tool sets, hatch patterns and line styles.

    As a best practice, we highly recommend using this configuration tool for creating all your deployment scripts, which can be used with your deployment tool or other method of choice. You can also still create deployment scripts manually (more on this here).

    This video has more about how it all works.

    Tool 3: Profiles

    Profiles provide an easy way to store your favorite toolbars, menus and other display settings so that the tools you find most useful are readily available each time you open Revu.

    Profiles can also be used to shape the user interface of Revu for particular job functions within an organization. For example, a simplified interface for users who view, but don’t need to edit, PDFs can be created by turning off most of the toolbars and tabs within Revu, maximizing viewing space (more on customization here).

    Once set, profiles can be easily shared and amended when required. We’ve seen customers create a set of core profiles designed to support different functional team needs. Once exported and shared, these core profiles can still be tweaked by users if they want to turn other toolbar items back on to suit their personal preferences.

    Tool 4: Tool Chest and tool sets

    The Tool Chest allows you to store all your markups in tool sets and share them with anyone. It comes pre-loaded with several collections of industry-standard markups to help get you started. But we know every organization is different, so when ready, try creating your own tool sets either with individual or grouped markups. Your custom tools sets can be exported, saved locally to your machine, imported or shared, so no matter where your teams are operating from, everyone uses the same tools and markups. You can even share your custom tool sets with other build teams outside your organization to ensure standardized markups from project start to finish.

    This quick video guide offers more details.

    Tool 5: Training resources

    One of the key components of any rollout is a wealth of training resources that can be accessed at any time within your organization. No matter if your team prefers self-study videos or virtual guided training courses, Bluebeam has you covered.

    Some of our most popular resources are listed below:

    If you need further help and support with your rollout, you can get in touch with your local Bluebeam team here.

    Environmental Acoustics Inc.

    Success Stories

    Environmental Acoustics Inc.

    Located in Mississauga, Ontario, Environmental Acoustics Inc is an exclusive distributor of the LogiSon® Acoustic Network. This networked sound masking, paging, and music system is recognized as an industry leader that’s installed in hundreds of millions of square feet worldwide and earned numerous awards for innovation, performance, and ease of use.  Environmental Acoustics Inc. prides themselves in designing and installing “sound masking” systems that provide acoustic comfort and higher levels of speech privacy within the office, medical, and hotel environments.

    Automating AutoCAD’s design process with SolidCAD’s built-in plugin

    The Challenge

    Whenever Environmental Acoustics (EA) begins a new installation, they start their project by studying the building layout drawn as an AutoCAD file. Their experts identify required components (e.g., speakers, power supplies, etc.) and insert them as AutoCAD blocks. The EA experts use AutoCAD’s lines and arcs to model wires and connect them to the component blocks. However, because AutoCAD has no relation between components and wires, EA faced many challenges in having a clear and standard way to properly mark their AutoCAD files.

    Often, many of their experts worked on different installations at once, and each drawing would contain incorrect components or redundant wires that were once attached to a component that was either moved or deleted. This often resulted in a final AutoCAD drawing that contained various design errors.

    With a growing increase of errors, this also complicated the company from creating Bill of Materials (BOMs) since there was no standard way to quantify the wires used in any of their projects.

    The Solution

    After identifying the issue, EA turned to SolidCAD in need of a solution that would streamline their process and limit the number of errors and rework their design files. SolidCAD’s programming team developed an AutoCAD plugin that can be added to any AutoCAD version between 2018-2022. The plugin was built to show a list of available components which can be dragged and dropped into the AutoCAD file. The plugin also added a new command which allows users to select two components to wire them. Behind the scenes, the plugin uses the standard AutoCAD entities such as blocks, lines, and arcs which flatten the learning curve. This allowed users to only select from standard design options when adding components onto a drawing, which always ensured that every user followed the same design expectations for all their projects. In addition, the plugin was also designed intuitively that whenever a component was removed, it would automatically delete any incoming and outgoing wires attached.

    To help solve the issues of generating BOMs, SolidCAD ensured that the plugin automatically generated BOMs for components and wires that could easily be exported into Excel which would automatically contain any cost information related to the materials used in the installation.

    The Results

    After undergoing the process of assessing current procedures performed by EA, SolidCAD was able to help EA to:

      • Generating BOMs from 30 minutes into milliseconds
      • Standardized design files with the built-in component blocks while still allowing admin to add/edit/delete components as necessary.

    Testimonial

    SolidCAD’s development team delivered an AutoCAD plugin that not only improves our design process and eliminates errors, but also showed their commitment to delivering high-quality automation services.

    - Stan Klas,
    President at Environmental Acoustics Inc.

    Products & Services Used

    • Programming
      • AutoCAD
      • .NET framework to create AutoCAD plugin
      • C# to write the plugin
      • XAML to create UI

    Similar Projects

    Procepack

    PROCEPACK is a firm specializing in the purchase and sale of packaging and process equipment. They serve customers from a wide range of industries from food and cosmetics to pharmaceuticals. They leverage their vast and…
    Manufacture Scorpion Success Story

    Manufacture Scorpion

    Manufacture Scorpion is a manufacturer/distributor whose mission is to make the world’s best pneumatics and vacuum technologies available quickly and easily to North American companies. As the largest Pneumax partner, they have exclusive agreements with…

    RGTECH

    RGTECH is a specialty precision machining company. Founded in Lévis, QC by experienced industry professional, Rémy Gagnon, RGTECH works closely with several industries including the medical, optic/photonic and electronic industries to provide high quality parts…

    How Framing Contractors Can Best Use Bluebeam Revu

    This story was originally published by  on the Bluebeam Blog.

    In my last article, we covered the features in Bluebeam Revu that all concrete subcontractors should know. I started the piece saying I’m a firm believer that every specialty contractor could benefit from implementing Revu. To continue with this series, I want to highlight the next subcontractor on site, the framing contractor.

    Let’s look again at some creative ways Bluebeam Revu is being used in the industry.

    It’s the framing contractor’s turn to show off and again prove my theory that every specialty contractor could benefit from implementing Revu in their everyday workflows.

    Whether you’re timber framing single-family homes, multi-family residential or steel stud commercial tenant improvement, this article applies to you. If you’re interested in seeing the more technical side of these workflows in action, check out my article.

    Material Takeoffs: With the complexities of wood framing, estimating would be difficult without some degree of guesswork. Not only do we have different nominal lumber for different wall thicknesses, but we also have different products like glulam, LVL, timbers, Versa, BCI rafters and I-joists with different series, as well as CDX plywood and OSB. With all of those comes a library of sizes, shapes and thicknesses.

    Do we base on averages for square footage or measure the linear footage of walls? If our material takeoffs are too low, the project is on hold waiting for supply shortages. If it’s too high, we have an owner assuming you’re hauling the lumber they paid for to the next job. Also, when material arrives, how do I know what goes where?

    With the flexibility of Revu, we can build custom tools with formulas embedded to not only get the length of material needed for the facia board, but that same markup could calculate the sub-facia and number of outlookers as well.

    Starting with the end in mind, takeoff tools can be built to calculate several materials at the same time, like an assembly. This allows a chance to embed industry know-how and ensure materials aren’t overlooked. Obviously, you can imagine this method easily translates into the pre-construction of wall panels or modularized construction by applying mark numbers to the panel assemblies.

    Become an AutoCAD Power User by following this one simple step!

    null

    Become an AutoCAD Power User by following this one simple step!

    Ready to power up your AutoCAD skills?

    You can do this with one simple step: download this free eBook to discover popular tips from pros around the world.

    Autodesk’s 34 time-saving topics will change the way you work, and help you uncover command options, keyboard combos and new functionality to work more efficiently, save time and automate your workload.

    Download today by filling out the following form below.

    Contact

    null


    How to Use Revu to Create Successful Bids

    This story was originally published by  on the Bluebeam Blog.

    With smart PDFs now being generated as part of bid packages thanks to a variety of digital tools within the marketplace, end–users can now use technology to boost the visual appeal, accuracy, and overall value of bid packages.

    Bluebeam Revu can actually make use of those smart PDFs by making sure that it allows estimators to take off quantities accurately,” said Deepak Maini, a qualified mechanical engineer with two decades of experience. “The tools that you’ve got available in Bluebeam Revu, the accuracy of picking regions, the accuracy of visually searching items, and the standardization potential make it a great asset to making a successful bid package.”

    Three keys to a successful bid

    • Accuracy of the scale of the sheet
    • The right set of customizable and standardized digital tools
    • Accurate cost values associated with materials and labor

    Quantity takeoffs and accuracy

    Now a noted guest lecturer at the University of Technology Sydney (UTS) and University of New South Wales (UNSW), Maini, the current national technical manager for Cadgroup Australia, advocates for paperless bid packages and credits Revu as a crucial piece of the puzzle.

    “In the Australia-New Zealand market, and actually in the global market as a whole, the climate is very competitive,” Maini said. “The process of taking off quantities within today’s market needs to be accurate and needs to be fast. And that’s where Bluebeam Revu plays a massive role. With it, the estimator can take off quantities on one job and then quickly get onto the next job without wasting too much time.”

    “There’s absolutely no comparison between Revu and paper,” Maini continued. “We are talking about projects going in hundreds of millions of dollars and billions of dollars as well, which means that you’ve got these PDF sheets getting delivered to you, which are not two or three sheets. You’ve got 100-150 sheets getting delivered and that’s why taking off quantities using an accurate process is really important.”

    Digital collaboration with Bluebeam

    Ensuring scale can also be achieved within the sophisticated calibration capabilities in Revu. This is crucial when receiving documents as you don’t have to rely on the imagery to be accurate in scale, which could be a huge issue for estimation.

    “In Revu, we calibrate the sheet and we find out what scale the objects are at, and then when we are taking off the quantities, it ensures that we use the right scale and we get the right measurements,” Deepak said.

    Standardizing

    Being able to consistently takeoff accurate quantities is essential to completing bid packages in a timely and accurate manner.

    “This is again where Bluebeam Revu is absolutely fantastic,” Maini said. “I create certain specialized and takeoff tools, I can then have them sitting in my own custom toolset, and then I can distribute the toolset within my own team, which means that everybody who’s taking off the quantities will have the same display of quantities. ”

    Cost values can also be plugged into Revu, allowing instant dollar projections for the project. “As you take off the quantities, it gives you the dollar value of that quantity right there in front of you,” Maini said. “You can have that displayed as a table on the sheet, which means that you can straight away find out how much it’s going to cost you.”

    The ability within the digital tools in Revu to drive accuracy and consistency among estimators allows firms the flexibility to more accurately staff projects, without the risk of lesser experienced estimators using a process of their own, which might hinder the accuracy of the quantity takeoffs and the success of the bid as a whole.

    An Electrician’s 4 Favorite Bluebeam Revu Features

    This story was originally published by DOMONIC DIAZ-WESTON on the Bluebeam Blog.

    Every construction trade plays a different role in each construction project. As a result, they are likely to find different values in the myriad tools and features available in Bluebeam Revu.

    Kaaron Lee-Wah, an electrician in Toronto, is no different. To him, Revu has become essential ever since his boss asked him to explore how to completely digitize his company’s electrical drawings from paper. Revu has allowed him to use tools in the software that make his job more efficient, helping him to save time on previous paper-based tasks.

    These are the Revu features that are unquestionably Kaaron’s favorite:

    Tool Chest“This allows you to create custom icons to help identify and create a clean and easy layout for your guys in the field to follow along. When it comes to electricians using Bluebeam, there are many different panels, circuits and devices that we have to account for and include on our drawing. With Tool Chest, you can create icons, color whatever size you need it, all in a matter of seconds—and they look very professional.”

    Calibrate“The Calibrate feature is pretty dope, where you’re able to upload a PDF version of any drawing—whether it be mechanical, architecture, electrical, even landscape—and you can customize that calibration to that specific scale. So, drawings come in many different scales, and other software have a hard time picking up and reading that scale of a drawing. But Bluebeam has a great feature, the Command + M tool, that can measure it, and you’re able to customize and calibrate any drawing or PDF you upload into Bluebeam, which gives you access to finding whatever measurement that you need—whether it be in millimeters or meters or feet—all off the custom calibration once you upload it into your Bluebeam Revu.”

    Overlay“It’s kind of similar to Snapshot, but with Overlay you’re able to grab the entire page itself and overlay it on top of a second set of drawings, and then that can help you identify or troubleshoot any issues with architecture and electrical drawings.”

    Snapshot“I find with Snapshot you’re able to now copy a section—let’s say the electrical drawings—and bring them over to the architectural drawings if you want to overlay for a certain reason. So, what we do in the electrical trade is I’ll take a Snapshot of the electrical drawings of let’s say a unit in a condo, and I will overlay it on the architectural drawings, which show you more detail—wall sizes, how long a wall is, how deep the wall is. It’s an amazing feature, and it comes in clutch every time.”

    Watch on YouTube https://www.youtube.com/watch?v=zAkD-l8v_m8 

    How Concrete Contractors Can Best Use Bluebeam Revu

    This story was originally published by Troy Degroot on the Bluebeam Blog.

    I’m a firm believer that every specialty contractor could benefit from implementing Bluebeam Revu in their everyday workflows. For this article, I’d like to highlight a concrete contractor’s position from bid to built.

    There are a few important objectives we find in any construction project. I’d like to walk through how Revu meets those requirements. If you’re interested in learning more about how these can be done in Revu, have a look at “5 Ways Concrete Contractors Get the Most Out of Bluebeam Revu.”

    Every company is different in how it approaches projects. In this article, I want to highlight the possibilities so you can see where Revu fits and what customizations may be required to make it fit your unique needs.

    Let’s look at those project objectives.

    From the first time you open the request for proposal (RFP), there are things a project manager starts to think about even before they open the drawings—and even more as the plans rollout.

    Project Location: Do we have crews in the project location, or do we need to accommodate for travel expenses? While Revu may not have a “location cost” built into the available tools, it is possible to develop these. Perhaps you want to have a pulldown menu with specific cities or areas where you perform work regularly. Along with the locations in a pulldown, you could also associate a percentage markup to account for that area based on historical project data.

    Pour Dates and Schedule: Do we have crews available to meet dates and project phases? For large development projects with phases, we can use the Spaces feature in Revu. Simply draw a Space shape around an area of work and name it “Phase II.” By doing so all the slabs, curbs, etc., will be categorized in the markups list under the Phase name. This makes it easier to allocate crews, materials and equipment based on the specific requirements of each phase. We can also track the progress using the built-in Status column where crews can mark each day’s progress on what slabs, walls or foundations were completed.

    Equipment Required: Just like labor availability, we need to consider equipment availability for things like forms, trucks, curb or cross pan machines. Creating custom tools in Revu, you can place a symbol within a “Phase” indicating what equipment is required. You can even allocate a rental price per day for the equipment cost estimate.

    Estimate: There are great measurement tools included in Revu allowing you to calculate area of slabs, volume of isolated pad footings or linear footage of strip footings. The versatility of Revu and our ability to customize tools opens the door to personalizing your markups and what data is generated. We can differentiate types of pours by color, linestyle and hatch patterns, or even add labels to display a description right on the drawing. We can also add parameters like design mix, hand vs. machine, or whether fiber mesh or WWF is required. In some cases, we could even estimate the rebar required or the number of trucks need to be scheduled based on cubic yards.

    Finish Requirements: We need a clear understanding of finishes like construction/control joint layouts, stamped design, smooth or broomed, color stained or saw cut requirements. Applying different colors or hatch patterns to the markups will clearly identify those areas in a clear and visual way for the estimator and the crew in the field. A custom line tool representing saw cuts allows you to trace them on plan and quickly apply labor and equipment costs based on a linear footage collected in the markups.

    QA/QC: As a final walk through you can do a punch list noting any damage cause by other trades. You can easily incorporate images or video documenting these damages and what it will cost to fix them.

    Revisions and Scope Changes: Every project has delays for weather, site and utility prep. Often projects have design changes as well and we need to not only stay current but also track and communicate scope changes. These can often change cost and pricing as the scope begins to creep after the original estimate. Revu also has tools called Document Compare and Overlay Pages that will look at two drawings and quickly point out the differences. Document Compare is going to automatically draw clouds around all the changes. Overlay Pages is like the old light tables we used to place physical drawings over one another and see what was different. After finding the changes, your takeoff markups can quickly be stretched or moved rather than starting over. At that point, you have tangible evidence of scope changes for cost updates.

    After reading these objectives and possibilities, you could have one of three responses. One, this article helped evaluate Bluebeam Revu as a solution. Two, you already use Revu, but the article sparked ideas on how your current use could improve. Or three, we confirmed you’re already getting the most out of your software investment.