• Elevating Business Strategies with the Digital Practice Assessment (DPA)

    Introduction

    How do leaders  maintain their edge in a rapidly evolving market? The secret isn’t just in the tools they use, but how they integrate these tools strategically within their business frameworks. Introducing the concept of Digital Practice Assessments (DPA)—a approach that transcends traditional technology usage to streamline operations and maximize efficiency across industries, and particularly within architecture, engineering, construction, and operations (AECO).

    What is a Digital Practice Assessment?

    A Digital Practice Assessment dives deep into a company’s existing workflows, practices, and tools to pinpoint opportunities for improvement and innovative integration. It’s more than an evaluation—but it’s a strategic roadmap tailored to align technological capabilities with overarching business goals, ensuring that technology investments are precise, impactful, and directly tied to business outcomes.

    What is the difference between your traditional Business Process Assessment (BPA) and Digital Practice Assessment (DPA)?

    In the digital age, mastering your operational and technological strategies is more crucial than ever. While a Business Process Assessment (BPA) meticulously streamlines your company’s workflows—identifying bottlenecks and optimizing operations for peak productivity—it’s the Digital Practice Assessment (DPA) that really resonates with today’s tech-focused world.

    DPA dives into the heart of your technology stack, evaluating how your digital tools integrate and enhance your business processes. This isn’t just about using technology; it’s about transforming your operations to be digitally forward. As businesses prioritize digital transformation to stay competitive, DPA provides the insights needed to ensure your investments are driving genuine innovation. For firms looking to thrive in a digitally driven marketplace, understanding and implementing a robust DPA plan can be the game changer you’re looking for.

    Why Invest in Digital Practice Assessments?

    Imagine having a strategic tool that not only identifies potential pitfalls but also provides customized, actionable solutions. Here’s how a DPA can benefit your business:

    Enhanced Efficiency: It helps pinpoint and eliminate process inefficiencies, streamlining operations to boost productivity.

    Cost Reduction: By identifying areas where technology can minimize rework and errors, a DPA helps reduce overhead costs significantly.

    Competitive Advantage: Keep your business at the front of technological advancements, ensuring you lead rather than follow.

    Empowerment of Staff: By equipping teams with optimal tools and streamlined processes, a DPA enhances job satisfaction and attracts top talent.

    The Genesis of Digital Practice Assessments

    The development of DPAs was driven by the need for a structured, outcome-oriented approach to technology integration in various sectors. This need became especially apparent through discussions with stakeholders across multiple industries with our clients who expressed concerns over the overwhelming array of digital tools and the unclear ROI they presented. The DPA was crafted to demystify these technologies, offering a clear path to tangible business benefits, and track success.

    Looking Forward

    As businesses in sectors that focus on designing and making continue to evolve, integrating technological strategies becomes imperative. A DPA offers more than insights—it provides a pathway to a smarter, more efficient, and competitive future. In our next piece, we’ll explore the specific business outcomes achievable through DPAs through the Desired Outcomes Chessboard.

    Working with the Bluebeam Tool Chest: A Guide for Electricians

    This story was originally published by  on the Bluebeam Blog.

    Discover how the Bluebeam Tool Chest can revolutionize your workflow as an electrician by providing a streamlined, efficient way to manage and reuse your most frequently used markups, ensuring precision and productivity in all your projects.

    As an electrician, your work demands precision and efficiency, especially when marking up electrical plans and blueprints. The Tool Chest in Bluebeam Revu can be your best ally, helping you streamline your markup process. This guide will show you how to leverage this powerful tool to enhance your productivity and accuracy.

    Understanding the Tool Chest

    The Tool Chest is designed to store and organize your frequently used markups, making them easily accessible whenever you need them. It automatically remembers your recent markups and can reapply them with their original properties or scale them to fit different drawings. This feature is especially useful for electricians, as it ensures that your tools are always at the right scale, saving you from the hassle of recreating them for each new project. And with the latest release of Revu 21.2, Tool Chest is even better, as users can now use search to quickly find and use markups based on Subject, Comment and Label search parameters (See more of what’s new in the latest release here).​

    Saving Markups to the Tool Chest

    Saving a markup from a PDF to the Tool Chest is straightforward. Right-click the markup, go to “Add to Tool Chest,” and select the desired tool set. This way, your electrical symbols and notes are always ready for reuse.

    Placing Markups on a PDF

    When you need to place a markup on a PDF, select the tool from the Tool Chest and click on the document. This quick and easy access ensures that you can efficiently mark up your electrical plans.

    Managing Tools within Tool Sets

    Organizing your tools is crucial for maintaining efficiency. To copy a tool from one set to another, simply drag its icon. You can also reorder tools by dragging them to your desired location. Deleting a saved tool is easy:

    – Click the tool and hit the delete icon on the toolbar.

    – Select the tool and press the DELETE key.

    – Right-click the tool icon and choose “Delete.”

    If you need a duplicate tool or want to change its color, right-click the tool icon and select “Duplicate” or “Change Colors” to customize your toolkit.

    Reusing Recent Tools

    The Recent Tools set automatically records markups as they are added to your PDF. To reuse a tool, click its icon and place the markup on your document. This feature is particularly handy for repetitive tasks, such as marking circuit paths or labeling outlets.

    When the number of saved tools exceeds the display capacity, an arrow appears on the right. Clicking this arrow reveals all your recent tools. You can configure the maximum number of tools stored in Recent Tools by clicking the properties gear and adjusting the “Maximum Recents” setting.

    If you need to clear your recent tools before closing Bluebeam Revu, click the properties gear and select “Clear Recents.”

    Permanently Saving a Tool to be Reused

    To ensure a tool remains available after Revu is closed, you have a couple of options:

    – Drag the tool’s icon from Recent Tools into another tool set.

    – Right-click the tool icon in Recent Tools and select “Add Item to My Tools,” which saves it to the My Tools tool set. Use the drag-and-drop method to save it to a different set if needed.

    To save a markup on the document as a reusable tool, right-click the markup, go to “Add to Tool Chest,” and select the desired tool set.

    Special Properties of the My Tools Tool Set

    The My Tools tool set is a customizable collection of frequently used tools, offering easy access and special properties. Tools in this set are assigned numeric hot keys for quick access, shown in the upper right corner of the icon. Changing a tool’s position in the set automatically updates its hot key.

    The My Tools set is a permanent feature in Revu, available in all profiles by default. While it can be hidden, it cannot be completely removed. Tools in this set can toggle between Properties Mode and Drawing Mode for versatile use.

    Properties Mode vs. Drawing Mode

    Tools in My Tools, Recent Tools, and custom tool sets can operate in two modes: Drawing Mode and Properties Mode.

    – Properties Mode: Adds a new markup with the same appearance properties as the saved markup, retaining properties like color and border, but not exact dimensions or text.

    – Drawing Mode: Adds an exact duplicate of the saved markup, perfect for repetitive tasks where precision is key.

    Switching modes is easy—double-click the tool or use the Toggle Mode icon on the Tool Chest toolbar. This flexibility allows you to choose the best mode for your needs.

    Pinning, Scaling Tool Sets

    For quick access, you can pin a tool set to any toolbar. Click the properties gear next to the section name, go to “Pin,” and select the specific toolbar.

    Tool sets can also scale automatically when placed in a calibrated drawing, thanks to Revu’s Dynamic Tool Set Scaler. This feature is particularly useful for electricians, as it ensures your markups, like conduit paths or switch locations, are accurately scaled.

    Generating a Markups Legend

    Creating a Markups Legend based on a tool set is a powerful feature, enabling you to keep track of all your tools and their uses. Refer to the Markups Legend section in Revu for detailed instructions.

    The Tool Chest in Bluebeam Revu is a game-changer for electricians and other construction workers looking to enhance their productivity. By efficiently organizing, saving and scaling your tools, workers can focus more on the critical aspects of their job and less on repetitive tasks. Explore these features to make the most of the document markup experience, ensuring electrical plans are always clear, precise and professional.

    How to Manage Survey Standards with CTC’s Survey Tools

    A guide for civil engineers and surveyors who want to streamline their survey workflows with Civil 3D and other software

    Surveying is a crucial part of any civil engineering project, but it can also be a time-consuming and error-prone process. That’s why many civil firms use CTC’s Survey Tools, part of the CIM Manager & CIM Project suites of add-ons for Civil 3D that help manage survey standards, and convert point file data. In this post, we will show you how to use CTC’s Survey Tools to improve your survey workflow with Civil 3D.

    What are Survey Standards and Why are They Important?

    Survey standards are the rules and conventions that define how survey data is collected, processed, and displayed in different software. With respect to Civil 3D Survey standards include things like survey codes, point formats, figure styles, and linework settings. Survey standards are important because they ensure that the survey data is consistent and compatible across different projects and software.

    By using quality survey standards, you can save time and avoid errors when working with survey data. These survey standards should be applied across the entire organization to ensure an output that is consistent in quality and display for every project, because building a company brand for high quality output takes consistency.

    How to Manage Survey Standards with CTC’s Survey Tools?

    CTC’s CIM Manager Suite is a suite of add-ons for Civil 3D that help you manage survey standards and overall CAD Standards in a convenient and efficient way. The CIM Manager Suite include 4 main components that can help you with different aspects of survey standards management.

    These are:

    • Linetype Manager: This tool is a free tool in theis CIM suite that offers a much more dynamic way to create and edit .lin files then the conventional ways in AutoCAD. Providing a dynamic preview window to show changes as they are being made to a linetype.

    • Survey Template Manager: a tool that allows you to manage survey templates in Excel, instead of using the clunky interfaces of Civil 3D. You can create and edit description keys, figure prefix databases, and linework code sets in a familiar spreadsheet environment, and then import them into Civil 3D with a few clicks.
    • Layer Boss: Speeds up Civil 3D layer management and creation by syncing with an Excel spreadsheet. All layer properties can be managed from an external spreadsheet, allowing faster template management. All Civil 3D object layer settings can be synced in the same way. Initial spreadsheet creation occurs through a simple export option from any drawing or template file.
    • Point File Converter: Although this tool is in the CIM Project Suite, this is a tool that allows you to convert point files between different formats, such as CSV, FBK, LandXML, and more. You can also manage multiple survey coding standards and translate them to different software, such as MicroStation, Trimble, and others.

    To demonstrate how to use CTC’s Survey Tools, we will follow the typical survey workflow and show you how each tool can help you with each step. We will use Civil 3D and TBC as examples of software, but you can use other software as well, depending on your needs and preferences.

    Configure Survey Codes

    The first step of any survey workflow setup is to configure the survey codes that will be used to define the survey information. Survey codes are essential for creating accurate and consistent survey data, as they control how the points and survey figures are named, described, and displayed in the software. Civil 3D uses three means of managing survey codes: description keys, figure prefix databases, and linework code sets. These can be created and edited in Civil 3D, but the interfaces are not very user-friendly and can be very time-consuming. That’s why CTC’s Survey Template Manager is a better option, as it allows you to export and manage survey codes in Excel, which is a more familiar and flexible environment. To use Template Manager, you need to follow these steps:

    • Open the Survey Template Manager tool from the CTC Survey ribbon in Civil 3D.
    • Select the type of survey code you want to create or edit: description keys or figure prefix databases.
    • Click on the Excel icon to open the survey template in Excel.
    • Fill in the survey template with the survey standards information you want to use.
    • Save and close the Excel file.
    • Click on the Import icon in the CIM Managers Suite ribbon in Civil 3D to import the survey template from excel.
    • Verify that the survey codes are imported correctly in Civil 3D and click Apply.

    By using the Survey Template Manager tools, you can save time and avoid errors when creating and editing survey codes. You can also easily document these standards for use in formal onboarding documentation and CAD Standards.

    Perform the Survey

    The next step of the survey workflow is obviously to perform the survey in the field. The survey data is stored in the data collector, and can be exported to different formats, such as CSV, FBK, LandXML, and more. Most of which can be handled by Civil 3D.

    Import Survey Content to Civil 3D

    The next step of the survey workflow is to verify and import the survey content, which means checking that the survey points and figures are correct and consistent with the survey standards followed by importing into Civil 3D.

    Checking the survey data files is a crucial step in the process that will help confirm the point code and line work standards that have been used, as well as identify initial errors in the field data. Taking time for this step can pay dividends in later processing steps with data in Civil 3D. This step is generally easiest when working with a .CSV file in ASCII format. (ASCII format is the widely used format for point files these days, offering a typical five pieces of information. Point number, northing, easting, elevation, description or PNEZD)

    During import, Civil 3D uses a survey database to store and manage survey data, which can be imported from different formats, such as CSV, FBK, and more. During this import process line work is automatically created based off the figure prefix database file and the linework code sets, and survey points are stylized by the description key set.

    Once this survey data is imported into Civil 3D it can then be assessed again to ensure that it represents the existing conditions in the field. Looking for 0 elevations, and other oddities that can occur from incorrect inputs into the data collector or improper rod heights while surveying.

    Now the data is imported into Civil 3D, the rest of the design can continue with surfaces, corridors, pipe networks, and other design aspects.

    Compatibility Issues with Survey Standards & Data Files

    Often times organisations subcontract surveys. This can be an issue if these subcontractors don’t adhere to the survey standards the organization sets out. If the subcontracted surveyor does not adhere to the CAD standards of the organization, survey files cannot be read correctly. This leads to incorrect line work, poor stylization, and misinterpreted data.

    Point File Converter is a tool in the CTC CIM Project Suite That can help manage incompatibilities between survey standards and data files. It works best with .CSV files, and uses a spreadsheet “translation file” that spells out code conversions. The tool will read the conversion and apply them to one or more point files. Line work codes, as well as prefixes and suffixes in the coding are all accounted for.

    This offers unparalleled flexibility when working with subcontracted surveyors and their are various survey standards. This should also improve the surveyor’s efficiency as they are not forced to work in a foreign survey code list.

    Conclusion

    CTC’s Survey Template Manager Tools are part of a CIM Manager suite of add-ons for Civil 3D that help you manage survey standards, and convert point files. By using CTC’s Survey Manager Tools, you can streamline your survey workflow with Civil 3D and improve the quality and efficiency of your survey data and civil projects. To learn more about CTC’s Survey Tools, visit our website or contact us for a demo.

    Maximizing Security and Collaboration with Autodesk Construction Cloud: A SolidCAD Perspective

    At SolidCAD, we’re proud to partner with Autodesk to bring forward-thinking solutions and services to the construction technology landscape. Autodesk’s recent strides in trust, security, and collaboration are perfectly aligned with our mission to deliver excellence to our clients.

    Enhancing Autodesk Construction Cloud Security

    Autodesk Construction Cloud (ACC) continues to elevate project management with advanced security features. Imagine managing your projects with the confidence that multi-factor authentication (MFA), role management, and seamless data syncing bring. These updates are crafted to enhance your project management capabilities, leveraging serverless architecture and custom integrations for a smooth, efficient workflow.

    Commitment to Data Security and Privacy

    In the realm of data security and privacy, Autodesk sets a gold standard. Their security and privacy organization has seen remarkable growth, now encompassing over 150 experts globally. This team meticulously measures security and privacy requirements, reporting progress to the board of directors quarterly. The three key pillars—build, run, and maintain—are not just concepts but active practices. Through threat modeling, rigorous testing, and proactive incident response, Autodesk ensures your data is safeguarded at every step.

    Recent Improvements in Autodesk Construction Cloud

    Significant improvements to ACC are transforming project management. Imagine the ability to approve information between linked projects or hide specific tools within the platform. These are just a few examples of the recent updates. The launch of Bridge is particularly exciting, allowing subcontractors and third parties to collaborate more efficiently on projects, with seamless data syncing between accounts. Moving to a serverless architecture and adopting an event-driven design further prioritizes reliability and performance.

    Upcoming Features and Investments

    Autodesk is continuously evolving. Upcoming features include secure service accounts for apps, project audit logs, activity tracking, and centralized role management. Their investment in data sovereignty, especially in Canada, reflects a commitment to regionalization. Additionally, their focus on generative design is a testament to their dedication to leveraging customer feedback for innovation. Recently, a video demonstration showcased Autodesk’s humane approach to AI, ensuring technology serves you better.

    The Future of AI and Customer Feedback

    Generative AI is revolutionizing various applications, and Autodesk is at the forefront. Customers are actively exploring its potential and providing valuable feedback on its impact on creativity and intellectual property. Autodesk’s sessions to identify gaps and mitigate risks emphasize the importance of community and collaboration in AI development. Your feedback plays a crucial role in shaping the future of AI solutions.

    Data Privacy and Security in AI

    Data privacy remains a top priority. Autodesk is cautious about using customer data, with no commercial use occurring without thorough discussion and consent. They’ve implemented an architecture for GDPR compliance, ensuring that all data is securely deleted upon request, addressing one of the top customer concerns.

    Transitioning from BIM 360 to ACC Unified

    The transition from BIM 360 to ACC Unified poses challenges, particularly for ongoing projects. Autodesk focuses on regionalization and centralizing permissions rather than developing migration tools. ACC is poised to distinguish itself from BIM 360, offering unique features and enhancements.

    Security Settings

    ACC’s standout features include multi-factor authentication. Ongoing developments aim to enforce Single Sign-On (SSO) and 2FA policies, enhancing security measures to stay ahead of potential threats. These advancements ensure that your data and projects are protected with the highest standards.

    Seamless Integration with Other Tools and Platforms

    Integration is key to a cohesive project management experience. Autodesk is diligently working to integrate the Construction Cloud with other tools and platforms. We see some of our customers being enthusiastic about these developments, despite challenges like managing email notifications for project invitations.

    High Availability and Data Replication

    Autodesk’s commitment to high availability and data replication means your data is always within reach. Customer data is replicated between data centers in different locations, ensuring no data loss or delay in service if a failover occurs. This replication process is swift, typically within 15 minutes, with daily database backups for added security.

    Securing Physical Infrastructure

    Autodesk Construction Cloud applications operate in secure data centers powered by Amazon AWS. These centers are fortified against unauthorized access and environmental hazards with a range of security measures. From facilities access control to video surveillance, fire prevention, and climate controls, every measure is taken to ensure the safety of your data.

    Investing in People

    Security starts with people. Autodesk provides comprehensive information security policy and awareness training to all employees and contingent workers. New hires sign confidentiality agreements and undergo specialized training. Regular mock phishing exercises keep the team alert and vigilant against potential threats.

    Through our partnership with Autodesk, we at SolidCAD aim to bring these advancements to our clients, providing a secure and collaborative environment for all. By continuously enhancing products and services, Autodesk ensures that trust and privacy remain at the forefront of their innovations. Join us as we build a future where your projects are not just successful but secure and reliable.

    Key Takeaways

    • Autodesk Construction Cloud Security: Elevating project management with multi-factor authentication, role management, and seamless data syncing.
    • Data Security and Privacy: Autodesk’s commitment to safeguarding data with over 150 global experts.
    • Recent ACC Improvements: Approving information between linked projects and launching the Bridge feature for efficient collaboration.
    • Upcoming Features: Secure service accounts, project audit logs, activity tracking, and centralized role management.
    • Generative AI and Customer Feedback: Exploring AI’s potential while addressing data privacy and security.
    • Transitioning from BIM 360 to ACC Unified: Focusing on regionalization and centralizing permissions.
    • High Availability and Data Replication: Ensuring data safety with replication and daily backups.
    • Physical Infrastructure Security: Operating in secure AWS data centers with advanced protective measures.
    • Employee Training: Comprehensive security policy and awareness training for all employees.

    By incorporating these key elements, we at SolidCAD ensure that your projects are not just successful but secure and reliable, leveraging our partnership with Autodesk to bring you the best in construction technology.

    Revolutionizing Contract Administration with Digital Transformation

    In the ever-evolving AECO (Architecture, Engineering, Construction, and Operations) landscape, effective contract administration is paramount. At SolidCAD, we recognize that while many of our clients use multiple tools, these tools, though digital, might not be properly tailored for the nuances of contract administration. The opportunity for digital transformation is ripe, and we champion the adoption of Autodesk Construction Cloud (ACC) and Bluebeam to lead this change.

    Embrace Purpose-Built Tools

    For executives and decision-makers in the construction industry, the goals are clear: save time, cut costs, and mitigate litigation risks. Current tools, though familiar, often miss the mark due to their generic design. It’s time to embrace tools specifically crafted for construction projects.

    Transformative Solutions: Autodesk Construction Cloud and Bluebeam

    1. Save Time and Cut Costs: Autodesk Construction Cloud (ACC) centralizes storage for all project-related data, including emails, photos, Revit or AutoCAD files, specifications, and meeting minutes. This streamlined access to information not only saves time but also reduces costs associated with managing both physical and digital storage. Achieve efficient construction management effortlessly

    ACC’s mobile app boosts efficiency by enabling on-site access and updates to project data. Capture photos, record meeting minutes, and review files directly from mobile devices, ensuring seamless real-time data flow and decision-making.

    2. Mitigate Litigation Risks: ACC stands out with its robust version control and unlimited storage capacity. By maintaining a comprehensive record of document histories and project communications, ACC ensures a transparent and verifiable audit trail. This thorough documentation is invaluable in defending against potential litigation, providing clear evidence of project progress and decision-making processes.


    1. Enhance Collaboration: Bluebeam and other applications complement ACC with top-tier markup, measuring, and estimation tools. Its Studio Sessions feature allows multiple stakeholders to collaboratively review and mark up PDF files in real-time. This capability reduces the need for extensive email exchanges, consolidating all comments into a single, comprehensive report, thus enhancing collaboration in construction.

    The SolidCAD Edge

    At SolidCAD, we partner with Autodesk and Bluebeam to deliver cutting-edge solutions, guiding our clients through their digital transformation journey. As trusted consultants, we offer tailored strategies leveraging ACC and Bluebeam, ensuring our clients utilize the best tools for their unique needs. By adopting these purpose-built technologies, executives and decision-makers in the AECO industry can elevate efficiency, accuracy, and collaboration in their construction and contract administration processes.

    Conclusion

    Transitioning from generic digital tools to specialized solutions like Autodesk Construction Cloud and Bluebeam marks a significant advancement in contract administration. These tools not only address the immediate needs of saving time, reducing costs, and mitigating litigation risks but also pave the way for long-term operational excellence. SolidCAD is here to navigate this transformation with you, ensuring you unlock the full potential of these innovative technologies for your contract administration needs.

    Optimizing Contract Administration in AECO: Utilizing CTC Model Dashboard for Revit

    Effective contract administration is vital for project success in the AECO industry. By leveraging CTC’s powerful plug-ins for Revit, such as the Model Dashboard, you can enhance project visibility and streamline workflows for project leads, senior architects, designers, and BIM managers.

    The Problem: Navigating Revit’s Complexity

    Revit users often grapple with identifying critical project metrics due to several challenges:

    Lack of Visibility: In Revit, project metrics such as the number of in-place families, line style counts, and total warnings are dispersed across the project, making it difficult to obtain a clear overview. Users may remain unaware of numerous instances in the model that require attention.

    Limited Reporting Tools: Revit does not offer built-in tools for comprehensive error reporting on metrics like in-place families, line style counts, and many others.

    Manual Inspection: Identifying project metrics usually involves manual inspection, which is time-consuming and prone to errors. This process makes it challenging to spot every instance that needs correction.

    No Warning System: Revit lacks real-time warnings or notifications regarding project metrics, their impact on performance, or compliance with best practices. Users often do not receive alerts until issues have escalated.

    Limited Documentation: Many Revit projects suffer from insufficient documentation and standards related to project metrics, complicating the enforcement of consistency and error identification.

    Growing Impact: Failure to adhere to project standards and improper modeling workflows, such as the excessive use of in-place families, can lead to performance issues, increased file sizes, and longer load times. These issues accumulate gradually, making them less noticeable initially.

    To overcome these obstacles, Revit users must resort to a mix of manual checks, custom scripts, and third-party tools. Implementing best practices and standards for family usage is crucial in preventing such issues. This is where the CTC Model Dashboard steps in as a comprehensive solution.

    The Solution: CTC Model Dashboard

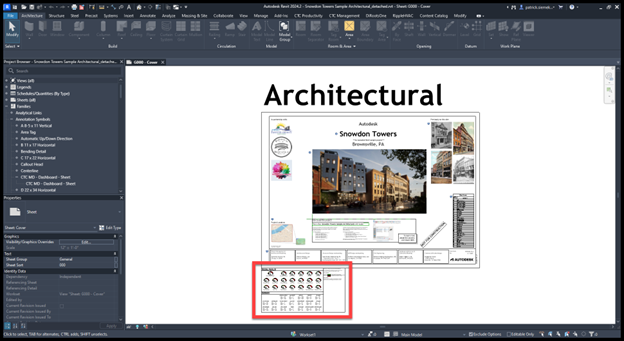
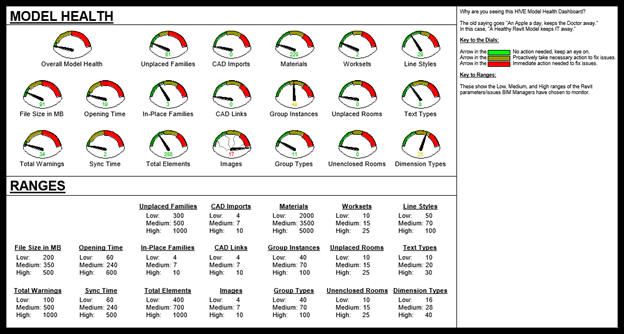
    The CTC Model Dashboard is an innovative Revit feature designed to enhance project oversight by populating custom parameters within a Revit model with specific metrics. This tool provides a visual presentation of over 30 metrics, offering users a clear snapshot of their project’s health.

    Key Features:

    • Visibility of Metrics: Place the CTC Model Dashboard titleblock on your Revit “Starting Page” to display project metrics upon opening a model.
    • Customizable: Use the titleblock as-is or customize it to meet your specific needs.
    • Comprehensive Data Collection: Gather 30+ project metrics, including:
      • Open and save times
      • Quantities of placed and unplaced/unused Revit objects
      • Total warnings
      • File sizes
      • Linked elements
      • Worksets
      • Text types, line styles, dimension types
    • Real-Time Updates: Metrics are updated every time a user saves or syncs the Revit model.
    • Proactive Issue Identification: Helps you spot problems early and address them before they escalate.

    To utilize the CTC Model Dashboard, a license for the CTC BIM Project Suite is required. This suite includes over 19 premium Revit add-ons, enabling users to streamline repetitive tasks, analyze modeling scenarios, extract model data, and much more efficiently within the Revit environment.

    Partnering with SolidCAD

    At SolidCAD, we are more than just software providers; we are your partners in achieving excellence in contract administration. Our team of experts is here to guide you in effectively deploying the CTC Model Dashboard and other CTC plug-ins, ensuring you gain the maximum benefit from these tools. We offer tailored consulting services to help you integrate these solutions seamlessly into your workflows, enhancing your project’s performance and efficiency.

    For any inquiries, reach out to your sales representative or contact us at info@solidcad.ca. Together, let’s transform how you manage contract administration in Revit and elevate your projects to new heights of success.

    Autodesk Desktop Connector

    Version 16.9 of the ADC is now available to download. You can find information about it and download it from this link.

    If you’re upgrading from 15.x, it would be best that you read this document as there have been significant changes.

    In addition to the usual performance and defect fixes, probably the most important new feature is this:

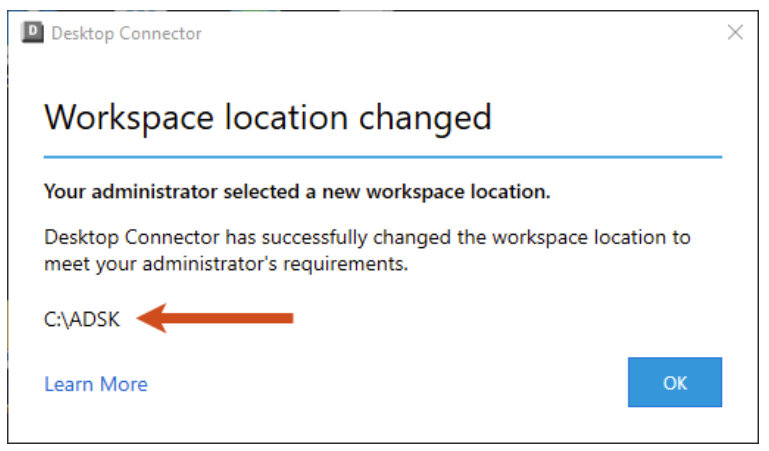
    Administrators now have the ability to set the local workspace location during install/deployment of Desktop Connector. This capability allows admins to enforce a company standard workspace. (CDX-24152)

    For any questions reach out to your sales rep or contact us at info@solidcad.ca

    The Future of Infrastructure: BIM & GIS Integration in Canada

    BIM and GIS: A Powerful Combination

    The integration of Building Information Modeling (BIM) and Geographic Information Systems (GIS) is transforming the approach to infrastructure development and management in Canada and globally. This fusion of technologies offers several significant benefits across various stages of infrastructure projects, such as:

    1. Enhanced Planning and Design: Integrating BIM with GIS allows for a more contextual and informed approach to planning and design. This combination helps in visualizing projects within their real-world geographical context, ensuring that designs are more accurate and aligned with environmental and spatial data​ (EsriGIS)​.
    2. Improved Construction and Operational Efficiency: The integration facilitates better collaboration among stakeholders, leading to more efficient project management. For instance, using BIM and GIS together enhances decision-making, which is crucial for managing the complexities of construction projects. It also enables the creation of digital twins, which serve as comprehensive replicas of physical assets, allowing for better asset management and operational planning​ (EsriGIS)​​ (EsriGIS)​​ (Autodesk)​.
    3. Disaster Resilience and Sustainability: By combining the detailed structural data from BIM with the extensive geographic data from GIS, infrastructure can be designed with better resilience against natural disasters. This integration also supports sustainability initiatives, as it allows for detailed environmental impact assessments during the planning phase​ (Autodesk)​​ (EsriGIS)​.

    Real-World Applications:

    In Canada, significant projects highlight the practical benefits of BIM and GIS integration. For instance, initiatives like the Digital Twin Roadmap for defense infrastructure and the Real Property Spatial Data Warehouse emphasize how these technologies enhance asset management and operational efficiency. These projects showcase the practical implementation and benefits of integrating BIM and GIS in managing complex infrastructures​ (Virtual Building Studio)​.

    The future of infrastructure in Canada looks promising with the continued integration of these technologies, leveraging the strengths of both to create smarter, more efficient, and resilient infrastructures.

    Diving into current Canadian Initiatives

    Our team attended this year’s GeoIgnite conference and got firsthand experience on several key projects and initiatives in Canada take the stage for successful integration of BIM and GIS. During the conference, presentations and topics included:

    • Digital Twin Roadmap: Led by John Hale, Vice-President of BuildingSmart and BIM lead for the Department of National Defence (DND), this project aims to create a comprehensive digital twin of defense infrastructure. The Digital Twin Roadmap integrates BIM and GIS technologies to develop a dynamic, digital representation of physical assets. This enables real-time monitoring, predictive maintenance, and enhanced decision-making, thereby improving the management and resilience of defense assets. By using this digital twin, DND can simulate various scenarios, optimize asset performance, and ensure operational readiness. (GeoIgnite)
    • Real Property Spatial Data Warehouse (RPSDW): This project, spearheaded by Leonardo Parra at Defense Construction Canada, focuses on creating an integrated system for managing spatial data related to defense properties. The integration of BIM and GIS is central to this initiative, allowing for a comprehensive view of real property assets. The RPSDW project aims to streamline data management, improve spatial analysis, and support strategic planning and operations within the defense sector. This integration enhances the accuracy and accessibility of information, facilitating better asset management and decision-making processes. (GeoIgnite)
    • House of Commons Asset Management: Susan Keenliside, Deputy Director at the House of Commons, is overseeing the implementation of BIM processes for public sector asset management. The integration with GIS will significantly improve the management and maintenance of government facilities. By adopting BIM and GIS, the House of Commons can create detailed digital models of its properties, track maintenance activities, and manage spatial data effectively. This integration supports informed decision-making, efficient resource allocation, and proactive maintenance strategies, ensuring the sustainability and longevity of public sector assets. (GeoIgnite)

    These projects collectively represent significant advancements in employing cutting-edge technologies to bolster infrastructure management and resilience in Canada, reflecting a strong trend towards digital transformation in asset management and planning.

    How to get started?

    Are you looking to elevate your infrastructure projects through advanced BIM and GIS integration? Connect with SolidCAD, a strategic partner to BuildingSMART and a seasoned collaborator with major clients like the Department of National Defence (DND). With extensive expertise in GIS consulting, BIM integration, and data management practices, SolidCAD is well-equipped to enhance your project outcomes. Discover how SolidCAD’s comprehensive services can transform your spatial data management and design processes. Visit our GIS Consulting Services page to learn more and contact us today to discuss how we can support your specific needs.

    Let’s collaborate to build smarter and more resilient infrastructure together. Reach out now and take the first step towards leveraging SolidCAD’s deep industry knowledge and technical proficiency for your projects.

    Civil 3D: Subassembly Composer Tip of the Year

    Good day folks, do we have a tip for you today! If you create custom subassemblies with the Subassembly Composer, you’ll want to read on…

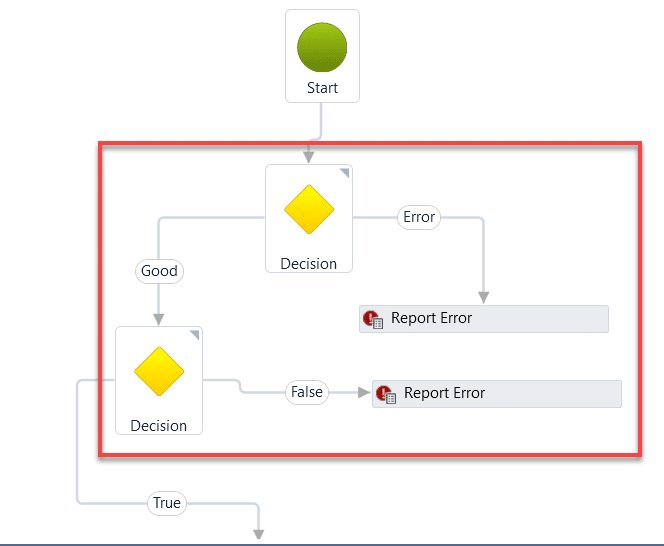
    I’ve created maybe a couple hundred subassemblies for myself and various customers over the years. Some easy and some very involved. In nearly all of them, I’ve wanted to move all or some of the nodes in the flowchart. In this example, I need to move the nodes within the red rectangle.

    It sounds easy, and it is, but only if you know the trick. And many thanks go to my colleague Jae Kwon for pointing this out to me today. Where were you 6 years ago?


    Multiple nodes can be selected by holding the CTRL button while selecting nodes but only one moves.

    Here is the key:

    1. Double click in a blank area. It doesn’t seem to matter where, just double click somewhere, say close to the X in the image.

    2. Select the nodes you’d like to move by holding CTRL and picking them with your mouse. To move all, CTRL+A.

    3. Use the arrow keys (not the mouse) to move them.

    That’s it. Enjoy.

    For any questions reach out to your sales rep or contact us at info@solidcad.ca

    Bridging the Skills Gap: Training Workforce for CAM Automation – Part 1

    Automation is crucial in modern manufacturing, streamlining processes and enhancing efficiency. Despite its importance, there is a noticeable skills gap in the workforce’s ability to effectively utilize this technology. This gap not only infringes on productivity but also affects the industry’s capacity for innovation and competitiveness. An understanding of these issues sets the stage for exploring effective training and development strategies. Implementation of Industry 4.0 trends is helping partners achieve greater outcomes by leveraging all aspects of their daily operations.

    Evolution of CAM

    In the late 80’s early 90’s, creating a lathe bit for a specific application involved either making it yourself or consulting with a colleague. The drawer where these tools were kept often became so heavy that the rollers broke under the weight. This collection represented years of experience and countless hours of work.

    Initially, half-inch carbide blanks were ground down on a deckle wheel to make cutters for specific needs. Over time, machinists built their collections of carbide cutters, each created for a particular need, leading to heavy toolbox drawers. The days of programming directly on the machine controller and manually grinding down tools have largely disappeared. Today’s machinists rely on CAM software to create their programs. The art of 2D programming has evolved into 3D programming due to surfacing capabilities and time savings. As the industry has evolved, manufacturers have continually sought ways to improve their business operations but, to this day, filling gaps in the workforce that can keep up with the rapidly changing industry remains a key challenge for many businesses.

    Strategies for Training the Workforce in Current and Emerging Software

    Addressing the skills gap involves first assessing the specific training needs of the workforce through skills audits and feedback mechanisms. Developing a curriculum that focuses on critical CAM software like Autodesk Fusion can significantly enhance capabilities. Additionally, partnerships with educational institutions, software providers, machine tool partners, and industry leaders can help create comprehensive and practical training modules that are directly applicable to the industry’s needs.

    As the industry has evolved and CAM has become increasingly important in manufacturing, there has been a focus on building upon current processes. Historically, most tasks were programmed with a CAM package, and automation was discussed but implemented differently. Today, forging holistic industry partnerships can create comprehensive and practical training modules.

    Before the current advancements, macros were created to assist with repetitive tasks, such as rest machining toolpaths and setting up programming sessions for new models. Today, there is a push to automate everything, developing processes to advance manufacturing and address the shortage of skilled workers. Automation now includes Artificial Intelligence and plugins to maximize efficiency while minimizing personnel requirements.

    Tools and Technology to Streamline Processes

    Incorporating automation tools such as Make Productivity, CloudNC, and OptiNC can address many common manufacturing pain points. Implementing them can increase both efficiency and accuracy, helping to meet the manufacturing needs of today’s machining processes and ultimately leading to greater sustainability. Integrating these tools into the workforce ensures that employees are proficient in modern technologies, preparing them for current demands and future advancements.

    A notable example of successful workforce transformation is the case of Manufacture Scorpion. Through targeted training and technology adoption, operational efficiency was significantly enhanced. This case study, among others, provides valuable insights into effective strategies and best practices that can be adopted by other firms aiming to leverage CAM automation for business improvement.

    Read more about Manufacture Scorpion’s success story here.

    The Future of CAM Automation and Required Skills

    The future of CAM automation is likely to be shaped by continuous technological advancements. As these innovations emerge, the industry must prepare a workforce that is skilled in current technologies and adaptable to future changes. This requires an ongoing commitment to training and development, ensuring the workforce remains competitive and capable of handling new challenges and opportunities in CAM automation.

    Artificial intelligence is now a significant tool in the industry, changing the manufacturing landscape for future generations. With companies having facilities in various countries, efficient data exchange will be transformed by AI tools that strengthen customer relationships and service delivery. The future of CAM automation will be shaped by technological advancements, requiring a workforce that is adaptable and skilled in current and future technologies.

    To learn more about training and other CAM automation services visit this link or reach out to info@solidcad.ca